Systems music is an idea that explores the following question: What if we could, instead of making music, design systems that generate music for us?
This idea has animated artists and composers for a long time and emerges in new forms whenever new technologies are adopted in music-making.
In the 1960s and 70s there was a particularly fruitful period. People like Steve Reich, Terry Riley, Pauline Oliveros, and Brian Eno designed systems that resulted in many landmark works of minimal and ambient music. They worked with the cutting edge technologies of the time: Magnetic tape recorders, loops, and delays.
Today our technological opportunities for making systems music are broader than ever. Thanks to computers and software, they're virtually endless. But to me, there is one platform that's particularly exciting from this perspective: Web Audio. Here we have a technology that combines audio synthesis and processing capabilities with a general purpose programming language: JavaScript. It is a platform that's available everywhere — or at least we're getting there. If we make a musical system for Web Audio, any computer or smartphone in the world can run it.
With Web Audio we can do something Reich, Riley, Oliveros, and Eno could not do all those decades ago: They could only share some of the output of their systems by recording them. We can share the system itself. Thanks to the unique power of the web platform, all we need to do is send a URL.
In this guide we'll explore some of the history of systems music and the possibilities of making musical systems with Web Audio and JavaScript. We'll pay homage to three seminal systems pieces by examining and attempting to recreate them: "It's Gonna Rain" by Steve Reich, "Discreet Music" by Brian Eno, and "Ambient 1: Music for Airports", also by Brian Eno.
This guide is targeted for people who know some JavaScript and are interested in making music with it.
We'll be using ES2015 JavaScript and knowing at least some of it will make it a lot easier to follow along. However, we won't be doing anything hugely sophisticated, so advanced knowledge is not required.
You don't have to be a musician or an expert in music theory to follow this guide. I'm neither of those things. I'm figuring things out as I go and it's perfectly fine if you do too. I believe that this kind of stuff is well within reach for anyone who knows a bit of programming, and you can have a lot of fun with it even if you aren't a musician.
One thing that definitely won't hurt though is an interest in experimental music! This will get weird at times.
How to Read This Guide
The guide is divided into three chapters, one for each of the musical pieces we'll study and recreate:
In "It's Gonna Rain" we'll get acquainted with the Web Audio API and playing sounds with it.
In "Music for Airports" we'll learn more details about playing sample-based music and implementing audio processing effects such as reverb.
In "Discreet Music" we'll study audio synthesis and sequencing with the Tone.js library and build a more elaborate effects graph.
Each chapter stands on its own, so you can just pick one and read it. However, I will refer to previous chapters from time to time and I recommend working through the whole guide in order. This is especially true if you haven't used the Web Audio API before.
You'll get the most out of the guide if you write your own version of the code every step of the way. This will also allow you to further experiment with the systems. But you don't have to do that if you don't want to. I've set things up so that you can hear and see everything right on this page.
The Tools You'll Need
For running the experiments you'll need a web browser that supports ES2015 JavaScript and the Web Audio API. The latest versions of Chrome and Firefox will work fine, as will Safari 10 (currently in beta). MS Edge should be OK too, but Internet Explorer will not work.
If you also want to code along, you need a couple of other things:
An installation of Node.js. We'll use it to run a local web server.
Steve Reich
It's Gonna Rain
1965
Performing and listening to a gradual musical process resembles:
pulling back a swing, releasing it, and observing it gradually come to rest;
turning over an hour glass and watching the sand slowly run through the bottom;
placing your feet in the sand by the ocean's edge and watching, feeling, and listening to the waves gradually bury them.
The first piece we're going to explore takes us back to the mid-1960s. This was a time right after the Cuban Missile Crisis, when the end of the world by nuclear annihilation did not seem all that implausible.
One of the exciting new possibilities of this technology was that you could record your own sounds and then play them back. Reich was using this possibility to make field recordings. In 1965 he happened upon San Francisco's Union Square, where a Pentecostal preacher called Brother Walter was bellowing about the end of the world.
From this tape Reich would construct what is considered to be his first major work and one of the definitive pieces of American minimal music: "It's Gonna Rain".
As you listen to it, I'd like you to pay particularly close attention to the movement that begins around the two minute mark and lasts for about six minutes. This is the part produced by the process that we're about to examine.
Now, this is not exactly easy listening. It gets pretty intense. Notwithstanding the pigeon drummer, it even challenges most people's conception of what "music" even means. This is basically just looped human speech, isn't it?
To me, what this piece seems to be saying is "we're going to take this subsecond apocalyptic sound clip and we're going to listen the shit out of it". And as we listen, the clip starts shifting and layering on top of itself. The words disappear and it all just becomes pure sound. Even though no new sonic information is being introduced, you keep noticing new things all the time — things that were there all along but you just hadn't payed attention to. Until, at the end, the words re-emerge again and we're back where we started and not quite sure what just happened.
To say I actually enjoy listening to this piece would probably be stretching it. It wouldn't be among the records I'd take with me on a desert island. But it is certainly fascinating and kind of hypnotic too. If you allow it to, it does evoke a certain kind of mental atmosphere.
All music to some degree invites people to bring their own emotional life to it. My early pieces do that in an extreme form, but, paradoxically, they do so through a very organized process, and it’s precisely the impersonality of that process that invites this very engaged psychological reaction.
Because of the simplicity of this piece, it's a great way for us to begin exploring Web Audio. So let's see how we might be able to reconstruct it in a web browser.
To host our JavaScript version of It's Gonna Rain, we're going to need a bit of HTML and a bit of JavaScript. Create a new directory for this project and add two files into it:
This is a very simple HTML document that just loads a couple of JavaScript files to the page:
The web-audio-api-shim library, which irons out some browser inconsistencies with the Web Audio API so that we don't have to deal with them.
A polyfill for the Fetch API, which also isn't fully supported across all browsers yet.
The file that will host our own code, itsgonnarain.js.
We're not going to use an ES2015 transpiler in these code examples, and will just rely on native browser support of the latest JavaScript features. If you want to share your work with the wider world, you'll definitely also want to transpile your code with a tool like Babel.
Also add some content to the itsgonnarain.js file:
console.log("It's gonna rain");
This will print a message to the browser's development console. It'll give us a chance to check that everything is working once we load up the page in a web browser. But before we can do that, we'll need to serve it up with a web server. Open up a command line and install the lite-server Node.js package:
npm install -g lite-server
The npm command comes with Node.js, so if it isn't working for you make sure you have Node installed.
We now have a package we can use to spin up a web server, and we can do so by running the following command from inside the itsgonnarain project directory:
lite-server
We'll keep the server running throughout the project. You should now be able to open http://localhost:3000 in a web browser to load the project (or it may already have opened automatically for you). It'll just be a blank page, but if you go and open the browser's developer tools you should see the It's gonna rain message in the console. We're ready to start playing some sounds!
I recommend always keeping the developer console open while working on the project. If something goes wrong with the code, this is where the browser will tell you about it.
Loading A Sound File
What we're going to do first is simply play a sound sample on our webpage. Before we can play it though, we'll need to load it.
What I did for my version was to take an MP3 file of the Reich piece and extract a short clip from the first 15 seconds or so. Unfortunately I can't give you that clip to download, but you can easily obtain it (it's on e.g. Amazon or iTunes). Or you can use some other piece of audio that you think would be interesting to use as raw material - it's entirely up to you!
Whatever audio you use, make sure it's in a format that web browsers can understand (.wav, .mp3, .ogg, etc.) and then place the file inside the project directory.
Once we have an audio file, we can add some JavaScript code to load it in:
Here we are using the Fetch API to send a request for the audio file over the network (which in this case will just go to our local web server). The file will eventually be received back from the server, and what fetch() returns back to us is a Promise object that will give us a chance to react when that happens.
What we do with the Promise is call its .then() method and supply it with a callback function we want to run when the response comes in. In the callback we invoke the arrayBuffer() method of the response, letting it know that we want to have the incoming data as a binary ArrayBuffer object.
Then we have to wait a bit more to actually receive all that data, so we get back another Promise object. This one will get fulfilled when the browser has finished receiving every last bit of the (binary) data. Into this second Promise we attach a callback function that simply logs the resulting ArrayBuffer into the developer console. We also include a catchrejection handler, which will log any errors that might occur during this whole process, so that if something goes wrong it'll also be shown in the developer console.
You should now see this message:
We now have the raw MP3 data loaded to our page.
Playing The Sound
We still have to do one more thing before we can play the MP3 data we now have. We have to decode it into a playable form. This is where we bring in the Web Audio API, which has the facilities for doing that.
With Web Audio, everything begins with something called an AudioContext. This is an object that handles all the audio processing we're going to do and internally manages any communication with the audio hardware and the resources associated with it. Before we do anything else, we need to create one of those AudioContexts. We'll be using it for many things, but right now we're going to call its decodeAudioData method to turn our MP3 ArrayBuffer into a decoded AudioBuffer:
itsgonnarain.js
let audioContext = new AudioContext();
fetch('itsgonnarain.mp3')
.then(response => response.arrayBuffer())
.then(arrayBuffer => audioContext.decodeAudioData(arrayBuffer)).then(audioBuffer => console.log('Decoded', audioBuffer))
.catch(e => console.error(e));
As we see here, decodeAudioData actually also returns a Promise instead of giving us the audio data right away. That's because the data may take a while to decode and the browser does it in the background, letting us get on with other business in the meantime. So what we now have is a chain of three nested Promises. After the last one we do our console logging. The message in the developer console should show that we have about 14 seconds of stereo audio data – or whatever the duration of your sound file happens to be.
This is something we can now play, so let's go right ahead and do that. We're going to use the AudioContext again, this time to create something called a buffer source. This is an object that knows how to play back an AudioBuffer. We give it the buffer we have, connect it, and start it. The result is that we can hear the sound play from the browser window – our equivalent of hitting the play button on Reich's tape recorder.
itsgonnarain.js
let audioContext = new AudioContext();

fetch('itsgonnarain.mp3')
  .then(response => response.arrayBuffer())
  .then(arrayBuffer => audioContext.decodeAudioData(arrayBuffer))
  .then(audioBuffer => {
    let sourceNode = audioContext.createBufferSource();
    sourceNode.buffer = audioBuffer;
    sourceNode.connect(audioContext.destination);
    sourceNode.start();
  })
  .catch(e => console.error(e));
What we've done here is set up our very first audio-processing graph, which consists of just two nodes, one connected to the next:
An AudioBufferSourceNode that reads in the AudioBuffer data and streams it to other nodes.
The AudioContext's built-in AudioDestinationNode, which makes the sound audible on the machine's speakers.
Basic Web Audio graph with a single source
In general, all audio processing with the Web Audio API happens with such graphs, through which audio signals flow, starting from source nodes and ending up in destination nodes, possibly going through a number of intermediate nodes. These graphs may contain different kinds of nodes that generate, transform, measure, or play audio. We'll soon be constructing more elaborate graphs, but this is all you need if you simply want to play back a sound.
Looping The Sound
What we have so far plays the audio file once and then stops. What we really want to do though to begin recreating the magic of "It's Gonna Rain" is make it loop over and over again.
Steve Reich was using magnetic tape, which in its usual configuration spools from one reel to the other. But there's a brilliant hack, pioneered by Pierre Schaeffer, that allows you to circumvent this process: You can splice the tape into a loop which gets you an infinitely repeating sample with a duration of a few seconds or less.
For Reich, as for anyone working with tape, this meant a laborious process of finding the right bit of tape, cutting it up and gluing it back together again. For us, it's much, much easier. This is because the AudioBufferSourceNode interface we're using happens to have a loop flag we can just set to true:
The effect of this is that the whole sample loops round and round forever.
We should still do the equivalent of cutting up the little piece that says "It's Gonna Rain" and loop just that bit. We could go into an audio editor and create an .mp3 file that only contains that part, but we don't actually need to. AudioBufferSourceNode has attributes called loopStart and loopEnd for controlling this. They allow setting the offsets, in seconds, of where the loop should start and end. With some trial and error you can find good values for them:
With these settings, the sample still starts playing from the very beginning and then gets "stuck" looping between 2.98 and 3.80, resulting in a loop with a duration of 0.82 seconds.
If we only want to play the looping part, we should also begin playing the sample from the loop start offset, which we can do by giving that same value to the start() method of the buffer source:
When to start playing. We want to start playing immediately, so we set it to zero. This is also the default but since we want to provide that second argument, we also need to come up with something for the first.
The offset at which to start playing the buffer. We set it to 2.98 - the beginning of our loop.
How Phase Music Works
And now we come to the real technical trick that underlies "It's Gonna Rain": What we are hearing are two identical tape loops playing at the same time. There's one in the left ear and one in the right. But one of those loops is running ever so slightly faster than the other.
The difference is so small you don't even notice it at first, but after a while it amounts to a phase shift between the two loops that keeps growing bigger and bigger as time goes by. First it sounds like there's an echo. Then the echo transforms into a repeating effect, and then it builds into a series of strange combinations of sounds as different parts of the sample overlap with others. At the halfway point the loops start to approach each other again, and we go back through repetition and echo to unison.
Brian Eno has likened this process to a moiré pattern, where two simple identical geometrical patterns are superimposed to give rise to something much more complex than the original.
It's a remarkably simple trick compared to the apparent complexity of what you actually hear. And from a 0.82 second loop we get six minutes of music. That's pretty good return on investment!
This is called phase music, which is a kind of systems music. One way to think about it is that Reich, as the author of the piece, did not write a score for it. He just set the inputs and parameters for a phase-shifting process which he would then execute, generating the music.
Though I may have the pleasure of discovering musical processes and composing the musical material to run through them, once the process is set up and loaded it runs by itself.
Setting up The Second Loop
To reproduce the phase-shifting process, we're going to need another instance of the "It's gonna rain" sound loop. Let's extract the initialization of our source node into a new function called startLoop, which we can then call twice. Two source nodes that both play the same AudioBuffer are created and started:
The only effect of doing this so far is that the sound we hear becomes louder. There are now two sources playing the loop in unison, which amps up the volume.
Web Audio graph with two looped sources.
Adding Stereo Panning
In Reich's piece the two loops are playing in separate stereo channels, one in your left ear and one in the right. We should do the same.
The AudioBufferSourceNode interface has no property for controlling this. Instead there's a more general purpose solution for it in the Web Audio API, which is to add specialized StereoPannerNodes to the audio graph. They can be used to pan their incoming audio signal to any point in the stereo field.
StereoPannerNode has a pan attribute that can be set to a number between -1 (all the way to the left) and 1 (all the way to the right), with the default being 0 (in the center). We set up our loops so that one is fully on the left and the other on the right:
We are no longer connecting the source nodes directly to the AudioContext destination. We connect them to the panner nodes, and then the panner nodes to the destination. The audio signals flow through the panners:
Web audio graph with two loops panned to different ends of the stereo field.
Putting It Together: Adding Phase Shifting
Finally we're ready introduce the phase shifting. This is done so that one of the loops plays slightly faster than the other. The difference should be so small that you don't perceive it at first, but large enough so that a noticeable phase shift starts accumulating over time.
The playback speed of an AudioBufferSourceNode can be set using the playbackRate attribute. The default value is 1 and setting it to something else makes it go slower or faster. For example, setting it to 2 doubles the playback speed, also halving the duration in the process.
For our purposes, I've found setting a value around 1.002 for one loop and keeping the other as 1 to work well. When the original loop is 0.82 seconds long, the second one thus becomes 0.82 / 1.002 ≈ 0.818 seconds long.
Web audio graph with two loops, panned and with phasing.
Exploring Variations on It's Gonna Rain
There's a lot of exploration we can do around the process we've set up. Here's a couple of ideas you can try to see what happens:
Try different playback rates. How much faster can you make one of the loops compared to the other before it turns from "phasing" to something else?
Set different values for panning. Does the piece sound different if you only partially pan the loops, or don't pan them at all? How about dynamic panning that changes over time? (There are several methods in the Web Audio API for gradually ramping parameters like pan or playbackRate up or down)
Another route of exploration is using different sound sources for the piece. You can try looping different parts of itsgonnarain.mp3, some of them shorter, some of them longer. Why not also try sourcing samples from audio you've found from the Internet or recorded yourself? You could try speech samples or even pieces of songs. The same process can result in wildly different results given different inputs. Here are some loops I've made:
Once I started working with generative music in the 1970s, I was flirting with ideas of making a kind of endless music — not like a record that you'd put on and which would play for a while and finish. I like the idea of a kind of eternal music, but I didn't want it to be eternally repetitive, either. I wanted it to be eternally changing.
Prior to the mid-1970s, Brian Eno was mainly known for his art rock bona fides, first as a member of Roxy Music and then as a solo artist. But this would soon change. Eno was interested in the experimental techniques of John Cage, Terry Riley, and Steve Reich. He was – and still is – also something of a tech geek. He was an early user of synthesizers and would later become a big proponent of the idea of the whole music studio as a compositional tool.
In 1975 Eno got into an accident. He was overrun by a speeding London taxi and was left hospitalized. During his time in the hospital something happened that led him to the conceptualization of "ambient music" – a term everyone is by now familiar with.
Now, Ambient 1: Music for Airports was not the first record Eno made as a result of this epiphany. That would have been "Discreet Music" a couple of years earlier, something that we're going to look into in the next chapter. But "Music for Airports" has a track on it that is very directly influenced by both the concept and the execution of Steve Reich's tape pieces. It's the second track on side A.
As a musical experience, this is clearly nothing like "It's Gonna Rain" though. Instead of a frantic loop of apocalyptic sermonizing, we're treated with gentle waves of vocal harmonies. It actually kind of sounds like music in the traditional sense!
But even though the results are very different, there are very close similarities in the underlying systems that produce the music.
The Notes and Intervals in Music for Airports
Before we discuss the system though, let's discuss the inputs.
The raw materials Eno used on this track are seven different "aahhh" sounds ("sung by three women and myself"). Each one of those sounds is on a different pitch.
In terms of musical notes, what we are hearing are F, A-flat, and from the next octave C, D-flat, E-flat, F, and A-flat. These, I'm told, together form "a D-flat major seventh chord with an added ninth". It's really quite beautiful:
This chord evokes a kind of reflective mood, which is very common throughout Eno's ambient work. You can get an idea of what he was going for in this interview clip (I like the sound of "well, if you die, it doesn't really matter"):
The note selection is also important because of the way the notes may combine. We'll be feeding these individual notes into a kind of generative system, and we will have little control over which combinations of two or more notes may occur. Any succession of notes might be played back to back forming a melody, or on top of each other forming a harmony.
Here are all the possible two note intervals in this chord:
A♭
C'
D♭'
E♭'
F'
A♭'
F
A♭
C'
D♭'
E♭'
F'
Among all these intervals, there's just one that's sharply dissonant (a minor second) and sounds a bit off. Can you hear it? However, since there's just one and it'll thus not occur very frequently, it'll only serve to add a bit of spice to the music. Looks like whatever the system may throw at us will generally sound pretty good.
With this background knowledge, we're ready to start writing our own little version of this piece. Let's begin by setting up the project. The basic structure will be very similar to what we did with "It's Gonna Rain".
We can leave the JavaScript file empty for now. If we just launch the web server from this directory, we're all set to start hacking:
lite-server
Obtaining Samples to Play
We're going to build a system that plays sounds based on the musical chord that we just heard. But we haven't really discussed what sounds those are actually going to be.
Eno used a set of samples based on voices he'd recorded himself. We have little hope of reproducing those voices exactly, so we're not going to even try. We can use readymade samples obtained from the Internet instead. Specifically, we're going to use samples from the freely available Sonatina Symphonic Orchestra sound bank. This is a very nice sampling of the sounds of individual instruments in a symphonic orchestra - violins, brass instruments, percussion, etc.
Go ahead and download and then unpack the Sonatina ZIP archive. It's pretty large so it might take a while to transfer and you'll need space for it. Then move or copy the Samples directory to the musicforairports project.
musicforairports/
index.html
musicforairports.js
Samples
1st Violins
1st-violins-piz-rr1-a#3.wav
etc.
etc.
Basically, we want to set things up so that we'll be able to load any of the samples into our JavaScript code, which means they need to be inside a directory we're serving using the lite-server.
If you're feeling adventurous, there's a lot of more experimentation you can do around sample selection, beyond the sounds found in the Sonatina library. You could:
Find other samples online, in places like freesound.org.
Generate samples from GarageBand or some other piece of software or equipment.
Record your own voice or a musical instrument.
Synthesize the sound, as we do in the next chapter.
Building a Simple Sampler
We now have a sample library and we should write some code that will allow us to play different musical notes using the various musical instruments in that library. In other words, we're going to write a primitive JavaScript sampler.
If you look into the various subdirectories under Samples you'll notice that there are many .wav files for each musical instrument, for various notes. But there's a problem: There aren't samples for every musical note. For example, looking at the alto flute, we've got samples for A#, C#, E, and G on three different octaves, but that's only four notes per octave. There are twelve semitones in an octave, so eight out of twelve are missing!
This is not really a problem though, and it's a pretty common occurrence in sample libraries. An obvious reason for this is preserving storage and bandwidth: You may have noticed that the Sonatina library is already half a gigabyte in size. If it included all the notes of all the instruments, that number could easily triple.
What we will do for each note that is missing a sample, is to find the nearest note that does have a sample and pitch-shift that sample to the new note. This technique for "filling in the blanks" is commonly used by samplers.
Let's look at the samples for the grand piano - an instrument I find fits well with this piece. It has samples on about seven octaves, a few in each octave. If we visualize the whole chromatic scale for octaves 4, 5, and 6, we see what we have and what's missing:
C4
C#4 D♭4
D4
D#4 E♭4
E4
F4
F#4 G♭4
G4
G#4 A♭4
A4
A#4 B♭4
B4
C5
C#5 D♭5
D5
E#5 E♭5
E5
F5
F#5 G♭5
G5
G#5 A♭6
A5
A#5 B♭5
B5
C6
C#6 D♭6
D6
D#6 E♭6
E6
F6
F#6 G♭6
G6
G#6 A♭7
A6
A#6 B♭6
B6
What our sampler should do is find for each of these notes the nearest note that has a sample. When we do that we have the keymap for this instrument:
C4
C#4 D♭4
D4
D#4 E♭4
E4
F4
F#4 G♭4
G4
G#4 A♭5
A4
A#4 B♭4
B4
C5
C#5 D♭5
D5
E#5 E♭5
E5
F5
F#5 G♭5
G5
G#5 A♭6
A5
A#5 B♭5
B5
C6
C#6 D♭6
D6
D#6 E♭6
E6
F6
F#6 G♭6
G6
G#6 A♭7
A6
A#6 B♭6
B6
The main function of our sampler will be one that takes the name of an instrument and a note to play. We'll expect it to return a sample that we'll be able to play (or, rather, a Promise that resolves to a sample):
musicforairports.js
functiongetSample(instrument, noteAndOctave) {
}
For each instrument we'll store a little "sample library" data structure, which records what note samples we have for that instrument, and where those sample files can be located. Let's put the grand piano samples for octaves 4-6 in it:
So now we're going to need to find, for any note given to getSample, the nearest note we have in the sample library. Before we can do that, we need to normalize the input notes a little bit.
Firstly, we should split the incoming note string ("B#4") into the note characters ("B#") and the octave digit ("4"). We can do so with a regular expression that pulls the two parts into separate capture groups.
The group (\w[b#]?) captures a single word character optionally followed by a 'b' or a '#', and (\d) captures a single digit. We then also parse the octave from a string to a integer number.
The Sonatina library contains samples for natural notes and sharp (#) notes only, but we would like to also support flat (♭) notes. We'll exploit the fact that for every flat note there is an "enharmonically equivalent" sharp note. This basically just means the same note may be written in two different ways, sharp or flat.
We can make a little function that eliminates flats completely by turning them into their equivalent sharps. For example, for the flat Bb we get the equivalent sharp A#:
In order to find the "nearest" note for a given input note, we need a way to measure the distance between two notes. This calls for a purely numeric note representation.
First of all, there are twelve notes ("semitones") in each octave, and each octave begins from the C note:
Based on this, we can form a function that calculates the distance between any two notes. It takes two note names and octaves and simply subtracts one's value from the other:
Now we have the building blocks of a function that finds the nearest sample given an instrument's sample bank, note, and octave. It sorts the sample bank array by the absolute distance to the requested note. It then returns the sample with the shortest distance, which will be the first sample in the sorted array.
The final helper function we'll need for our sampler is one that actually loads a sample file from the server. The code for that is very similar to the one we had for "It's Gonna Rain". It fetches and decodes the sample file. For this we also need to instantiate an AudioContext:
musicforairports.js
let audioContext = new AudioContext();
functionfetchSample(path) {
return fetch(encodeURIComponent(path))
.then(response => response.arrayBuffer())
.then(arrayBuffer => audioContext.decodeAudioData(arrayBuffer));
}
Note that we use the encodeURIComponent function to sanitize the file path before giving it to fetch. It's needed because our filenames may have '#' characters, which need to be escaped when used inside URLs.
Now we can put all of this together, so that getSample always returns an AudioBuffer as well as a number that denotes the distance between the sample that was requested and the one that was found.
In the case of the grand piano sample bank, the distances between requested and found samples range from -1 to 1 because we always have a sample at most one semitone away. But other instruments may have longer distances. This distance determines the amount of pitch-shifting we'll have to do.
Pitch-shifting is done by adjusting the frequency of the sound wave formed by a sample, and there's a simple formula for determining the size of the adjustment.
The key idea is that the relationship between musical notes and the underlying sound frequencies is exponential. Going up an octave always doubles the frequency of the sound wave, so if we want to pitch-shift a whole octave we need to double the frequency:
Going an octave up from C to C' means doubling the frequency.
Since an octave is divided into 12 semitones, going up a single semitone means multiplying the frequency by a fractional power of two: 21/12. And going up n semitones means multiplying the frequency by 2n/12. The same applies when going down, but then we multiply by negative exponents: 2-n/12:
Going up or down n semitones means multiplying the frequency by a fractional power of 2.
When we are playing sample files, we can't really just "set the frequency" of a sample directly. But what we can do is set the playback rate of the sample, because this will compress or expand its sound wave in time by the same ratio. To achieve a lower note, we simply play the sample more slowly, and to reach a higher note we play it more quickly.
Armed with this information we can come up with an expression that, given the distance to a note, gives us the playback rate we need to use. A zero distance gives the original playback rate, 1, since 20/12 = 20 = 1, whereas distance of one semitone should return a playback rate of 21/12 ≈ 1.059. This will make the sound play slightly faster, causing our ears to perceive it as a higher note.
let playbackRate = Math.pow(2, distance / 12);
Now we can form a function that actually plays any musical note for any instrument. It uses getSample to fetch the nearest sample, waits for the result, and then plays back the sample with the appropriate playback rate.
A general purpose sampler should also cache the sample buffers somewhere in memory instead of
fetching them again each time they're needed. But this is good enough for us right now.
Here's the complete code we have written so far, combined with some test code that plays the seven notes from "Airports" at one second intervals:
Now that we have an instrument to play, we can shift our focus to the system that will play it.
Eno's piece was generated by seven tape loops. Each one contained a recording of a single vocal "aaaahh" sound on one of the seven pitches. The loops all had different durations, between about 20-30 seconds. When you play such a combination of loops together, you get a similar kind of relative shifting of sounds as we have in "It's Gonna Rain". As the loops turn over at different times, the sounds and silences on the tapes constantly reorganize and "generate" new combinations.
Once again, it's really a very simple system compared to what the results sound like! This conceptual simplicity does not mean the piece was easy to execute though. The 20-30 second durations of these tape loops were way more than the 1-2 seconds that the tape recorders of the time were equipped to handle. Eno had to resort to some epic hacks to make it all work.
One of the notes repeats every 23 1/2 seconds. It is in fact a long loop running around a series of tubular aluminum chairs in Conny Plank's studio. The next lowest loop repeats every 25 7/8 seconds or something like that. The third one every 29 15/16 seconds or something.
What I mean is they all repeat in cycles that are called incommensurable — they are not likely to come back into sync again.
And how much of unique music can we generate with this technique? This depends on the relative durations of the loops (or, "lengths of tape") that we choose. If we have two loops, both with a duration of 2 seconds, the duration of our whole piece is 2 seconds since the whole thing just keeps repeating.
But if we make the duration of the second loop 3 seconds instead of 2, the duration of our whole piece doubles to 6 seconds. This is because the next time the two loops start at the same time is after six seconds. That's when the system will have exhausted all of its musical combinations.
By adjusting the two numbers we can make the piece much longer. If we make one loop only slightly longer than the other, it'll take a while for them to meet again. This is how Reich was able to squeeze out 6 minutes worth of music from two sub-second loops. He varied the playback rate rather than the tape length, but the result was effectively the same.
But it is when we bring in a third loop that the system really takes off. We won't have heard all the combinations the system is able to produce until we reach a moment when all of the three loops meet at the same time. That's going to take some time.
You can see how bringing in four more loops with similarly differing durations results in a piece of music that's very long indeed. That's pretty striking, giving the extremely limited amount of sonic material and the simplicity of the system.
Now of course, you don't have to listen for very long until you've figured out what type of music is being made. You can listen to it for a thousand years and it'll never play "Hotline Bling". It simply varies the relative timings of its seven notes. But in any case, anyone who buys a copy of the "Music for Airports" album only gets to hear a tiny 9 minute clip of the vast amount of music this system is capable of making.
Playing Extended Loops
Let's construct these loops in our project. Recall that with "It's Gonna Rain" we looped sounds by simply setting the loop property of the buffer source nodes to true, which made the sounds repeat. This time the loops are longer - much longer than the individual sample files in fact, so we can't apply the same trick here.
Eno had to set up physical contraptions to make his tape loops go around the studio space. Our equivalent of this is to use JavaScript's built-in setInterval function, which executes a given callback function with a regular time interval. If we make a callback that plays one of the sounds every 20 seconds, we have an "extended" loop. Replace the test setTimeout test code in musicforairports.js with this:
With this version we do need to wait for about 20 seconds before the first note plays too, which we may not want to do. Instead we can write a function that plays the sound once immediately and after that sets up the interval:
Since we're going to set up several loops, we should also have the possibility to add initial delays to them, so that all the sounds won't play at exactly the same time in the beginning. So, we should have another number that delays the playing of the sound within the loop. It controls at which section of our virtual "tape" the sound is recorded.
We can achieve this by adding a delay argument to the playSample function. It passes a new argument to the bufferSource.start() method - the time at which the sound should begin playing, relative to the AudioContext's current time:
Our Web Audio node graph at this point is very simple. There's at most just one AudioBufferSourceNode playing a sound, since we've got a single loop running:
Web Audio graph with one source added by the extended loop.
What's different this time though is that the node graph is not static. Every 20 seconds we attach a new source node. After it's finished playing it'll get automatically removed, at which point the graph contains nothing but the destination node.
The source is removed and destroyed once it finishes playing.
Having dynamic graphs such as this is very common with Web Audio. In fact, you can't even start an AudioBufferSourceNode more than once. Every time you want to play a sound, you make a new node, even when it's for a sound you've played before.
While the simple setInterval() based solution will work just fine for us, I should mention that it is not precise enough for most Web Audio applications. This is because JavaScript does not give exact guarantees about the timing of setInterval(). If something else is making the computer busy at the moment when the timer should fire, it may get delayed. It's not at all uncommon for this to happen.
Four our purposes though, I actually like that it's a bit inexact. We're dealing with the kind of application where scheduling is very porous anyway. Furthermore, this was a characteristic of the equipment Eno was using as well. The motors in his tape recorders were not exact to a millisecond precision, especially when he stretched them way beyond what they were originally designed for.
For the kinds of applications you do need precision for, you'll need to calculate the exact offsets manually and give them to bufferSource.start(). There are good articles and libraries that help with this. We will also see how to achieve
exact timing with the Tone.js library in the next chapter.
Adding Reverb
If you compare our grand piano loop to how Eno's original piece sounds, you'll hear a big difference.
Of course, this is mostly due to the fact that we're using completely different instruments, resulting in an entirely different timbre. But that's not the only difference. You'll notice that Eno's sounds seem to emerge from the ether very softly and then also fade back down gently, whereas our samples have a much rougher entrance and exit.
There are a number of ways we could adjust this. One very effective way to change the perception of the sound is to add some reverberation to it, making it seem like the sound is reflecting in a physical space. This will especially affect the part where the sound stops playing: Instead of all sound disappearing instantly, the reflections in the virtual space will linger.
The Web Audio API comes with an interface called ConvolverNode that can achieve this kind of an effect. It applies something called a convolution to a sound signal, by combining it with another sound signal called an acoustic impulse response. The exact math behind this is beyond the scope of this guide and to be honest I don't fully understand it. But it sounds pretty damn cool, which is the most important thing.
To use ConvolverNode we need to obtain an impulse response sample that will be used to convolve our audio source. As it happens, someone by the name of AirWindows has made a free one called "airport terminal", which is fantastically appropriate for our purposes and our theme. It's not actually recorded in a real airport terminal, but it simulates the massive amount of reverb you get in one.
I've made a suitable stereo .wav file of this impulse response, which you can get here. Place it within the musicforairports directory. Then modify the code that starts our audio loop so that it first fetches this file as an audio buffer and then creates a convolver node based on it. The node is given to startLoop as a new argument:
And finally, modify playSample so that it sends its audio signal to the given destination instead of the audio context's final destination node. This causes all of the samples to flow through the convolver node:
This makes a big difference in the sound produced! As far as reverberation effects go, it's certainly among the most dramatic and it completely changes the nature of the music. If it proves too massive to your liking, try one of the others from AirWindows or use one from this database compiled by The University of York.
Here's what the Web Audio node graphs produced by this code look like:
Web Audio graph with a single source and a convolver.
Putting It Together: Launching the Loops
With our sampler and reverbed loops, we can now prop up the whole system that produces our approximation of "Music for Airports 2/1". This is simply done by calling startLoop several times, once for each of the musical notes that we want to play.
Here we need to come up with a bunch of numeric values: We need to decide the duration of each loop, and the delay by which each sound is positioned inside its loop. Of these two, the loop durations are much more important since, as we saw earlier, making them incommensurable will cause the system to produce a very long piece of unique music. The delays on the other hand have less of an impact. They basically control how the music begins but very soon their role will diminish as the differences in the loop durations take over.
Here's an example set of numbers. Their exact values are not hugely important. The story tells that Eno merely cut the tapes up to what he thought were "reasonable lengths" without giving it much thought. We may just as well do the same.
A snapshot of the Web Audio graph formed by the Music for Airports system.
And here is this particular system in action:
"Music for Airports"
It's a fascinating feeling to set one of these systems off. You created it but you don't know what it's going to do. To me this captures some of the magic I felt when I was just getting started with programming, which I don't feel that often these days as a working software engineer. Even though there's absolutely nothing random about the system – its behavior is fully deterministic – you really have no idea what it's going to sound like. Those twelve numbers specify the system's behavior completely but the system seems much more complicated than that. The complexity is emergent.
Eno has compared making musical systems like these to "gardening", as opposed to "architecting". We plant the seeds for the system, but then let it grow by itself and surprise us by the music that it makes.
What this means, really, is a rethinking of one's own position as a creator. You stop thinking of yourself as me, the controller, you the audience, and you start thinking of all of us as the audience, all of us as people enjoying the garden together. Gardener included.
Exploring Variations on Music for Airports
This is a much more complex systems than "It's Gonna Rain", and as such provides a lot more room for all kinds of experimentation. See if any of the following tickles your interest:
Make the durations considerably shorter or longer. You may notice that the silences are just as important as the sounds in a piece like this. Having things playing constantly can easily feel crowded.
Play with different instruments from the Sonatina library or from elsewhere.
How about mixing two or more instruments in the same system? Maybe add more loops to accommodate them.
Change the musical chords played. For example, playing a straightforward C major scale will result in a very different mood than what we have currently.
Try different impulse responses to change the physical "space" in which the sound plays.
Try randomizing the loop durations and/or delays, so that a different system is generated every time the page loads.
Here's an example of a variation I came up with. I used the grand piano but accidentally divided the playback rates of the samples by three, causing them to sound completely different from what I was expecting.
"Music for Airports" - Oblique Piano
The result not only sounds nothing like a grand piano, but also changes the chord. As we've seen, frequencies and musical notes have an exponential relationship, so when I simply divide the frequency (= playback rate) by a constant number, a new set of musical intervals forms. I don't even know what they are in this case, but I like them.
What essentially happened here is that I caused a bug and it made the thing better. When's the last time you remember that happening? Yet this is the kind of thing that often happens when you're playing around with these kinds of musical systems. It's a good idea to listen carefully when it does, because what you did by mistake may end up sounding better than the thing you were originally trying to do. As one of Eno's Oblique Strategies cards says, "Honor thy error as a hidden intention".
In another variation I switched the instrument to the English horn, which is also included in the Sonatina sample library:
"Music for Airports" - Cor Anglais
Brian Eno
Discreet Music
1975
I’ve met a lot of children who were born listening to one record in particular, which is Discreet Music. I should think by now I’ve met about 60 or 70 kids who came out of the womb listening to that record, which of course, is any marketing department's dream: Get in there right at the beginning, you know?
While the second track on "Music for Airports" is possibly the simplest of Eno's systems music releases, it was not the first. That honor is bestowed on Discreet Music, recorded several years earlier, on one spring day in 1975.
It wasn't called "ambient" at the time (one contemporary review just called it "a haunting minimalist experiment"), but it's still a landmark piece in the development of ambient music, just as much as Music for Airports is.
"Discreet Music" is very explicitly a piece of systems music. In fact, Eno actually described the system that produced the music in the liner notes of the album release, and also included a diagram of how the whole thing was put together. This shows how central the "systems" idea was in his thinking at the time.
Brian Eno included a systems diagram in the liner notes of the Discreet Music record.
As we see here, and as we also hear from the results, this system is much more elaborate than the simple tape loops we've been studying so far. There are familiar things such as tapes and loops, but there are also new things such as synthesized sound. It'll take a bit more effort for us to reconstruct, but we'll get there!
Let's set up a new project for our rendition of Discreet Music. Its structure is the same as in our other projects. Create a new directory and add two files to it:
The contents of this file are the same as before, except that this time we're including the Tone.js library onto the page. This is a fantastic open source JavaScript library that provides all kinds of useful abstractions on top of the standard Web Audio API. We'll use it in several places as we construct this project.
We can now launch our dev server from this directory and start playing with it:
lite-server
Synthesizing the Sound Inputs
In the pieces we've looked at previously, all sounds have been sampled human voices or musical instruments. Discreet Music is very different in the sense that all sounds are electronically produced with a synthesizer – something that was still pretty exotic in the mid-70s. Eno synthesized the music with his EMS Synthi AKS modular analog synthesizer.
The EMS Synthi AKS modular - the model Eno used to make Discreet Music and many other things. Photo: Andrés Galeotti
The Synthi was Eno's workhorse for much of the 1970s, and it can be heard not only on Eno's own albums but also on many collaborations. It is all over David Bowie's Berlin trilogy, for example. The device had a convenient portable form factor: It was built into a briefcase that you could take with you, kind of like a laptop.
There's a neat JavaScript emulator of the Synthi too, though it doesn't have the keyboard or the sequencer.
Now, the thing about old analog synthesizers is that they all have distinct sounds. In these machines, sound signals were not treated in the exact digital form as they mostly are today, but were passed along in analog form through all kinds of electronic circuitry. This meant that the signals were subject to various subtle imperfections and disturbances of the physical world, causing each model to have its unique brand of wobble and distortion.
The EMS Synthi is no exception to this. We're not going to be able to emulate exactly what it produces, so we're not going to even try. Instead, we'll settle for something that sounds close enough, for some definition of "close".
The Web Audio API includes all the requisite parts for doing modular synthesis. It supports oscillators for producing sound waves, filters for filtering them, and all kinds of other processing nodes for further modifying the sounds, some of which we've already used in this guide.
But the thing is, these APIs are pretty low level. Setting up a synthesizer that approaches the capabilities of a real-world one would require quite a bit of code if we were to do it all directly with Web Audio nodes. This is where Tone.js comes in. Among the things it includes are abstractions over most of the low-level details of modular synths, allowing us to build different kinds easily.
The following steps demonstrate the construction of a particular synth sound that I came up with for this project. Obviously, there's a huge amount of possible variation here and you'll be able to come up with all kinds of different sounds by tweaking the parameters and trying different kinds of synths. This is especially true if you know your way around sound synthesis.
Setting up a Monophonic Synth with a Sawtooth Wave
The first thing we'll do is set up a simple Tone.js MonoSynth object. This is a monophonic synthesizer, just like the EMS Synthi, which means it's able to produce one sound at a time.
We'll then connect the synth to the Tone.js Master output and play a middle C note with a duration of one second, so that we can hear what it sounds like.
discreetmusic.js
let synth = new Tone.MonoSynth();
synth.toMaster();
synth.triggerAttackRelease('C4', 1);
Although we can't really see it, what we've constructed here is a Web Audio node graph. It lives inside an AudioContext that Tone.js has constructed for us, and outputs to its destination node.
The sound here is based on a square wave (), which is the default for MonoSynth. Let's change it to a sawtooth wave (). This will result in a very different kind of sound:
discreetmusic.js
let synth = new Tone.MonoSynth({
  oscillator: {type: 'sawtooth'}
});
synth.toMaster();
synth.triggerAttackRelease('C4', 1);
Filtering the Wave
Though the sawtooth wave we have right now is a good start, its sharpness bares no resemblance to the warm synth washes of Discreet Music. We can get much closer to that by filtering the wave with a low-pass filter. This will take out some of the higher frequencies of the wave, leaving us with a very different, softer sound ().
The MonoSynth comes with a built-in filtering capability. All we need to do is tweak its FrequencyEnvelope. If we allow the filter to pass just two octaves worth of frequencies above a base frequency of 200Hz, we get a "muffled" sound that's much closer to what we want:
discreetmusic.js
let synth = new Tone.MonoSynth({
  oscillator: {type: 'sawtooth'},
  filterEnvelope: {
    baseFrequency: 200,
    octaves: 2
  }
});
synth.toMaster();
synth.triggerAttackRelease('C4', 1);
As you listen to this sound, you may notice that it changes during its lifetime. This is because the filter is actually taking on different values over time, based on the default values of its Attack-Decay-Sustain-Release ("ADSR") envelope. In particular, the filter takes a while to kick in and then a bit more time to stabilize because of its attack and decay settings. We don't want that for what we're doing, so let's set those both to zero, so that the filter reaches its sustain level immediately:
Our synth currently starts playing at pretty much full volume immediately, and also ends very quickly once it's released after one second. In Discreet Music both of these sound softer: Synths don't come in quite so abruptly and also linger for a while before they go. Some of this is due to the echo effect we'll add later, but some of it we'll build right into the synth, by changing its amplitude ADSR envelope.
Firstly, if we set the attack to 0.1, the sound will "ramp up" for a tenth of a second as it begins:
Secondly, if we set the release of the synth to happen over a linear curve of four seconds, we get a very slow fading out of the sound after it's released.
This doesn't sound quite right though - the sound is muting out almost immediately instead of going out evenly over four seconds. This is because of our filter: It also has a release setting, which causes the filter frequency to drop to the base value of 200Hz. We don't want that, so let's go ahead and eliminate the filter's release by setting it to a very high number, meaning that it'll happen over such a long period of time that we'll never hear it.
The current sound we have is based on a single filtered sawtooth oscillator. We can gain a fuller sound if we combine it with a second oscillator producing a different kind of wave, such as a sine wave ().
We could set up another MonoSynth for this purpose and play both synths simultaneously. But we won't have to, since Tone.js comes with a suitable abstraction for this: DuoSynth packages two MonoSynths behind a convenient interface for controlling both at the same time.
Here's a DuoSynth, where the first voice is the MonoSynth we constructed before, and the second voice produces a sine wave. Both voices use the same amplitude and filter envelopes.
We can hear the two synths now but the sound is not quite right. There's a kind of eerie quality to it, which is a combination of two things: Vibrato (which we'll look at next), and the fact that the two oscillators are not vibrating at the same frequency.
The DuoSynth has a harmonicity attribute that controls the difference between the frequencies of the two oscillators. By default it's set to 2, causing the second voice to vibrate twice as frequently as (or "an octave above") the first one. While this is nice for many situations, we don't want that right now. We can disable it by setting harmonicity to 1 so that both oscillators have the same frequency and are playing exactly the same note.
The other extra quality in our sound that was introduced by the DuoSynth is a vibrato effect, making the sound's pitch oscillate slightly around the base tone.
While we don't exactly want vibrato in our synth, we can exploit the same feature to emulate something else: Eno's equipment caused some tape wow in the original piece, adding continuous slowly changing pitch shifts into the recording. What we can do is add a very slow and very slight vibrato to our synth to emulate a similar effect. It's a pale imitation of the warm analog flutter of the original, but I find it a nice touch anyway.
I found a frequency of 0.5Hz and an depth of 0.1 suitable for this. What we want is an almost imperceptible effect – enough that you hear a difference but not so much that it draws attention to itself.
Before we start building up the melodies that we're going to play with our synth, let's talk a little bit about how exactly we're going to control the timing of those melodies.
In the "Music for Airports" system we simply used JavaScript's built-in setInterval() function to make things repeat at (almost) regular intervals. With this system we have more things to control than just a few virtual tape loops. We need a better API than setInterval() for timing them.
This is another place where Tone.js can help, and it can do so in a couple of ways.
Transport Time
Tone.js has its own timeline, along which things can be scheduled to occur over time. For example, we could construct a Loop to achieve something very similar as setInterval(): To execute a callback function every 2 seconds.
new Tone.Loop(() => {
  synth.triggerAttackRelease('C4', 1);
}, 2).start();

// Tone's Transport needs to be started for any loops to become active
Tone.Transport.start();
But there's a lot more to the Loop API than this. For example, you can set a loop to only repeat a specific number of times, or add some randomness by only having the loop trigger at a given probability. Most importantly though, the loop API lets us do precise timing.
Because of the single-threaded nature of JavaScript, there is no way to guarantee that a given callback function is invoked at an exact moment in time. There is a clever way for us to get around this with Tone.js:
Tone.js always executes Loop callbacks slightly before their scheduled triggering time.
It passes each callback one argument: The exact time it was supposed to be executed at. Because of (1) this will always be a little bit in the future.
We use that time argument when we play our synth. For example, we can give triggerAttackRelease a third argument to control when it should trigger.
Tone.js invokes a loop callback slightly before its scheduled time and gives it the scheduled time as an argument.
This lets us play a sound at an exact interval:
new Tone.Loop(time => {
  synth.triggerAttackRelease('C4', 1, time);
}, 2).start();

Tone.Transport.start();
Musical Timing
Scheduling things to happen over seconds and milliseconds is one thing, but it's not how most music in the world is measured. Instead, we measure things using time signatures: Beats and measures.
In Tone.js we can use these musical time signatures instead of absolute times to schedule things. For example, we can schedule a loop to execute once per every measure (or "bar") with the 1m syntax where m is short for "measure":
new Tone.Loop(time => {
  synth.triggerAttackRelease('C4', 1, time);
}, '1m').start();

Tone.Transport.start();
In Tone's default 4/4 time signature (which is what we're going to use), this will happen every four beats (ONE-two-three-four-ONE-two-three-four).
We can also divide the measure into half notes (2n), quarter notes (4n), eighth notes (8n), and sixteenth notes (16n). We can play a note, say, on the second beat of every measure by delaying the trigger by one quarter note (one-TWO-three-four-one-TWO-three-four):
new Tone.Loop(time => {
  // Trigger one quarter note from now, and hold for one eighth note
  synth.triggerAttackRelease('C4', '8n', '+4n');
}, '1m').start();

Tone.Transport.start();
When we want to combine different measures, we can use simple arithmetic expressions ('1m + 16n'), or use a special shorthand "measures:quarters:sixteenths" syntax:
Perhaps the most useful part about using musical timing from our point of view is that using this scheme, the absolute timing of events can be changed by setting the BPM (beats-per-minute) value of the transport. For example, we can make everything in our system play in double speed by bumping the BPM from the default of 120 to 240;
Tone.Transport.bpm.value = 240;
This, in fact, is a trick Brian Eno commonly uses: He often works on his ambient pieces at double speed and then slows them down before release. This was also the case with Discreet Music. It's not simply about working at a faster pace, but about affecting how the results turn out:
I have a theory that, as a maker you tend to put in twice as much as you need as a listener. You tend to plug every hole. You're always looking for that charge, so you put more and more in to get it. But as a listener you're much less demanding. You can take things that are much simpler, much more open, and much slower.
It's often happened that I've made a piece and ended up slowing it down by as much as half. Discreet Music is an example: that's half the speed at which it was recorded.
As you work on this piece, you may want to double the Transport BPM to get a feel for the speed at which Eno actually worked on it.
Sequencing the Synth Loops
At the core of Discreet Music is an assortment of little melodic phrases, played with a synth similar to the one we've just constructed. If you listen to the original, you'll hear some of them playing somewhat to the left of center in the stereo field and some to the right. These seven phrases form all the sonic inputs to the system:
Left
Right
These phrases are arranged onto two repeating sequences that have slightly different durations: One for the left channel, and one for the right. Both sequences are looped. The result of this is yet another instance of a phasing loop system, the kind of which we've seen already. As the two loops repeat they form different combinations over time.
Since the two sequences use different stereo panning, and may also play at the same time because of the phasing that's going on, we can't really use the same MonoSynth for both. We need two synths, and we need to pan them separately. Let's extract our synth initialization code into a function that we can then call twice to make two identical synths.
We'll then set up two Tone.js Panners (which are pretty much just wrappers for the Web Audio StereoPannerNode that we've already seen). We connect each synth to a panner and set the panners to opposite locations of the stereo field:
discreetmusic.js
let leftSynth = makeSynth();
let rightSynth = makeSynth();

let leftPanner = new Tone.Panner(-0.5).toMaster();
let rightPanner = new Tone.Panner(0.5).toMaster();

leftSynth.connect(leftPanner);
rightSynth.connect(rightPanner);
We're setting the pannings to -0.5 and 0.5, putting them to the left and right of center, but not fully to the left and right so that some mixing of channels will occur.
Eno's Synthi AKS had a primitive sequencer (which he called a "digital recall system" at the time) onto which the sequences were programmed. What we can do to substitute for this is to model each sequence as a Tone.js Loop. We have one Loop for the left synth, and one for the right:
discreetmusic.js
let leftSynth = makeSynth();
let rightSynth = makeSynth();

let leftPanner = new Tone.Panner(-0.5).toMaster();
let rightPanner = new Tone.Panner(0.5).toMaster();

leftSynth.connect(leftPanner);
rightSynth.connect(rightPanner);

new Tone.Loop(time => {
  // We'll play leftSynth here
}, '34m').start();

new Tone.Loop(time => {
  // We'll play rightSynth here
}, '37m').start();

Tone.Transport.start();
With the default BPM of 120 and time signature of 4/4, the left loop's wall clock duration will be about 68 seconds, and the right loop's 74 seconds. This is roughly the same as in the original Discreet Music. Since the loops have different durations, the resulting phasing effect causes the sounds to shift relative to each other over time, just like in "It's Gonna Rain" and "Airports". In this case there'll be about 41 minutes of unique music before the loops start at the same time again.
Here's what the audio graph of this system looks like:
The Web Audio graph of two panned synths. The Tone DuoSynths and Panners are abstractions. Under the hood, each DuoSynth contains several oscillator, gain, and filter nodes.
Let's put the first melodic phrase of the left loop in. It triggers the C5 note, and then moves to the D5 note, and starts right at the beginning of the loop:
discreetmusic.js
new Tone.Loop(time => {
  // Trigger C5, and hold for a full note (measure) + two 1/4 notes
  leftSynth.triggerAttackRelease('C5', '1:2', time);
  // Switch note to D5 after two 1/4 notes without retriggering
  leftSynth.setNote('D5', '+0:2');
}, '34m').start();

new Tone.Loop(time => {
  // We'll play rightSynth here
}, '37m').start();
This phrase will play right when the page loads. It then repeats after just over a minute when the loop turns.
We can then fill in the rest of the phrases of the left sequence:
discreetmusic.js
new Tone.Loop(time => {
leftSynth.triggerAttackRelease('C5', '1n + 2n', time);
leftSynth.setNote('D5', '+2n');
// Trigger E4 after 6 measures and hold for two 1/4 notes.
leftSynth.triggerAttackRelease('E4', '0:2', '+6:0');
// Trigger G4 after 11 measures + a two 1/4 notes, and hold for two 1/4 notes.
leftSynth.triggerAttackRelease('G4', '0:2', '+11:2');
// Trigger E5 after 19 measures and hold for 2 measures.// Switch to G5, A5, G5 after delay of a 1/4 note + two 1/16 notes each.
leftSynth.triggerAttackRelease('E5', '2:0', '+19:0');
leftSynth.setNote('G5', '+19:1:2');
leftSynth.setNote('A5', '+19:3:0');
leftSynth.setNote('G5', '+19:4:2');
}, '34m').start();
The math here can be a bit tricky to follow because we're talking in musical measures and not absolute times. But if you play with the numbers and listen to the results you can get the hang of it pretty quickly.
And then we'll do the same for the right sequence, which will complete all the synth inputs to the system. Here's the full source code so far.
discreetmusic.js
functionmakeSynth() {
let envelope = {
attack: 0.1,
release: 4,
releaseCurve: 'linear'
};
let filterEnvelope = {
baseFrequency: 200,
octaves: 2,
attack: 0,
decay: 0,
release: 1000
};
returnnew Tone.DuoSynth({
harmonicity: 1,
voice0: {
oscillator: {type: 'sawtooth'},
envelope,
filterEnvelope
},
voice1: {
oscillator: {type: 'sine'},
envelope,
filterEnvelope
},
vibratoRate: 0.5,
vibratoAmount: 0.1
});
}
let leftSynth = makeSynth();
let rightSynth = makeSynth();
let leftPanner = new Tone.Panner(-0.5).toMaster();
let rightPanner = new Tone.Panner(0.5).toMaster();
leftSynth.connect(leftPanner);
rightSynth.connect(rightPanner);
new Tone.Loop(time => {
leftSynth.triggerAttackRelease('C5', '1:2', time);
leftSynth.setNote('D5', '+0:2');
leftSynth.triggerAttackRelease('E4', '0:2', '+6:0');
leftSynth.triggerAttackRelease('G4', '0:2', '+11:2');
leftSynth.triggerAttackRelease('E5', '2:0', '+19:0');
leftSynth.setNote('G5', '+19:1:2');
leftSynth.setNote('A5', '+19:3:0');
leftSynth.setNote('G5', '+19:4:2');
}, '34m').start();
new Tone.Loop(time => {
// Trigger D4 after 5 measures and hold for 1 full measure + two 1/4 notes
rightSynth.triggerAttackRelease('D4', '1:2', '+5:0');
// Switch to E4 after one more measure
rightSynth.setNote('E4', '+6:0');
// Trigger B3 after 11 measures + two 1/4 notes + two 1/16 notes. Hold for one measure
rightSynth.triggerAttackRelease('B3', '1m', '+11:2:2');
// Switch to G3 after a 1/2 note more
rightSynth.setNote('G3', '+12:0:2');
// Trigger G4 after 23 measures + two 1/4 notes. Hold for a half note.
rightSynth.triggerAttackRelease('G4', '0:2', '+23:2');
}, '37m').start();
Tone.Transport.start();
What we have now are two looping sequences, going about their way on their own timings and forming different combinations against each other:
This is starting to resemble Discreet Music, though it does still sound very sparse and not all that interesting. That will change soon.
I don't know exactly how Eno achieved what we've done here. As far as I can tell, the Synthi AKS could hold just one sequence at a time. Furthermore, it was monophonic so it couldn't play more than one note at a time. It wouldn't seem to be possible to run two sequences of different durations simultaneously.
The best theory I can come up with is that Eno actually ran the system twice – once per each sequence – and simply overdubbed each run to the same master tape.
Adding Echo
The Discreet Music system also contained an echo unit, through which all sounds coming from the synthesizer were routed before they reached the tape. We can simulate this by using a Tone.js FeedbackDelay node. It takes the incoming signal, holds on to it for a given delay, and then feeds part of it back to the signal again, causing each sound to repeat ("echo") a number of times.
A FeedbackDelay node partially repeats the incoming signal a number of times. It can be used to construct an echo effect.
The node is parameterized with two numbers:
delayTime - how long the delay should be, or "how long does it take before you hear the echo?"
feedback - how much of the input to feed back in, or "how loud is the echo?". This also indirectly controls how many times the signal will be repeated – until it reaches zero.
Let's put in a delay time of a sixteenth note and a feedback of 0.2. The delay is connected to the master output, and the panners are now connected to the delay:
discreetmusic.js
let leftPanner = new Tone.Panner(-0.5); // No longer connected to master!let rightPanner = new Tone.Panner(0.5); // No longer connected to master!let echo = new Tone.FeedbackDelay('16n', 0.2);
leftSynth.connect(leftPanner);
rightSynth.connect(rightPanner);
leftPanner.connect(echo);
rightPanner.connect(echo);
echo.toMaster();
Since we are now layering our synth sound on top of itself, it becomes a bit too loud and you may hear some distortion because of this. We can make it more manageable by adjusting the volume of our synths, by something like -20dB:
It sounds like Eno changed the echo delay during recording, which is easily done with the controls on the Echoplex unit he was using. Should you want to do the same, you can simply adjust the delayTime and feedback attributes our feedback delay (try something like 2n and 0.4).
Adding Tape Delay with Frippertronics
And now we arrive at the defining feature of the Discreet Music system: A tape delay contortion commonly called Frippertronics.
The basic idea of this system is that whatever sound goes into it is repeated again after a few seconds, and then again after a few seconds more, and again, until it gradually fades out.
Now, this may sound pretty similar to the "echo" feedback delay we just added in the previous section. And that's because that's precisely what it does. It feeds the audio signal back to the system with a delay. The difference is that in this case the delay is very long – several seconds long, in fact. It doesn't sound like an echo. It sounds like a completely new sound that just happens to be a repetition of a sound that occured a few seconds ago.
These days such effects can easily be achieved with digital delays, but in the early 1970s this was not the case. Delay units like the Echoplex could not provide anything close to the delay times we need here. Frippertronics is a very clever hack that gets around this. It involves the same kind of tape recorders we've been discussing with relation to tape loops, but configured a bit differently.
How this works is that you have two tape recorders. You plug your input (the synth, in our case) to one tape recorder, which then records that input onto a tape. But from this tape recorder you then feed the tape directly to the other tape recorder, where it is played back. The output signal of the second tape recorder is fed back into the first as another input, so that it's recorded to the tape again, and this is how it keeps repeating every few seconds.
The Frippertronics tape delay system, as illustrated on the Discreet Music liner notes.
So, after a sound is recorded to a tape on the first recorder, the tape travels to the second recorder, and then it is played back there. The exact delay is controlled by the physical distance between the two tape machines, because that directly affects how long the tape takes to travel between them. In the case of Discreet Music, the delay is about six seconds.
Eno and frequent collaborator, Robert Fripp of King Crimson, developed this system for their joint releases, such as (No Pussyfooting). The idea was that Fripp would play things on his guitar and Eno would use the delay system to layer the guitar sound on top of itself.
The system wasn't originally Fripp and Eno's invention though: Terry Riley and Pauline Oliveros had experimented with such systems as much as a decade earlier. Riley called it the Time Lag Accumulator and recorded pieces like Poppy Nogood and the Phantom Band with it. Oliveros used similar systems to record some fantastically eerie tape pieces like Bye Bye Butterfly.
But how should we approach emulating this kind of tape delay system? We could use a Tone.js FeedbackDelay again, but I think in this case it's more appropriate to drop to the lower level of the native Web Audio API, both because laying bare the internal structure of the system will help understand how it works, and because I feel it's closer to the DIY ethos of the original Frippertronics. As we do this, we'll see that Tone.js integrates well with the lower level Web Audio API nodes, and we can mix and match Tone nodes and raw nodes in the same graph.
The first thing we'll do is create a Web Audio DelayNode, and set its delay to six seconds, which is about what it is in Discreet Music. We then connect our echo delay to this new delay node. Both the echo delay and the new delay are connected to the audio context destination. Each sound is played right when it comes out of the synth and then repeated again six seconds later.
discreetmusic.js
let leftSynth = makeSynth();
let rightSynth = makeSynth();
let leftPanner = new Tone.Panner(-0.5);
let rightPanner = new Tone.Panner(0.5);
let echo = new Tone.FeedbackDelay('16n', 0.2);
let delay = Tone.context.createDelay(6.0); // Borrow the AudioContext from Tone.jsdelay.delayTime.value = 6.0;
leftSynth.connect(leftPanner);
rightSynth.connect(rightPanner);
leftPanner.connect(echo);
rightPanner.connect(echo);
echo.toMaster();
echo.connect(delay);
delay.connect(Tone.context.destination);
The Web Audio graph of two panned, echoed synths played twice: Once immediately and once after a delay.
With this, the music gets off to a good start, but it's not quite right. Everything repeats twice and then goes away. We want things to stick around longer than that.
The trick is to connect the delay back to itself. That means the sounds will just keep coming back after every 6 seconds.
discreetmusic.js
let leftSynth = makeSynth();
let rightSynth = makeSynth();
let leftPanner = new Tone.Panner(-0.5);
let rightPanner = new Tone.Panner(0.5);
let echo = new Tone.FeedbackDelay('16n', 0.2);
let delay = Tone.context.createDelay(6.0);

delay.delayTime.value = 6.0;

leftSynth.connect(leftPanner);
rightSynth.connect(rightPanner);
leftPanner.connect(echo);
rightPanner.connect(echo);

echo.toMaster();
echo.connect(delay);
delay.connect(Tone.context.destination);
delay.connect(delay);
What we've done here is formed a loop within the audio node graph.
The Web Audio graph of two panned, echoed synths played continuously through a looped delay.
This is much better, but now we have another problem. As we listen to the system for a while, it grows into an ear-shattering cacophony of melodies. It does sound interesting but it's not quite what we're after. That's because every sound coming in from the synth never goes away! It keeps looping forever.
What we need is a way to fade the sound out a bit each time it passes through the loop we've made. After each delay it should be a bit quieter than before. We can do this by introducing a GainNode to the loop. It is used to control volume, and what we'll do with it is lower the volume of the signal by a quarter each time it passes through.
discreetmusic.js
let leftSynth = makeSynth();
let rightSynth = makeSynth();
let leftPanner = new Tone.Panner(-0.5);
let rightPanner = new Tone.Panner(0.5);
let echo = new Tone.FeedbackDelay('16n', 0.2);
let delay = Tone.context.createDelay(6.0);
let delayFade = Tone.context.createGain();

delay.delayTime.value = 6.0;
delayFade.gain.value = 0.75;

leftSynth.connect(leftPanner);
rightSynth.connect(rightPanner);
leftPanner.connect(echo);
rightPanner.connect(echo);

echo.toMaster();
echo.connect(delay);
delay.connect(Tone.context.destination);
delay.connect(delayFade);
delayFade.connect(delay);
The Web Audio graph of a complete Frippertronics system: Two panned, echoed synths played continuously through a looped delay. The delay loop goes through a gain that gradually fades out the repeated signal.
That's more like it! Here's what the system we have now sounds like:
Controlling Timbre with a Graphic Equalizer
At this point there's just one more thing for us to do, and it involves the final piece in the Discreet Music diagram that we haven't addressed yet: The graphic equalizer.
What's meant by this is one of these things – an interface for controlling the volumes of different frequency bands in the audio signal:
The term graphic equalizer comes from the neat UI design of this interface: The knobs on each slider not only provide the means to control the volume of a certain frequency band, but also visualize the resulting frequency graph. If you plot a mental curve through the center of each slider knob, you get an idea of the frequency response of the equalizer. No separate graph display is required for that.
There are many reasons one may want to use a graphic equalizer when recording or playing back sound. For most of my lifetime I've used them to just make music sound as loud as possible while listening. But in this case we have a different, very specific purpose: To control the harmonic spectrum of our synthesizers while they're playing, resulting in different timbres.
The oscillators and filters we've set up for our synth are generating sounds at certain frequencies. Among them are the fundamental frequencies of each note. For example, when we play a C5 pitch, it plays a sound at the fundamental frequency of that pitch, 523.25Hz. But this is not the only frequency played. There are sounds played at a number of frequencies, particularly at certain integer multiples of the fundamental frequency, called harmonics.
Our synth driven through Chris Wilson's Web Audio Oscilloscope. The lower half of the image shows a frequency breakdown of the sound at a point in time. The leftmost bars display the fundamental frequency, and to the right of them there are several peaks for the various harmonics of the synth. With an equaliser we can manipulate the sound by eliminating or boosting some of those harmonics.
The relationships between the fundamental frequency and the harmonics result in the distinct sound of our synth (as they do for any musical instrument).
A graphic equalizer allows us to change these things at runtime. We can, for example, emphasize some harmonics and eliminate others. Or we may bring down the fundamental frequency itself, after which we may start hearing a completely different note!
What's notable about this from the perspective of our discussion is that here Eno introduced some manual inputs to his system, which was otherwise running fully automatically. When you listen to Discreet Music, you'll hear that the sound seems to become distinctly different in certain points. Sometimes its louder, sometimes quieter. Sometimes its thinner, sometimes fuller. What you're hearing is Eno adjusting the controls on his graphic equalizer to different settings during the recording. But that's all he's doing, the system itself is playing automatically.
So, what we're going to do is build a little graphic equalizer UI of our own, which we can then use to control our system as it is playing. We can do so with a bunch of HTML controls which we connect to Web Audio nodes.
Setting up the Equalizer Filters
We're going to control the gain of the sound signal separately on a number of frequencies. Before we do anything else, let's specify these frequencies in a constant:
These are all hertz values, about 1/3 of an octave apart from each other (remember the exponential relationship between notes and frequencies?). They're called ISO preferred frequencies and you'll find them on most so-called "1/3 octave" equalizers, which are the ones that have a big row of 30-31 knobs on them.
We are not going to use 30 bands in our equalizer though. We only have 21. That's because I've left out some of the lowest and highest frequencies completely. A general purpose graphic equalizer has knobs for the whole audible spectrum of about 20Hz to 20kHz, but our domain specific equalizer only needs to deal with the middle frequencies that are present in Discreet Music. In the interest of user experience we won't add unnecessary controls for the very low and high ends.
What we'll do next is add a filter node for each of these frequencies. Each filter can either boost or hinder that particular frequency.
The Web Audio API comes with the BiquadFilterNode interface that allows for signal filtering. There are different kinds of filters available and we can switch between them using the type attribute. The type we need here is peaking: It controls a certain frequency band "peaking" at a specific frequency. Here's how we could create a peaking filter for boosting the 1kHz frequency by 12 decibels:
The Q attribute controls the width of the frequency band around the base frequency. It is defined as "center frequency divided by the desired bandwidth". We always want a bandwidth of a 1/3 octave since that is the distance between our adjacent knobs, and for this 4.31 is a convenient magic number.
Now, we have a number of frequencies to control separately, and that means we need a number of individual filter nodes, one for each frequency. Let's create all those nodes:
discreetmusic.js
let leftSynth = makeSynth();
let rightSynth = makeSynth();
let leftPanner = new Tone.Panner(-0.5);
let rightPanner = new Tone.Panner(0.5);
let equalizer = EQUALIZER_CENTER_FREQUENCIES.map(frequency => {
let filter = Tone.context.createBiquadFilter();
filter.type = 'peaking';
filter.frequency.value = frequency;
filter.Q.value = 4.31;
filter.gain.value = 0;
return filter;
});let echo = new Tone.FeedbackDelay('16n', 0.2);
let delay = Tone.context.createDelay(6.0);
let delayFade = Tone.context.createGain();
Here we initialize a variable called equalizer, which will be an array of BiquadFilterNodes. Each of their gains is initialized to zero, which means that they will just pass the signal through without modifying it.
Next, we'll add these nodes into our audio graph. What we can do is simply connect them in series, so that the signal passes from one filter to the next. In Eno's systems diagram the graphic equalizer goes right after the synth, before the echo. So that's where we'll put it. The signal passes from the synth panners to the first filter in the equalizer. From the last filter in the equalizer we connect it to the echo:
discreetmusic.js
leftSynth.connect(leftPanner);
rightSynth.connect(rightPanner);
leftPanner.connect(equalizer[0]);
rightPanner.connect(equalizer[0]);
equalizer.forEach((equalizerBand, index) => {
  if (index < equalizer.length - 1) {
    // Connect to next equalizer band
    equalizerBand.connect(equalizer[index + 1]);
  } else {
    // This is the last band, connect it to the echo
    equalizerBand.connect(echo);
  }
});
echo.toMaster();
echo.connect(delay);
delay.connect(Tone.context.destination);
delay.connect(delayFade);
delayFade.connect(delay);
Here's the audio graph we have now:
The complete Discreet Music Web Audio graph: Panned synths, equalizer filters, echo, Frippertronics.
The system doesn't yet sound any different because none of the filters have nonzero gains. That's what we'll change next.
Building the Equalizer Control UI
We are still missing the "graphic" part of the graphic equalizer. What we're going to do is add to our HTML document a set of slider knobs, one for each frequency band in our equalizer. This will emulate the UI of an actual hardware graphic equalizer, which Eno would have been using.
Now, HTML5 has a standard range input, which renders a slider for controlling a numeric value. Unfortunately this input leaves a lot to be desired, especially in terms of how to control its look and feel consistently across browsers. Because of this, we're going to bring in an additional library which makes things a lot easier. It's called noUiSlider.
Let's add this library to the project. We need some JavaScript as well as some CSS for it. While we're at it, let's add a container <div> into which we'll render our equalizer:
Switching to the JavaScript code, we'll add a new function called initEqualizerUI, which takes the container div and the array of filter nodes as arguments. We'll call it right at the end of the file, after we've started the system:
In this function we're going to go through each frequency band in our equalizer and set up a knob UI for it. What we'd like to have for each knob is the following HTML structure - a wrapper <div> containing two elements: The slider element itself and a label element that displays what frequency we're controlling:
Here's the function we need to generate and render this HTML structure for each frequency band:
discreetmusic.js
functioninitEqualizerUI(container, equalizer) {
equalizer.forEach(equalizerBand => {
let frequency = equalizerBand.frequency.value;
let wrapper = document.createElement('div');
let slider = document.createElement('div');
let label = document.createElement('label');
wrapper.classList.add('slider-wrapper');
slider.classList.add('slider');
label.textContent = frequency >= 1000 ? `${frequency / 1000}K` : frequency;
wrapper.appendChild(slider);
wrapper.appendChild(label);
container.appendChild(wrapper);
});
}
Now we can bring in the noUiSlider library and let it construct a range slider for each of the <div class="slider"></div> elements we're producing:
discreetmusic.js
functioninitEqualizerUI(container, equalizer) {
equalizer.forEach(equalizerBand => {
let frequency = equalizerBand.frequency.value;
let wrapper = document.createElement('div');
let slider = document.createElement('div');
let label = document.createElement('label');
wrapper.classList.add('slider-wrapper');
slider.classList.add('slider');
label.textContent = frequency >= 1000 ? `${frequency / 1000}K` : frequency;
noUiSlider.create(slider, {
start: 0, // The initial gain, 0dB
range: {min: -12, max: 12}, // The allowed gain range, -12dB..12dB
step: 0.1, // Adjust the gain in 0.1dB increments
orientation: 'vertical', // Render a vertical slider
direction: 'rtl'// -12dB goes at the bottom, 12dB at the top
});
wrapper.appendChild(slider);
wrapper.appendChild(label);
container.appendChild(wrapper);
});
}
This will make the sliders visible, but we still need a bit of CSS to make them look better:
index.html
<!DOCTYPE html><html><head><linkrel="stylesheet"href="https://cdnjs.cloudflare.com/ajax/libs/noUiSlider/8.5.1/nouislider.min.css"><style>.eq.slider-wrapper {
/* Float the wrappers so the sliders will render side by side */float: left;
}
.eq.slider {
/* Put some horizontal space around each slider */margin: auto 5px;
/* Set the slider heights */height: 150px;
}
/* Make the frequency labels smaller and lighter */.eqlabel {
color: #777;
display: block;
font-size: 0.7em;
text-align: center;
}
</style></head><body><divclass="eq"></div><scriptsrc="https://tonejs.github.io/CDN/r7/Tone.js"></script><scriptsrc="https://cdnjs.cloudflare.com/ajax/libs/noUiSlider/8.5.1/nouislider.min.js"></script><scriptsrc="discreetmusic.js"></script></body></html>
Now we have a perfectly acceptable looking graphic equalizer!
There's a tiny problem with it though, which is that it doesn't actually work. Sliding the knobs has no effect. This is simply because we haven't connected the slider values to the gain attributes of the BiquadFilterNodes.
This is easily fixed. We just need to listen to the update event that noUiSlider sends when the slider's value changes. It gives us the slider value packaged into an array of strings (it's an array because the library supports multiple knobs per slider). We get the first value from the array and coerce it to a number to get the current gain number:
discreetmusic.js
functioninitEqualizerUI(container, equalizer) {
equalizer.forEach(equalizerBand => {
let frequency = equalizerBand.frequency.value;
let wrapper = document.createElement('div');
let slider = document.createElement('div');
let label = document.createElement('label');
wrapper.classList.add('slider-wrapper');
slider.classList.add('slider');
label.textContent = frequency >= 1000 ? `${frequency / 1000}K` : frequency;
noUiSlider.create(slider, {
start: 0,
range: {min: -12, max: 12},
step: 0.1,
direction: 'rtl',
orientation: 'vertical',
});
slider.noUiSlider.on('update', ([value]) => {
let gain = +value;
});
wrapper.appendChild(slider);
wrapper.appendChild(label);
container.appendChild(wrapper);
});
}
Then we can just plop that value into the gain attribute of the filter node for this frequency:
discreetmusic.js
slider.noUiSlider.on('update', ([value]) => {
  let gain = +value;
  equalizerBand.gain.value = gain;
});
And finally we have a fully functional version of the Discreet Music system:
"Discreet Music"
You can adjust the knobs to alter the timbre of the system. You can get the most dramatic results by bringing the lower half of the bands all the way down and the upper half all the way up. This'll eliminate many of the fundamental pitches and highlight the overtone frequencies.
Do remember that because of the way we've set this system up, the immediate control you have on the music is limited: You're not controlling everything you hear, but just the sounds that are currently being generated from the synthesizer. Anything that's being repeated by Frippertronics isn't affected because it doesn't pass through the equalizer.
Also, as you listen to the music, there's no need to feel compelled to constantly fiddle with the equalizer. You can just adjust it from time to time and then let it be. This is what Eno did when he was recording Discreet Music, because he was busy:
Once I got it going the phone started ringing, people started knocking on the door, and I was answering the phone and adjusting all this stuff as it ran. I almost made that without listening to it. It was really automatic music.
Going Forward
In this guide we've been reconstructing systems made by artists in the 1960s and 1970s using technology that's completely different from the original. The technical restrictions Reich and Eno faced – fixed, short tape durations and the absence of any kind of runtime computation – simply don't exist when working with Web Audio.
Making music with such artificial restrictions feels a bit funny, but then again, there's a certain elegance to the utter simplicity of these systems. Also, restrictions are often good when you're trying to create. Being overwhelmed with the technical possibilities of the platform can easily block you from coming up with anything interesting, and simply ruling out 80% of your options can unblock your creative flow. This is especially true when you're just getting started with the platform. As one of the masters of electronic music has put it:
When I first started using Max it was a bit intimidating, you'd get blank canvas syndrome, that moment of "what should I do? I could do anything!" Once I started to build stuff, narrow it down, reduce the capabilities, you start to get more ideas. It's all about narrowing down for me. There has to be a seed.
There's certainly a similar quality to Web Audio: There's so much you can do that it can be intimidating. But if you limit your options, as we've done here by pretending we're working with the technologies of yesteryear, it suddenly becomes a lot easier to experiment.
But interesting as these pieces are to reverse engineer and reconstruct, I don't think they really make use of the unique possibilities we have with Web Audio. Whereas the systems constructed by Reich and Eno were physically constrained to their respective studios, we can simply and trivially just send the systems over to anyone in the world. It's just code and it runs in any web browser. There's at least a couple of possibilities this opens up that we haven't even touched on in this guide.
Firstly, the systems could be interactive, bringing the listener in as an active participant instead of a passive receiver. Brian Eno himself has created such systems into his generative music apps for iOS, made in collaboration with Peter Chilvers.
Secondly, since we're working on the web platform, we are by definition connected to the outside world. Listeners could easily be connected to each other, making the interactive experience a social one as well. These systems could also potentially be connected to various servers and APIs around the world, providing possibilities for, say, music generated from real-time data sources.
Limited though these systems are, I hope they've given you an idea of the kinds of things we can do with Web Audio. They've certainly done so for me.
Tero Parviainen is an independent software developer and writer.
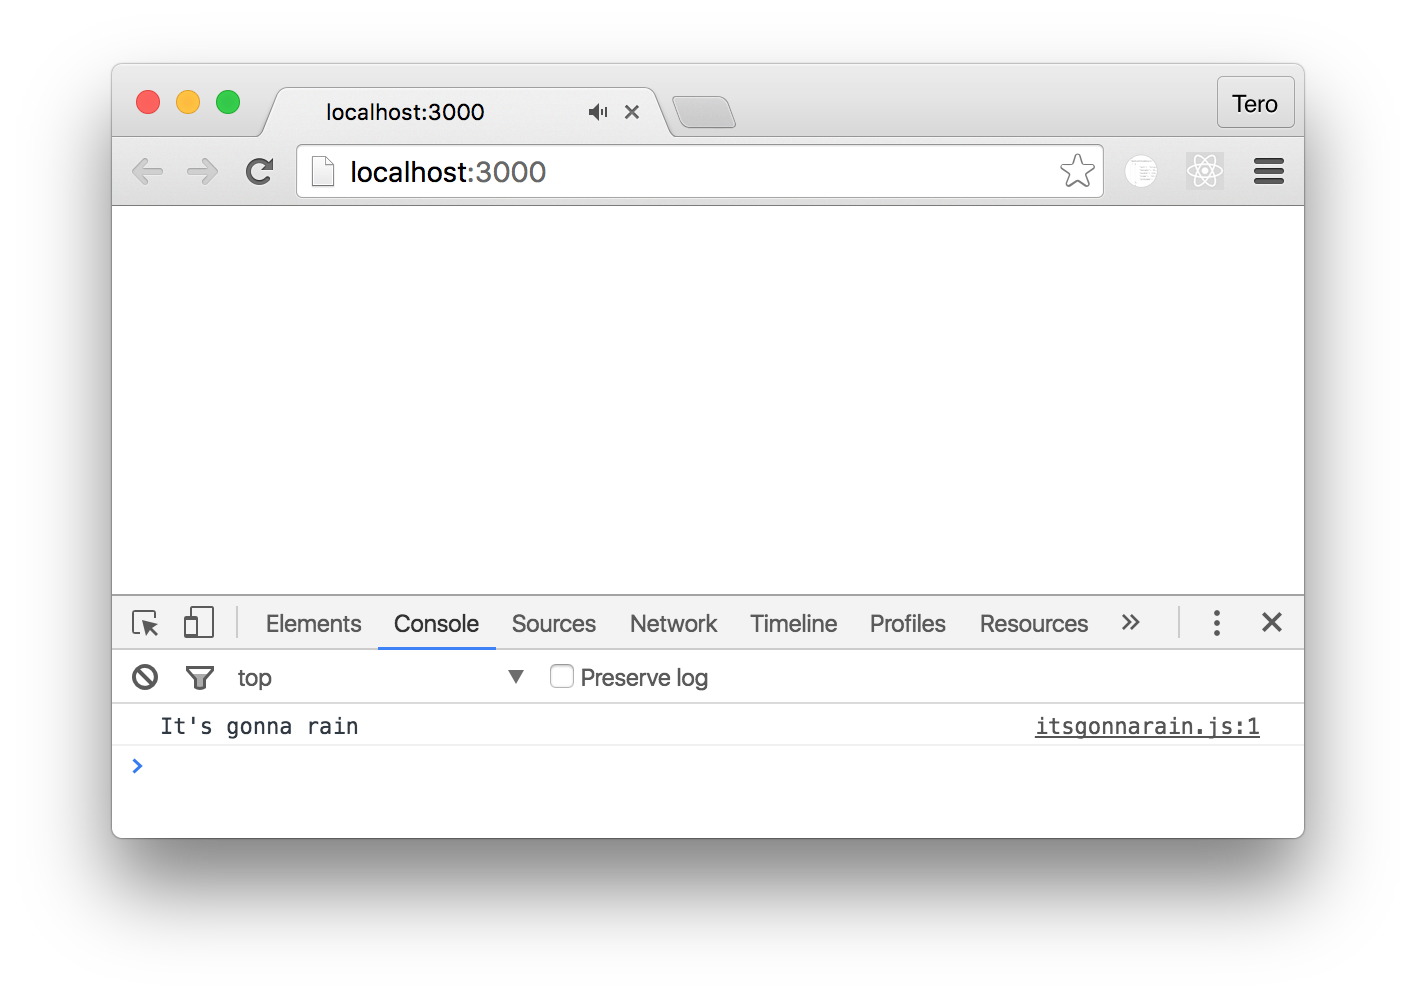
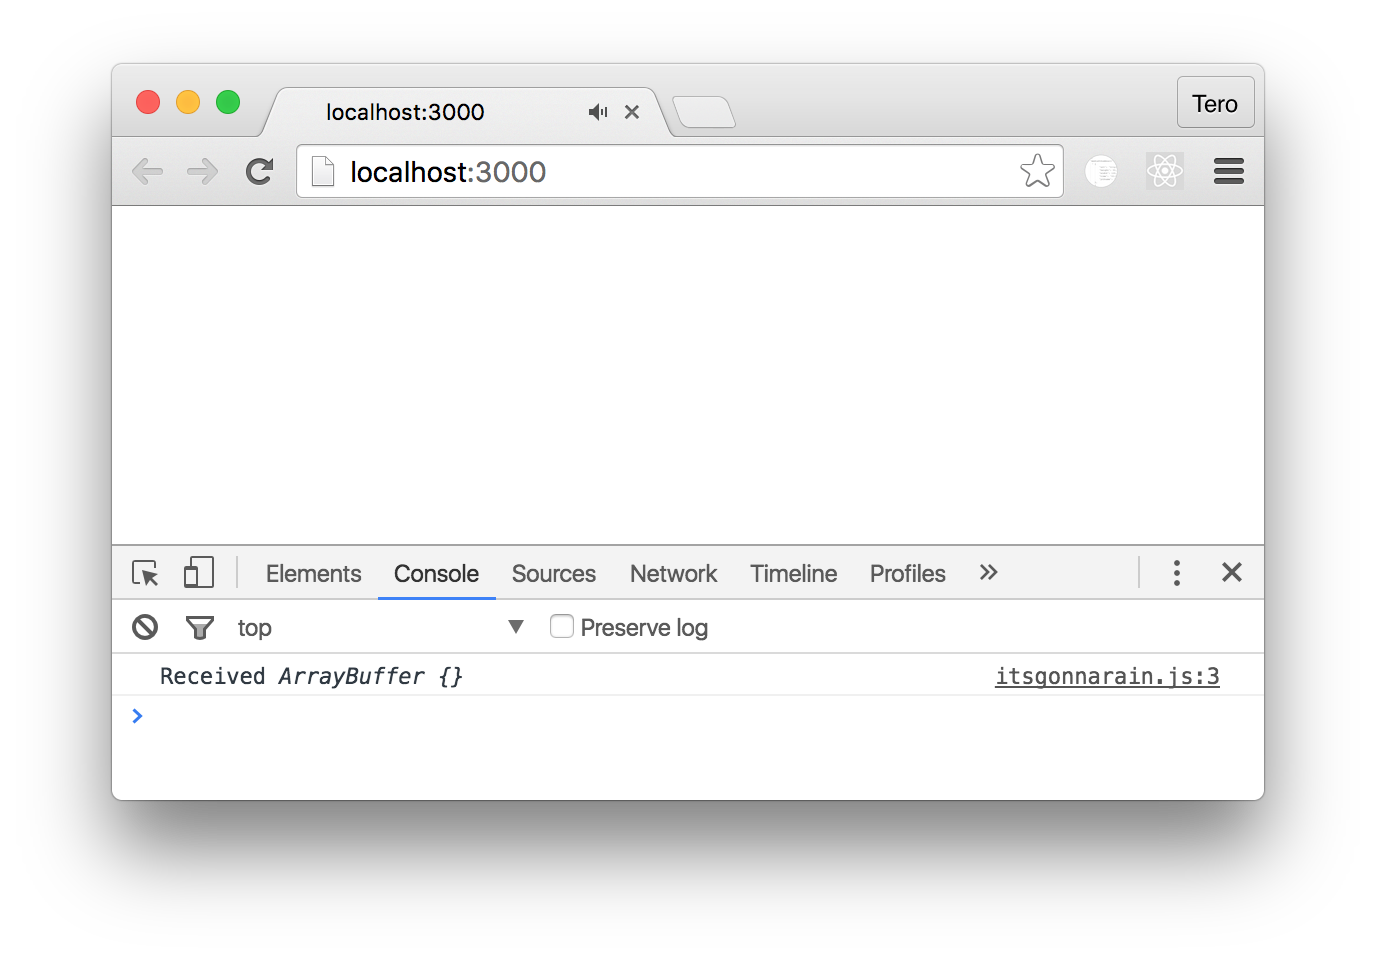 We now have the raw MP3 data loaded to our page.
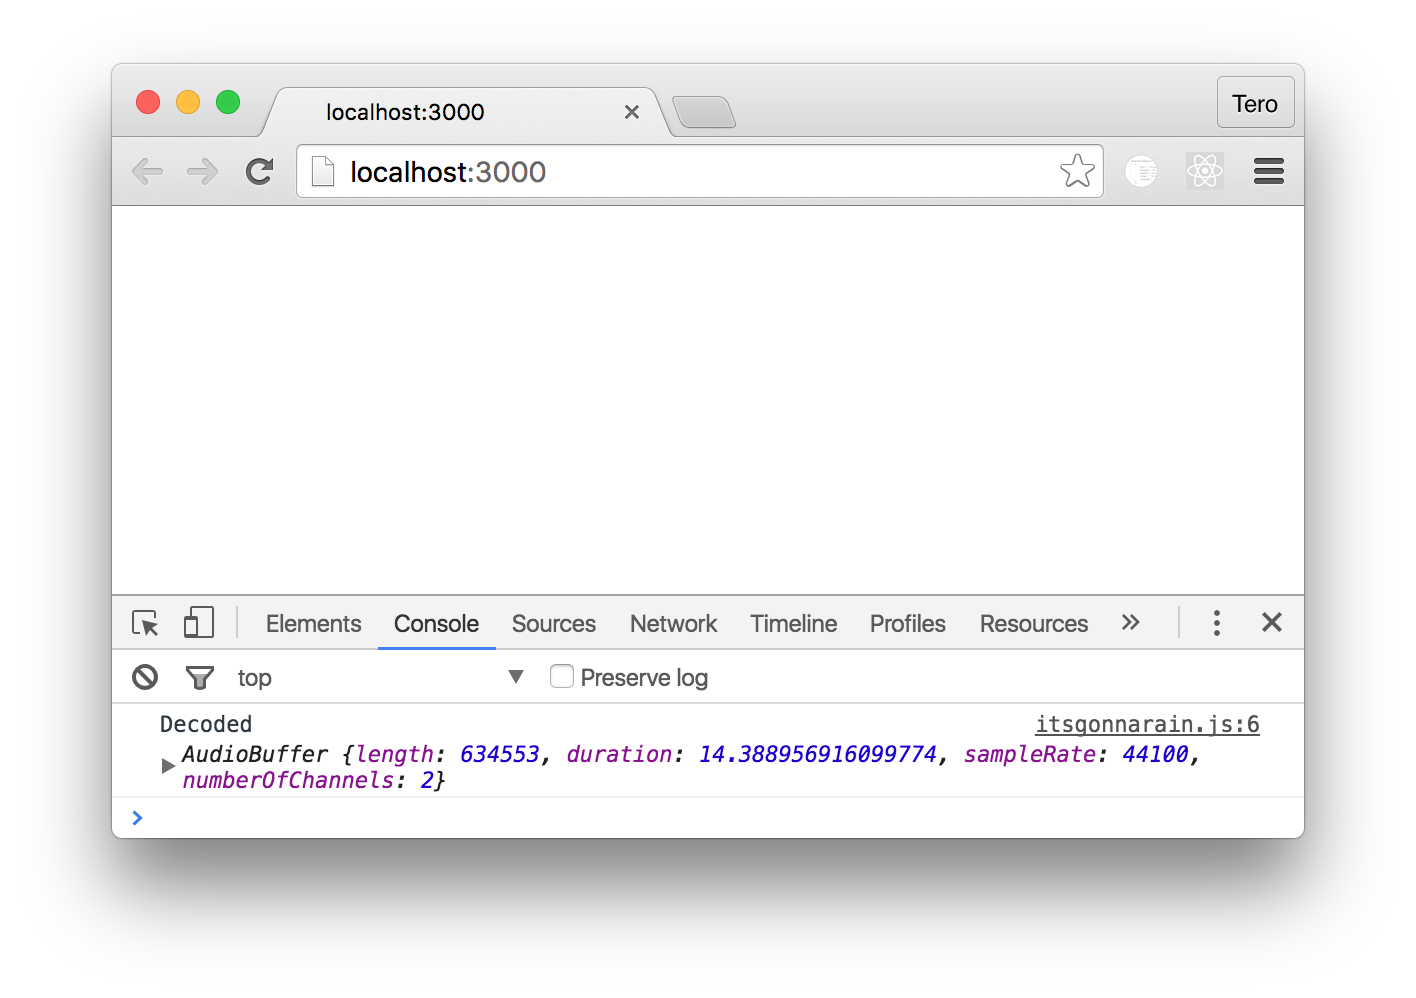 This is something we can now play, so let's go right ahead and do that. We're going to use the AudioContext again, this time to create something called a buffer source. This is an object that knows how to play back an AudioBuffer. We give it the buffer we have, connect it, and start it. The result is that we can hear the sound play from the browser window – our equivalent of hitting the play button on Reich's tape recorder.
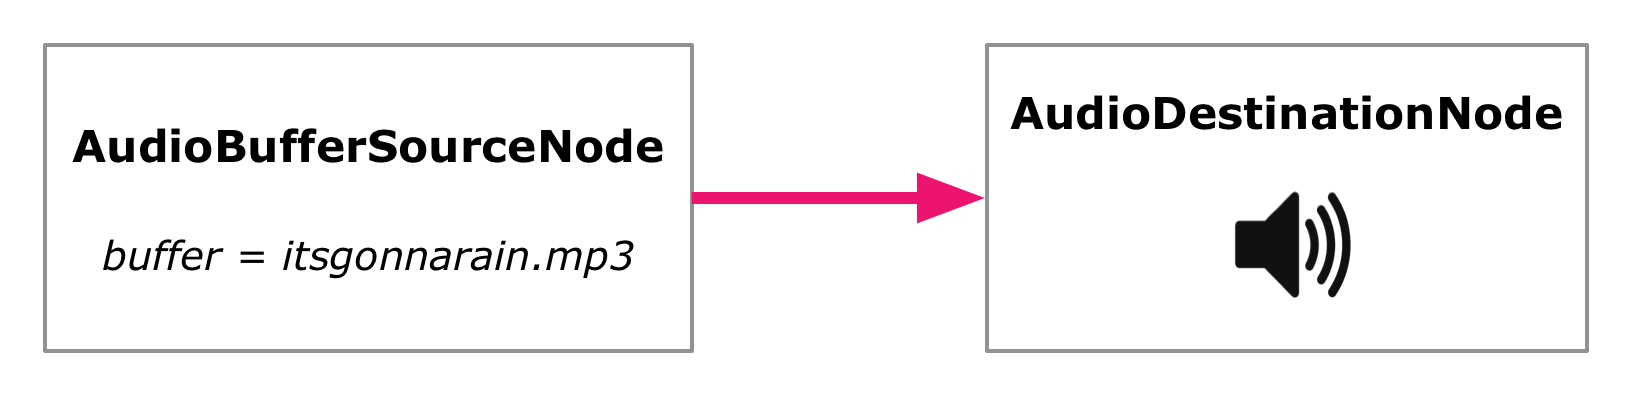
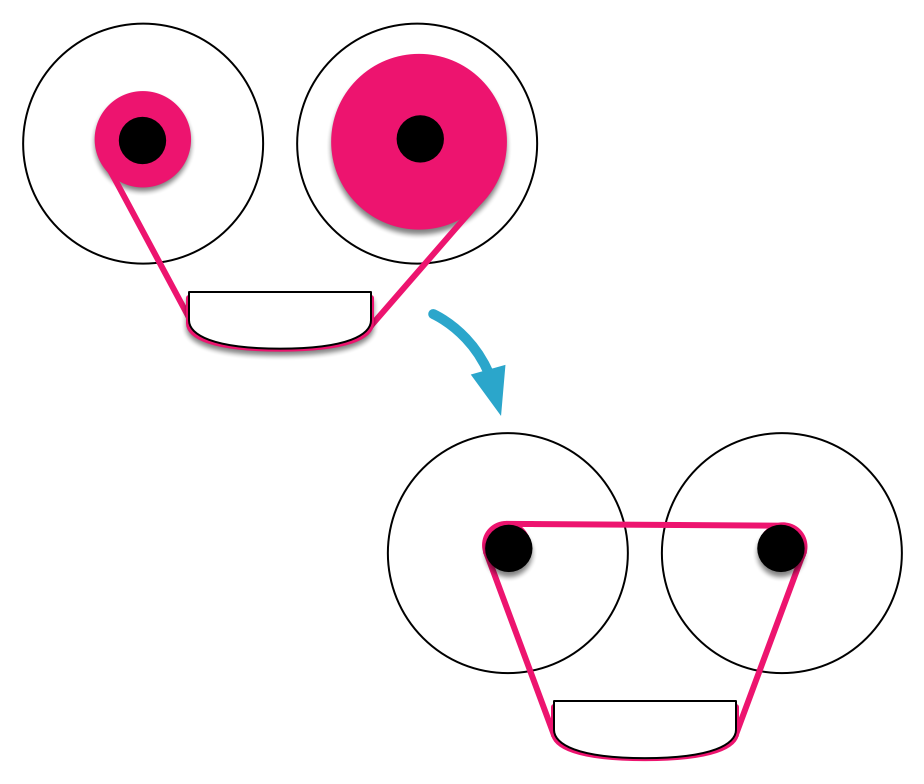
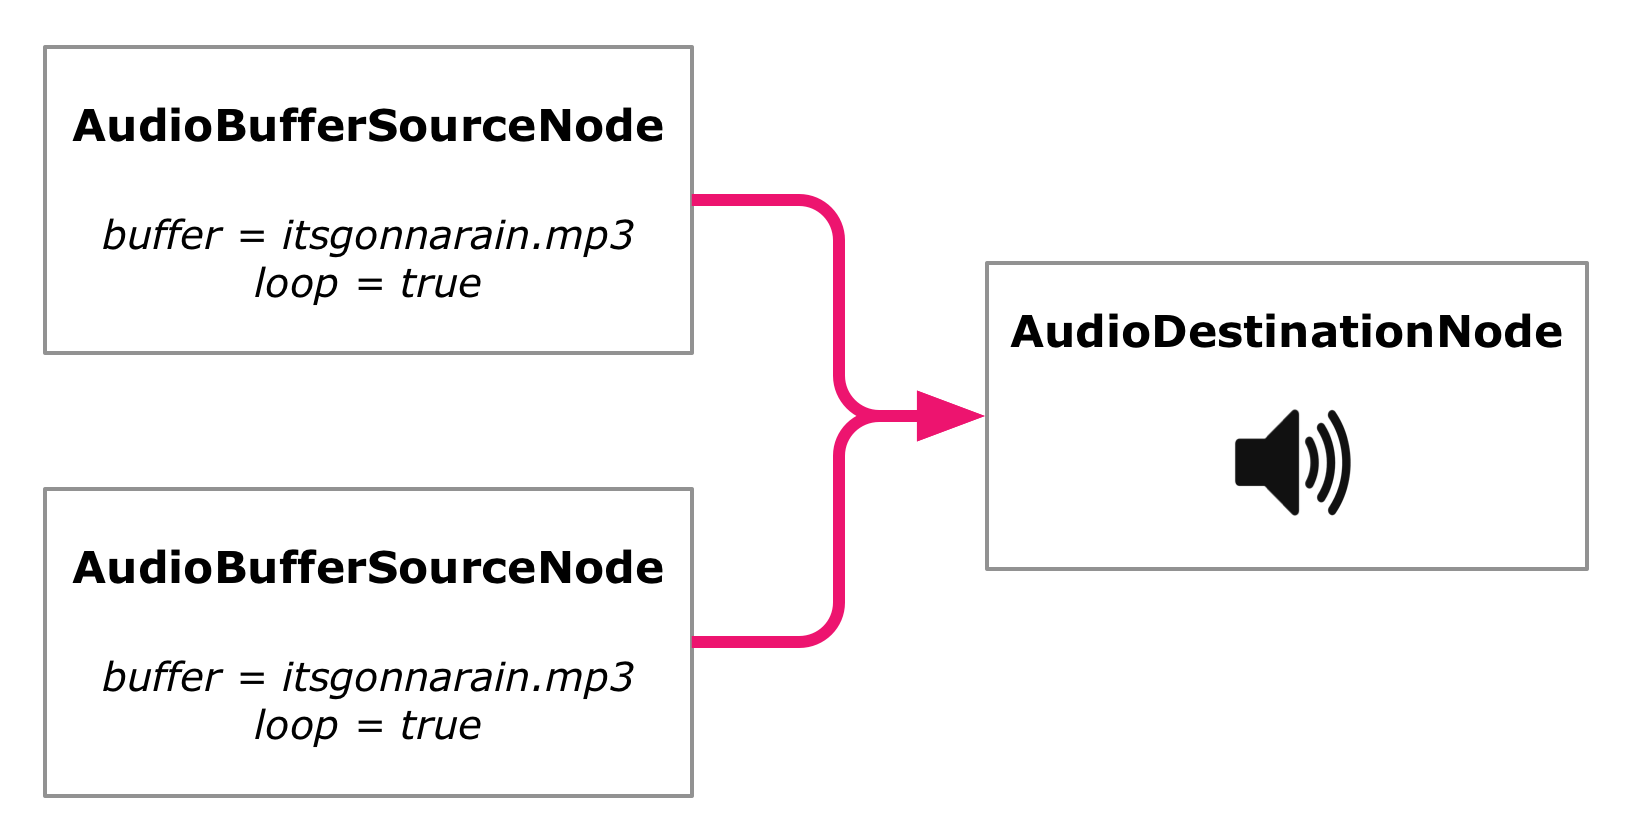
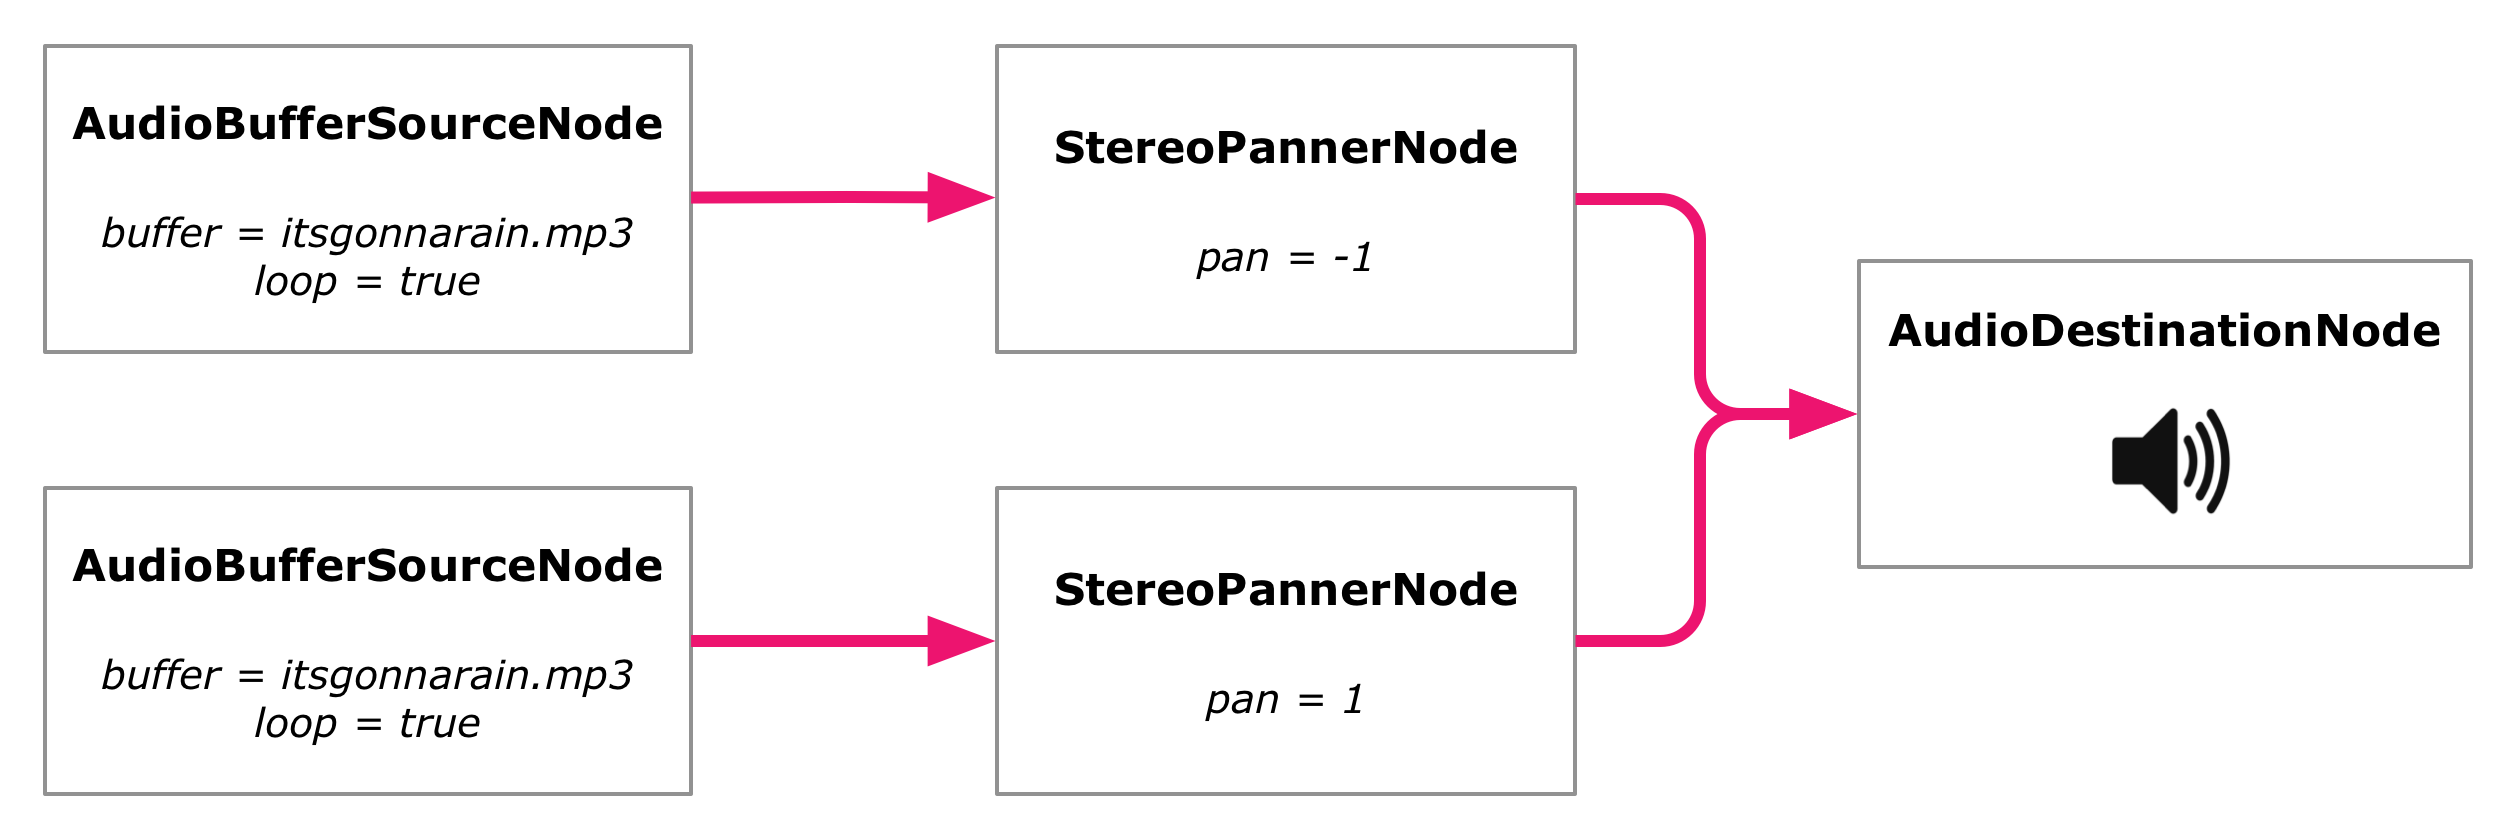

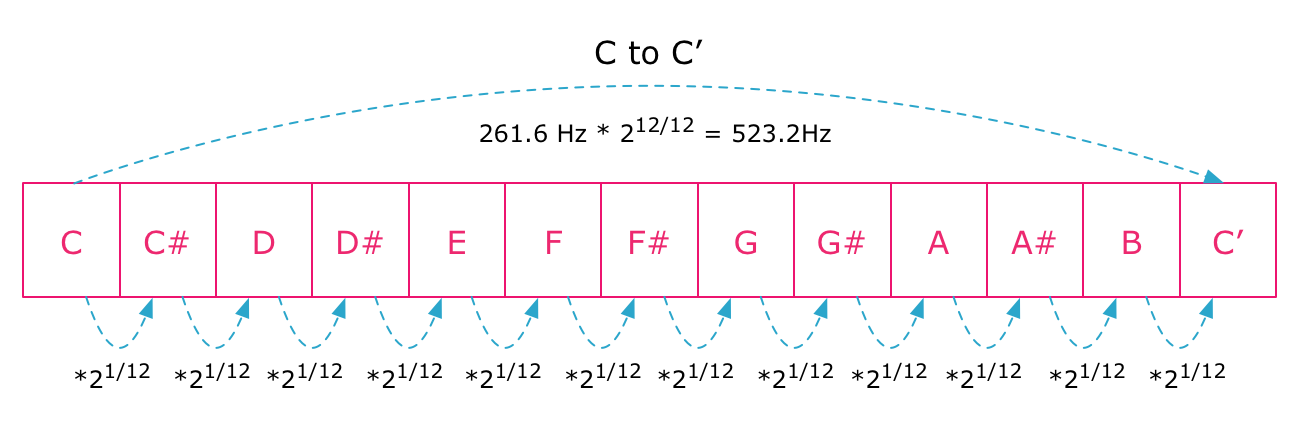
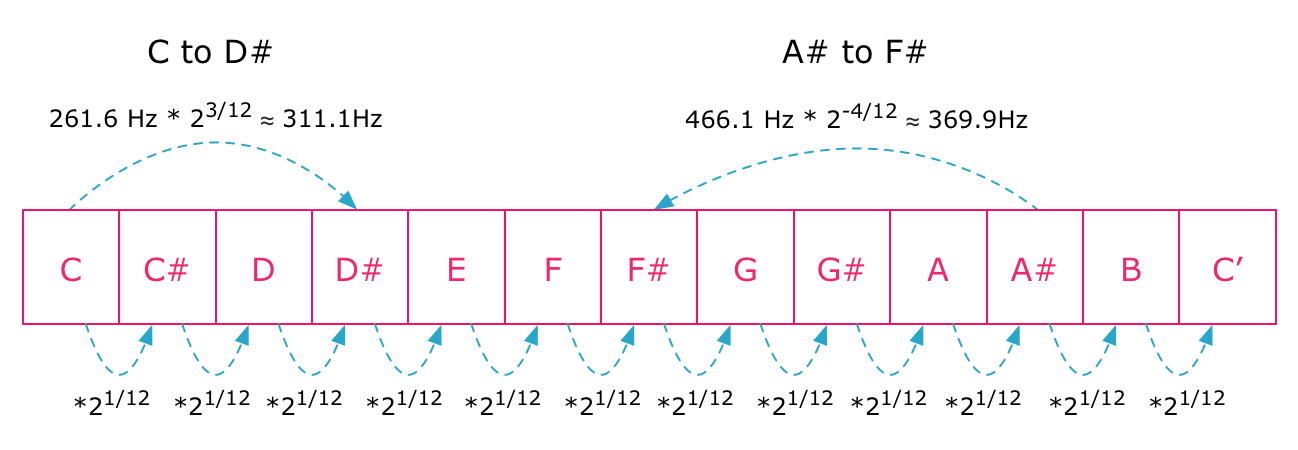
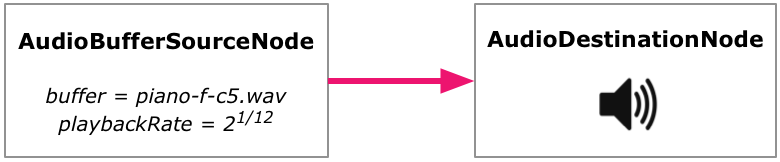
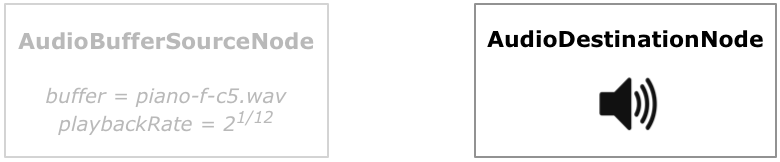

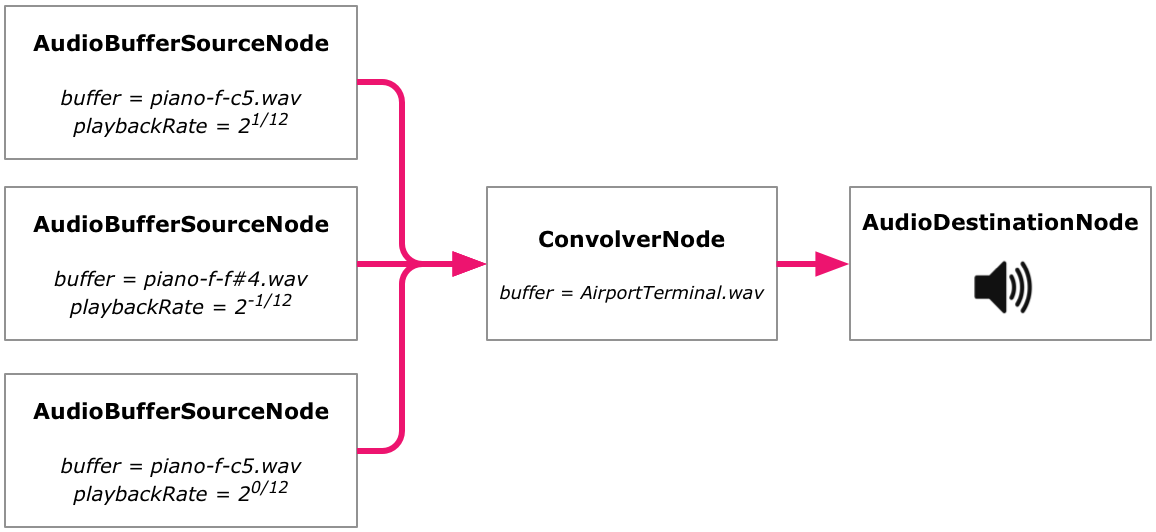
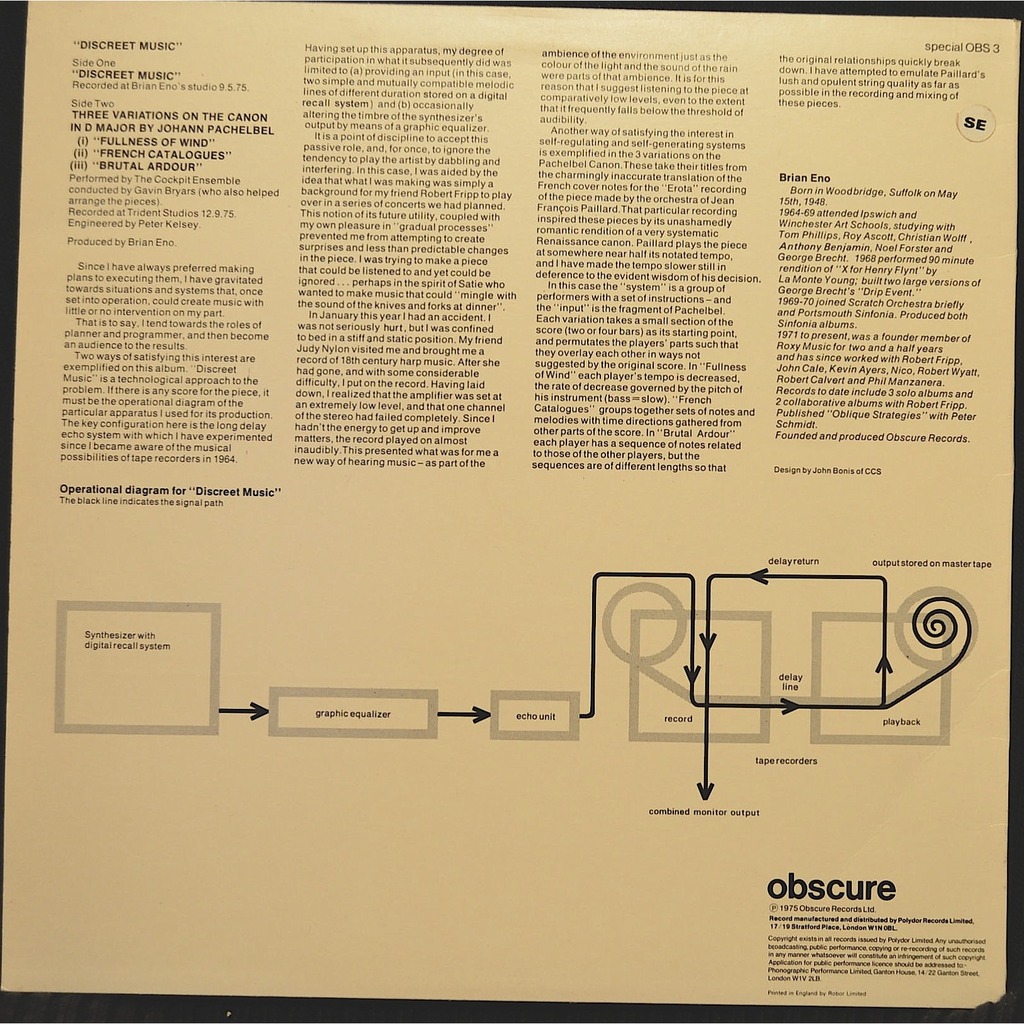
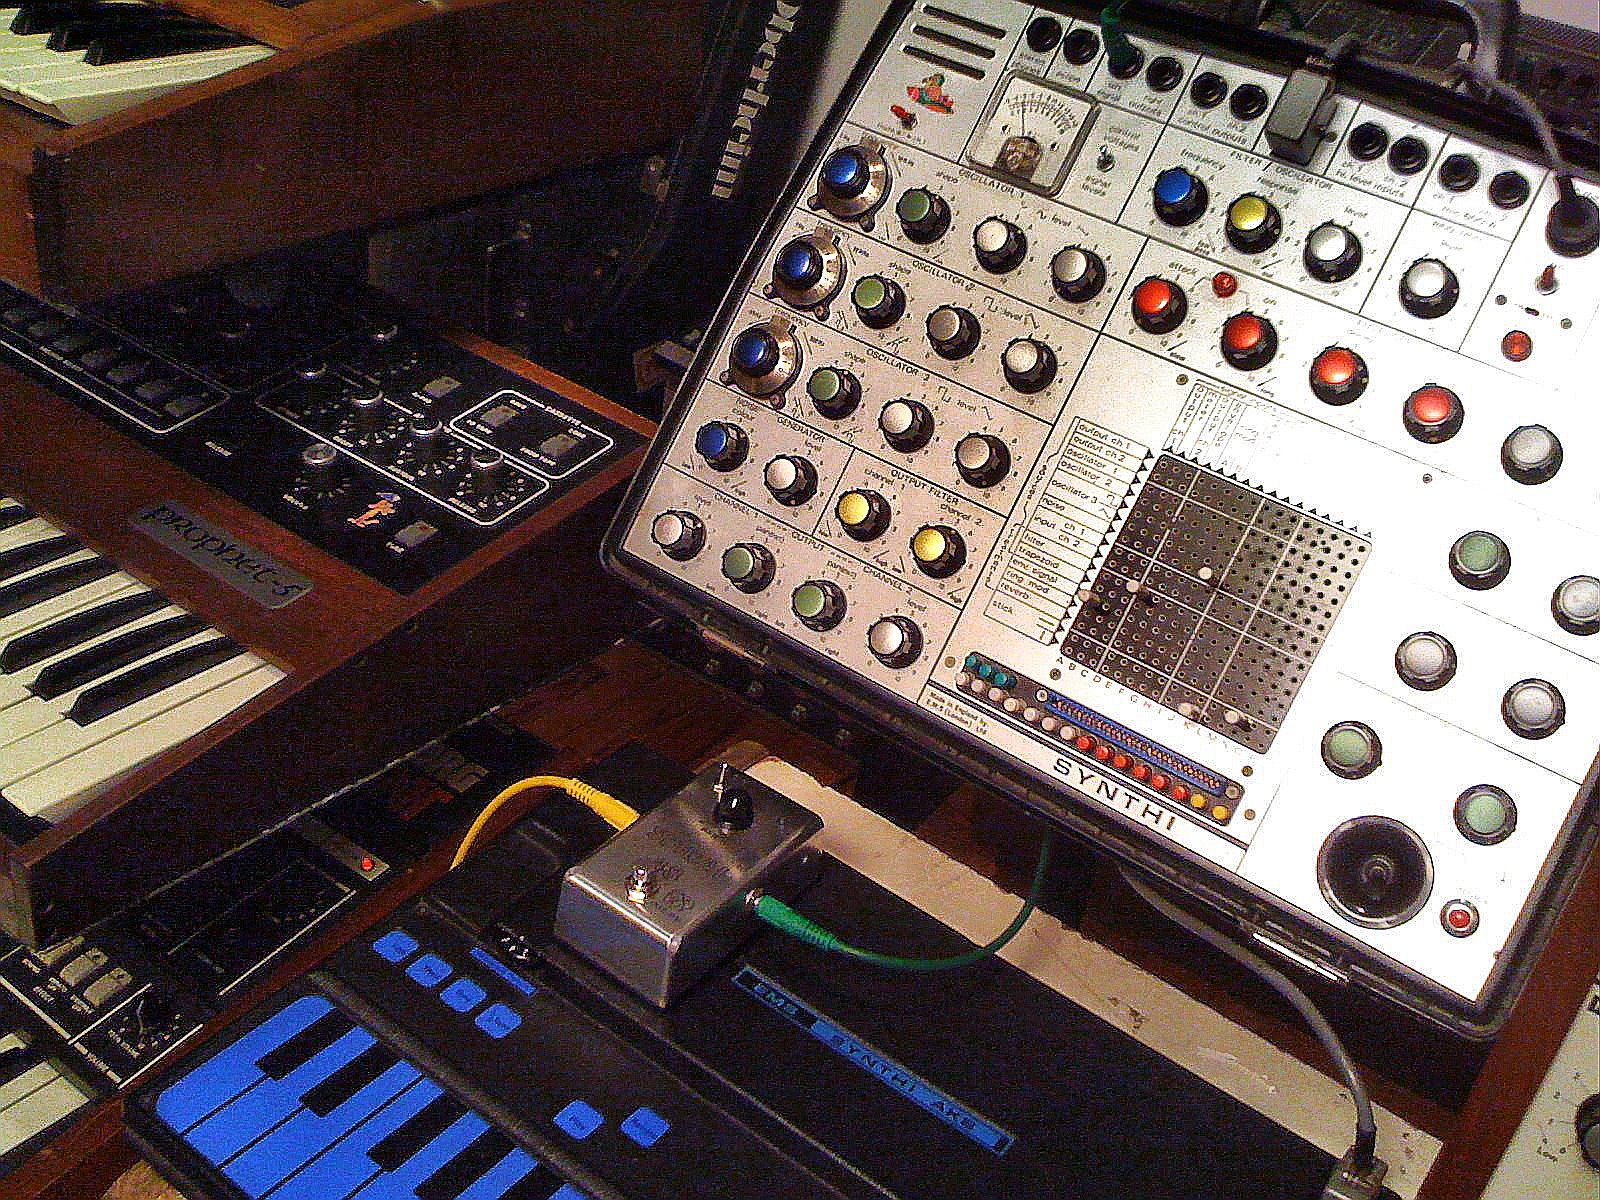
 ), which is the default for MonoSynth. Let's change it to a sawtooth wave (
 ). This will result in a very different kind of sound:
 ).
). ).
).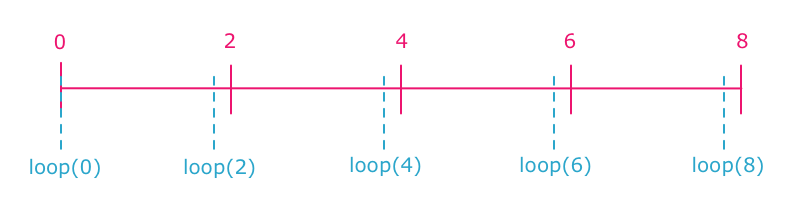
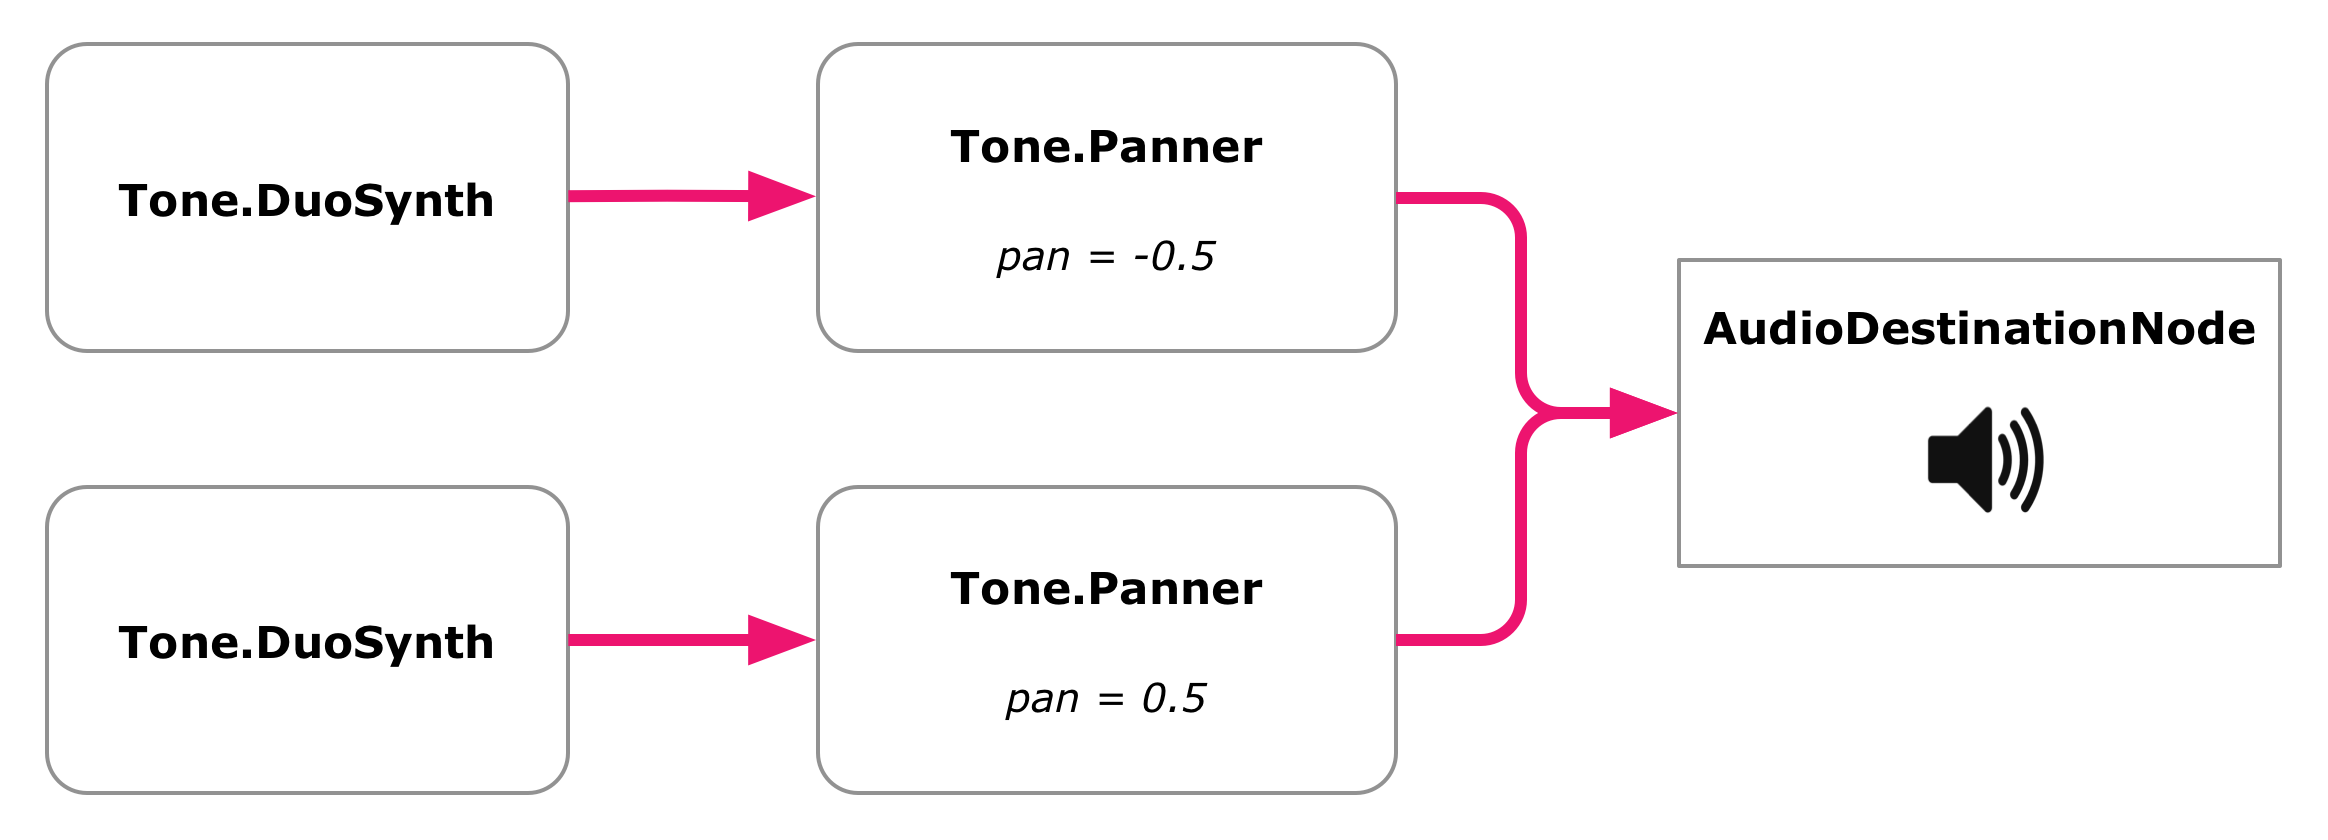
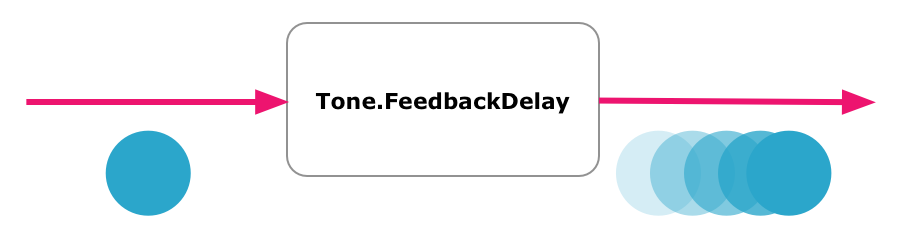
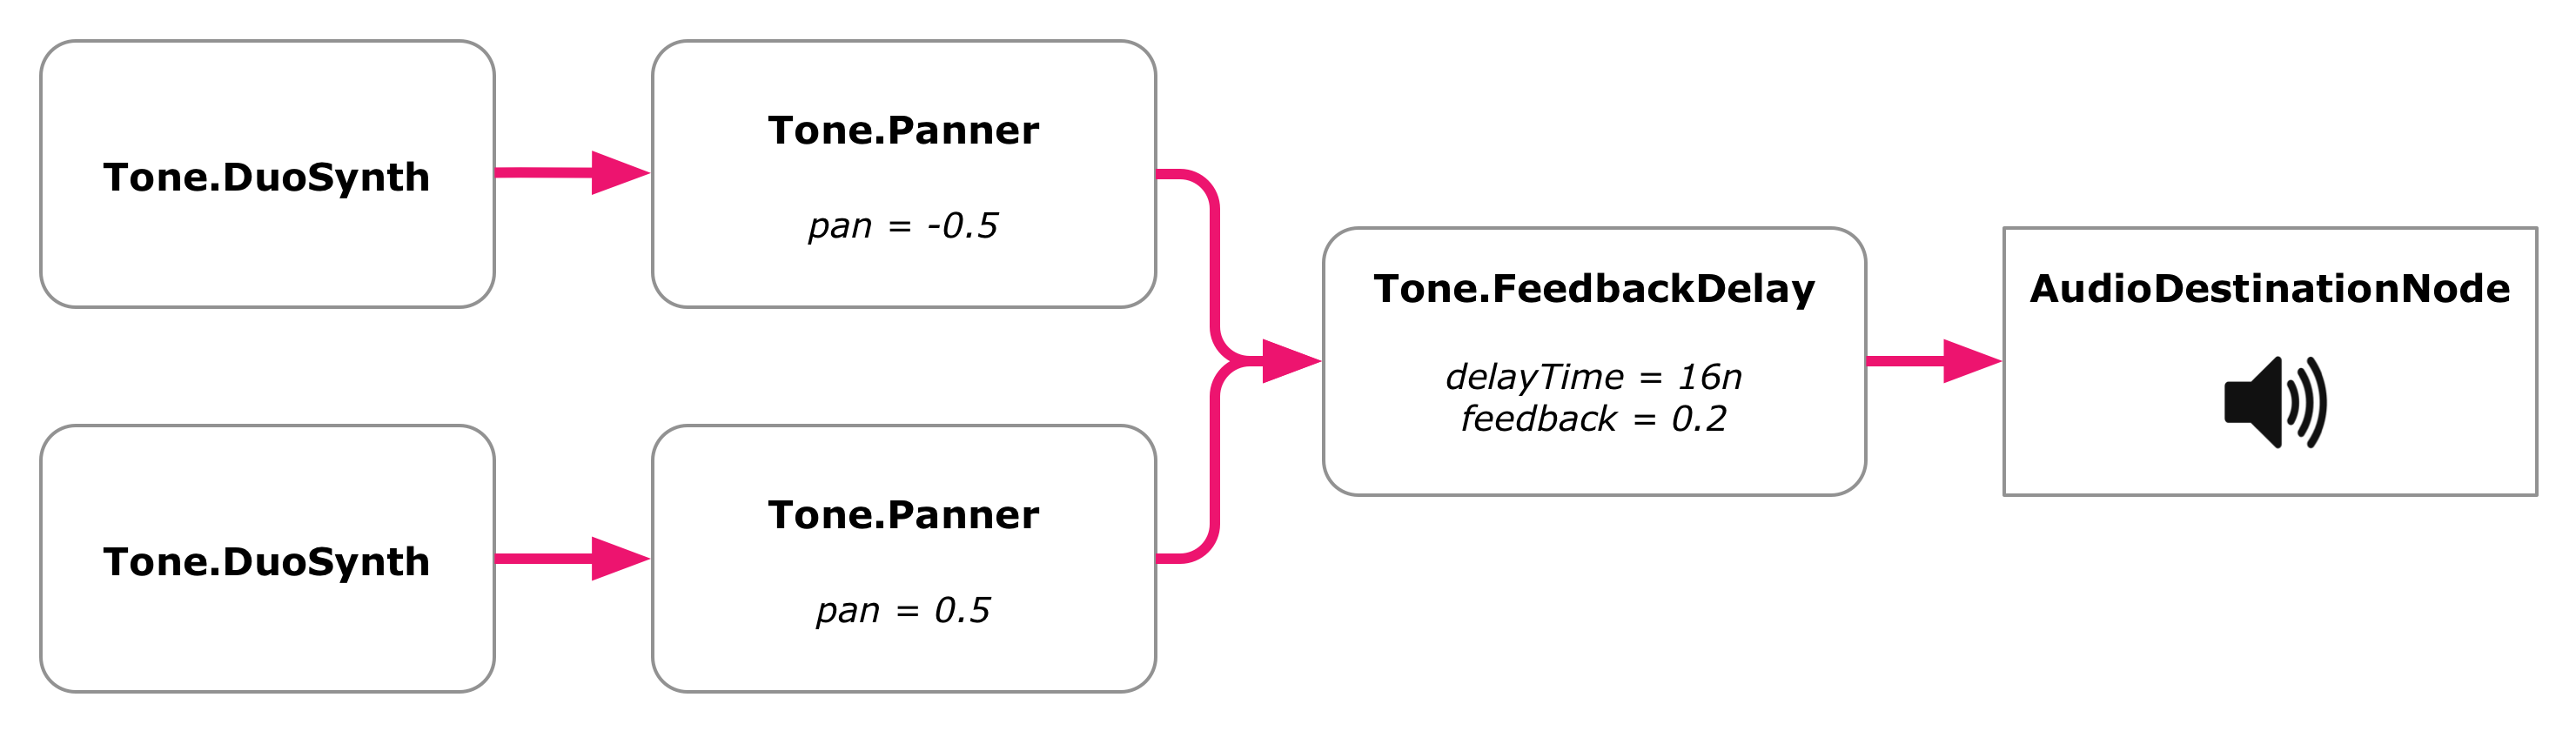

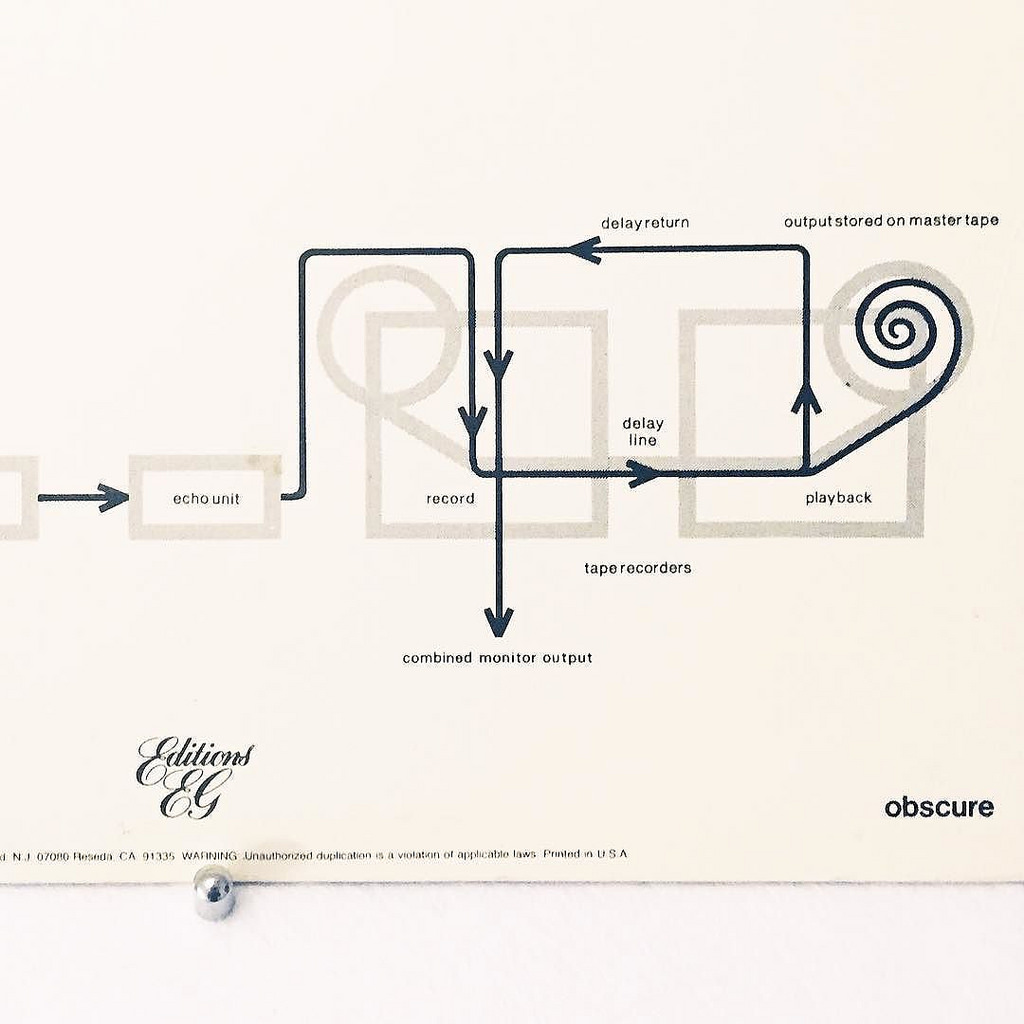
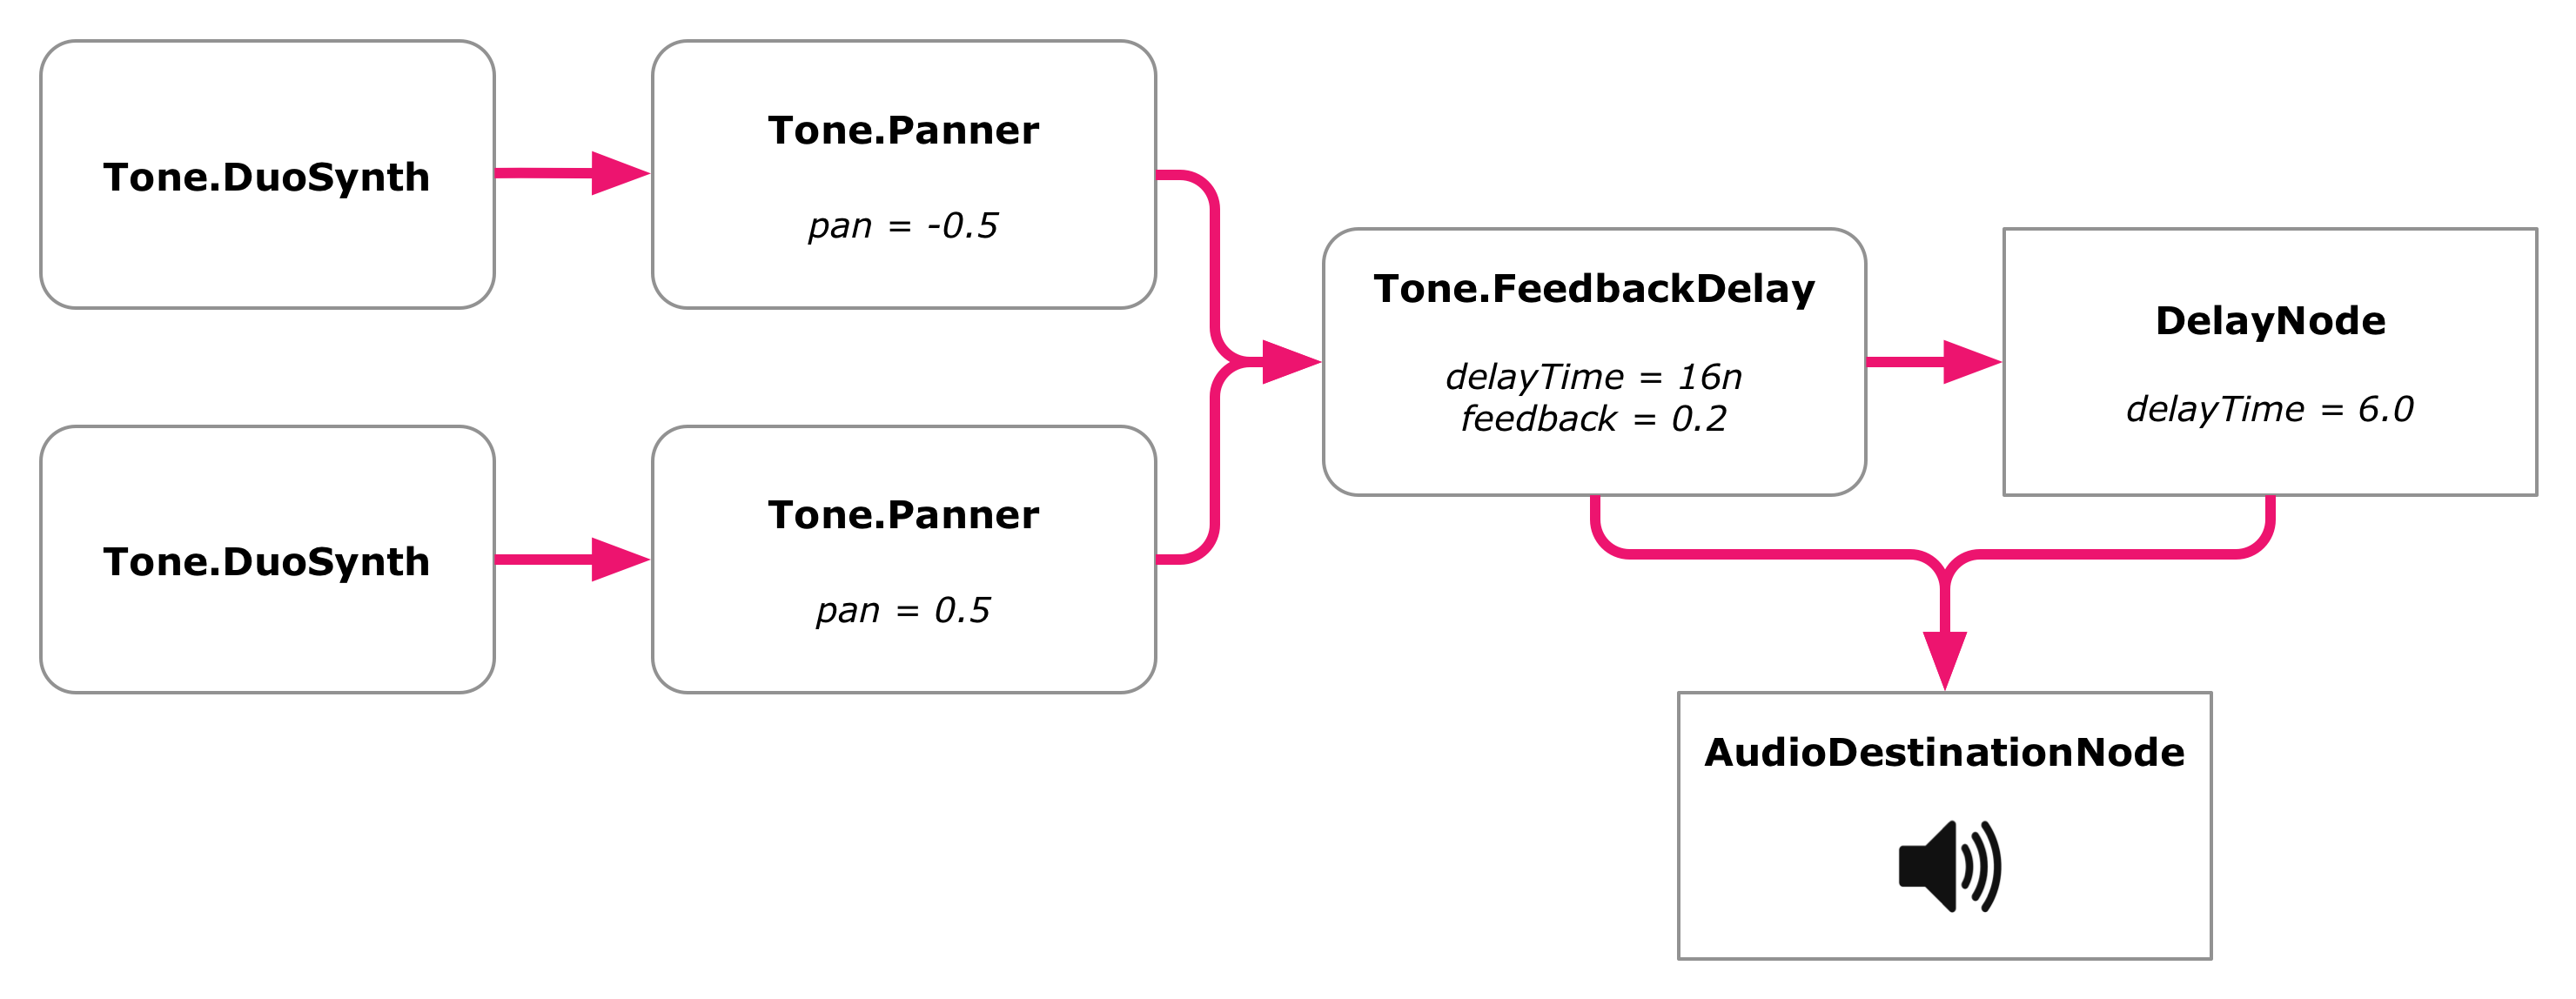
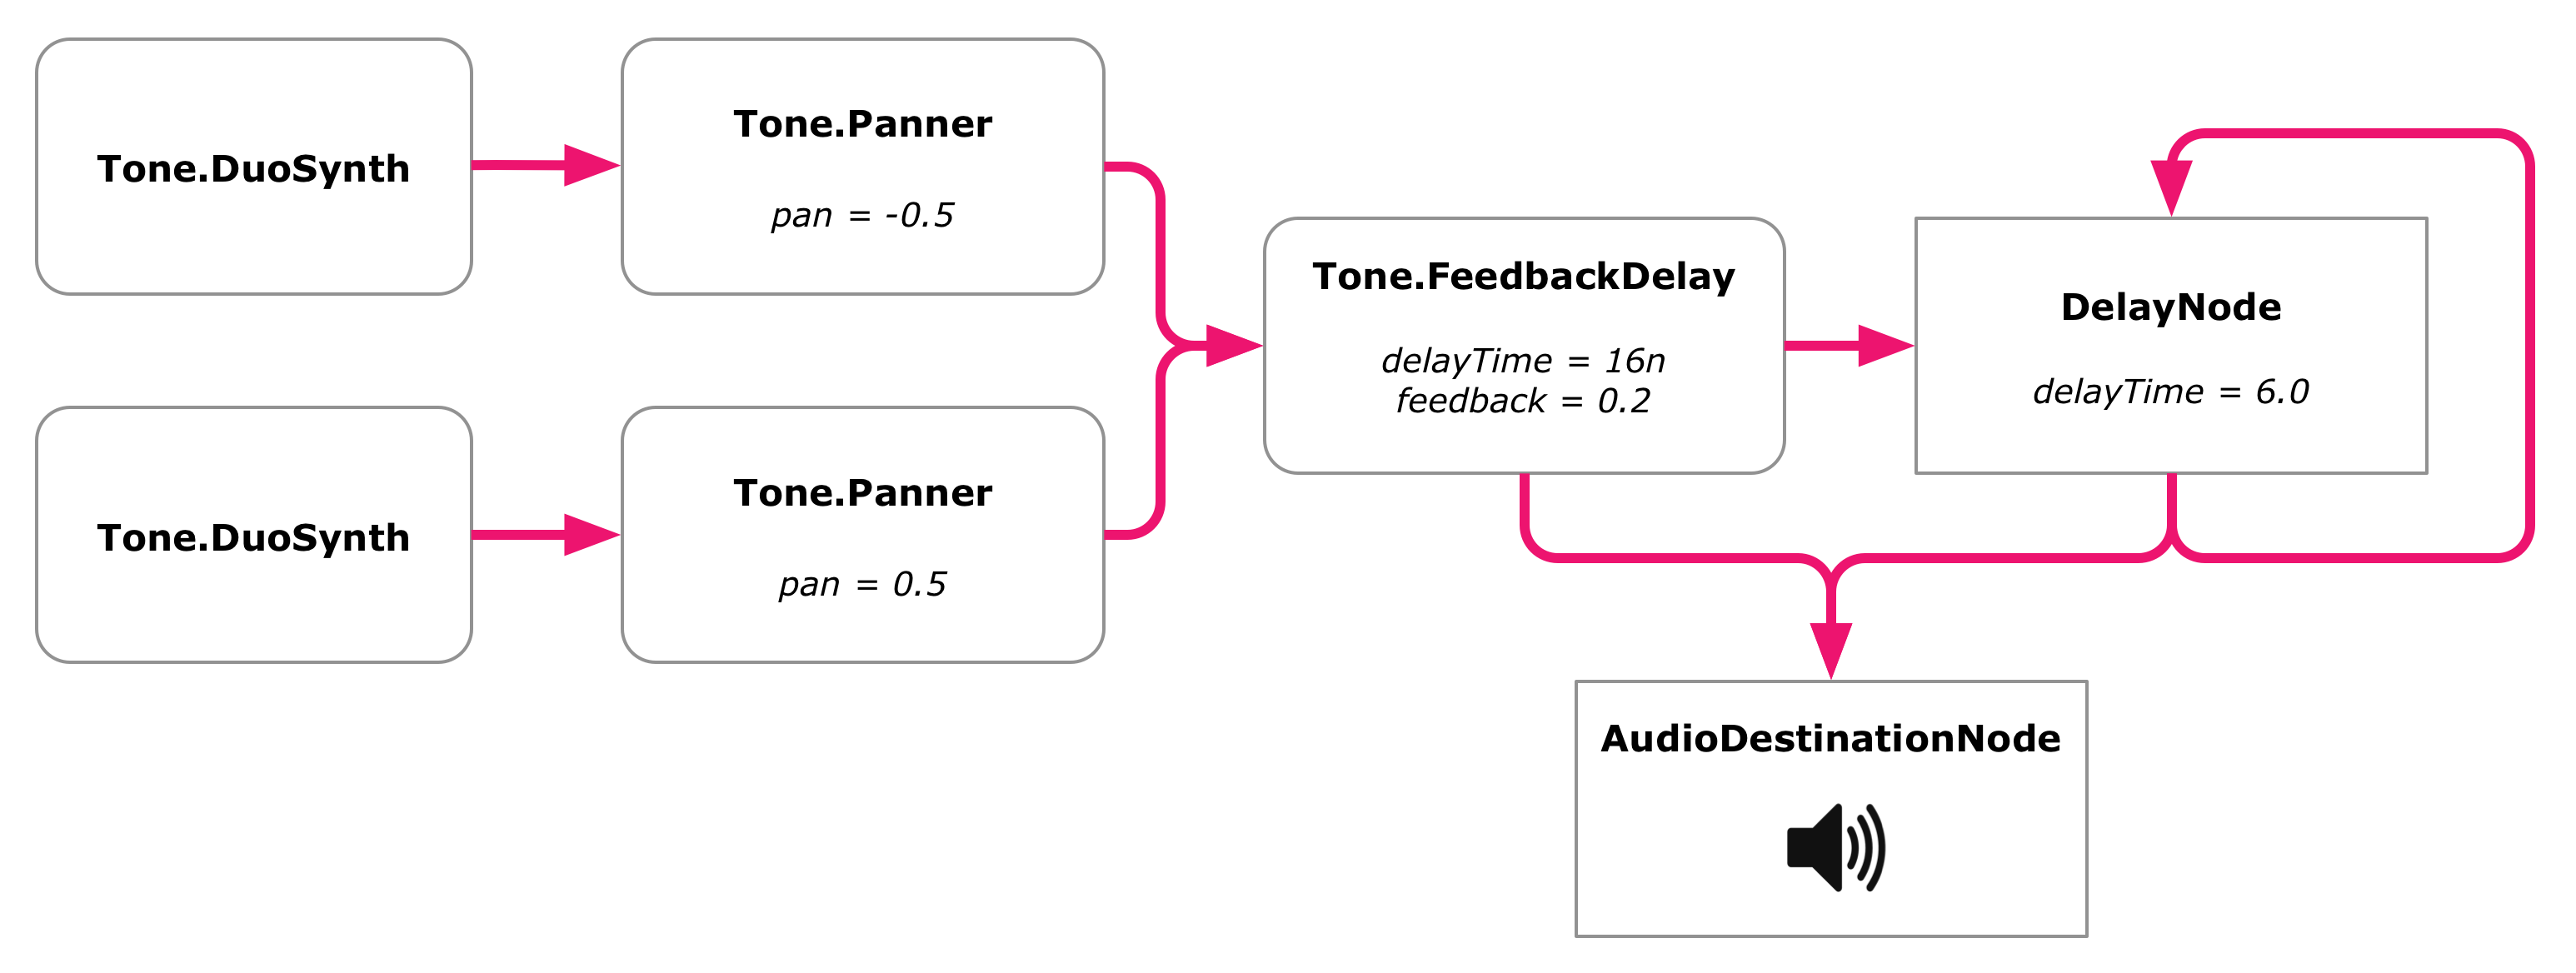
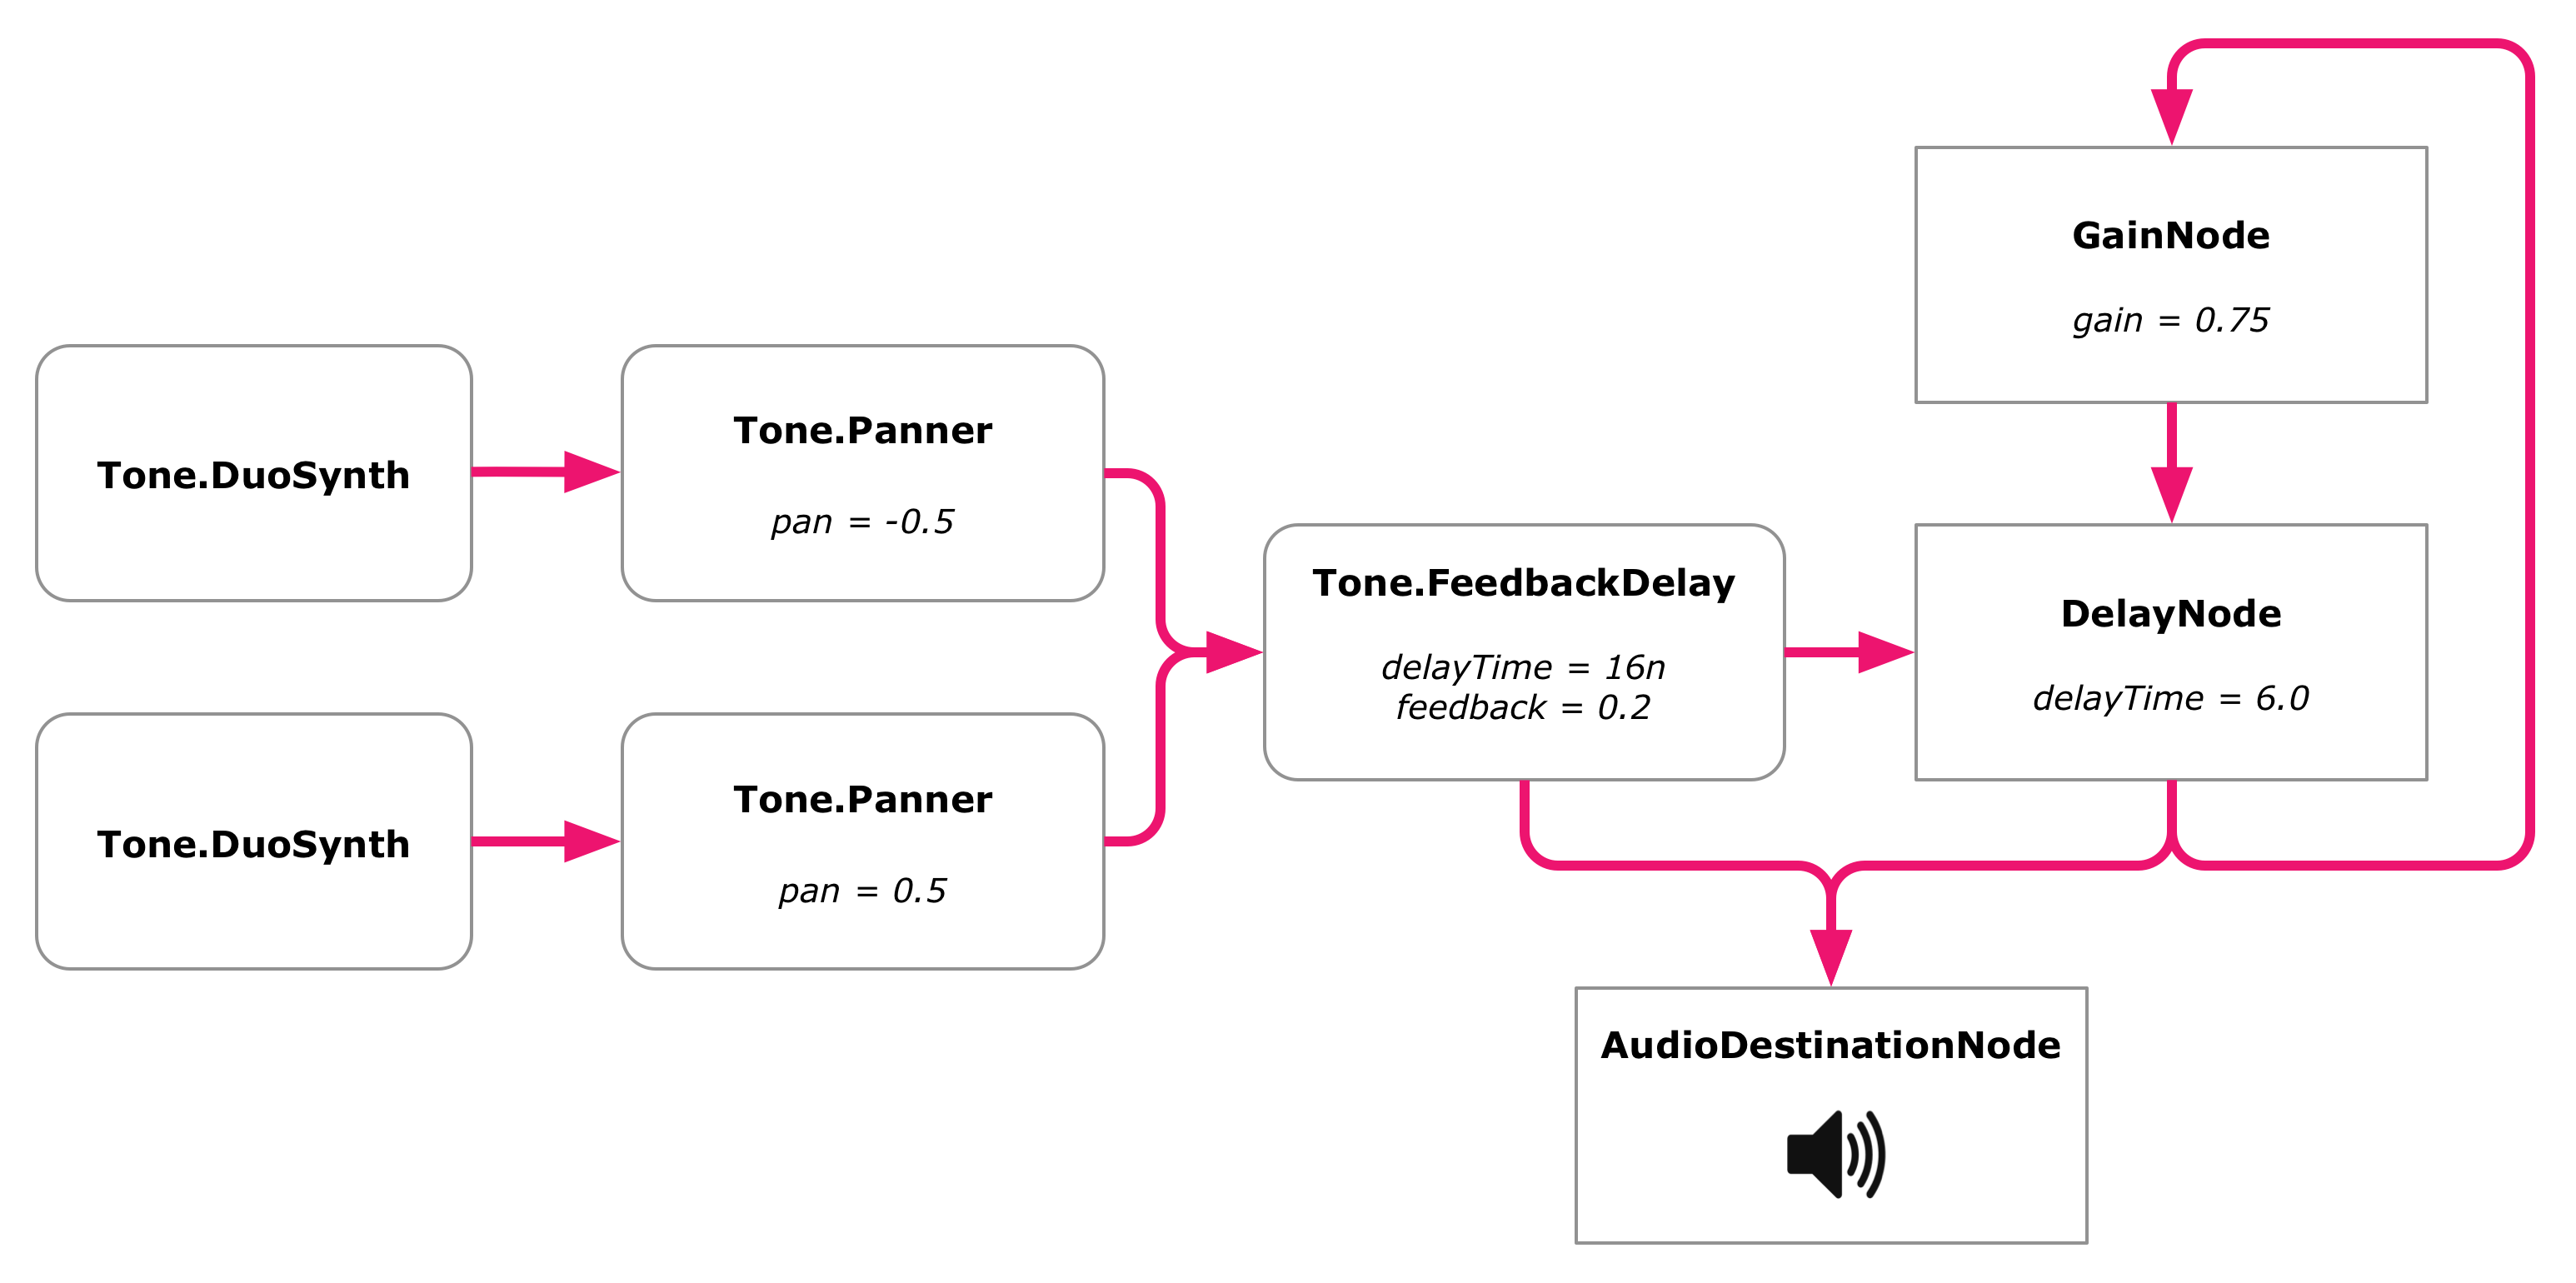
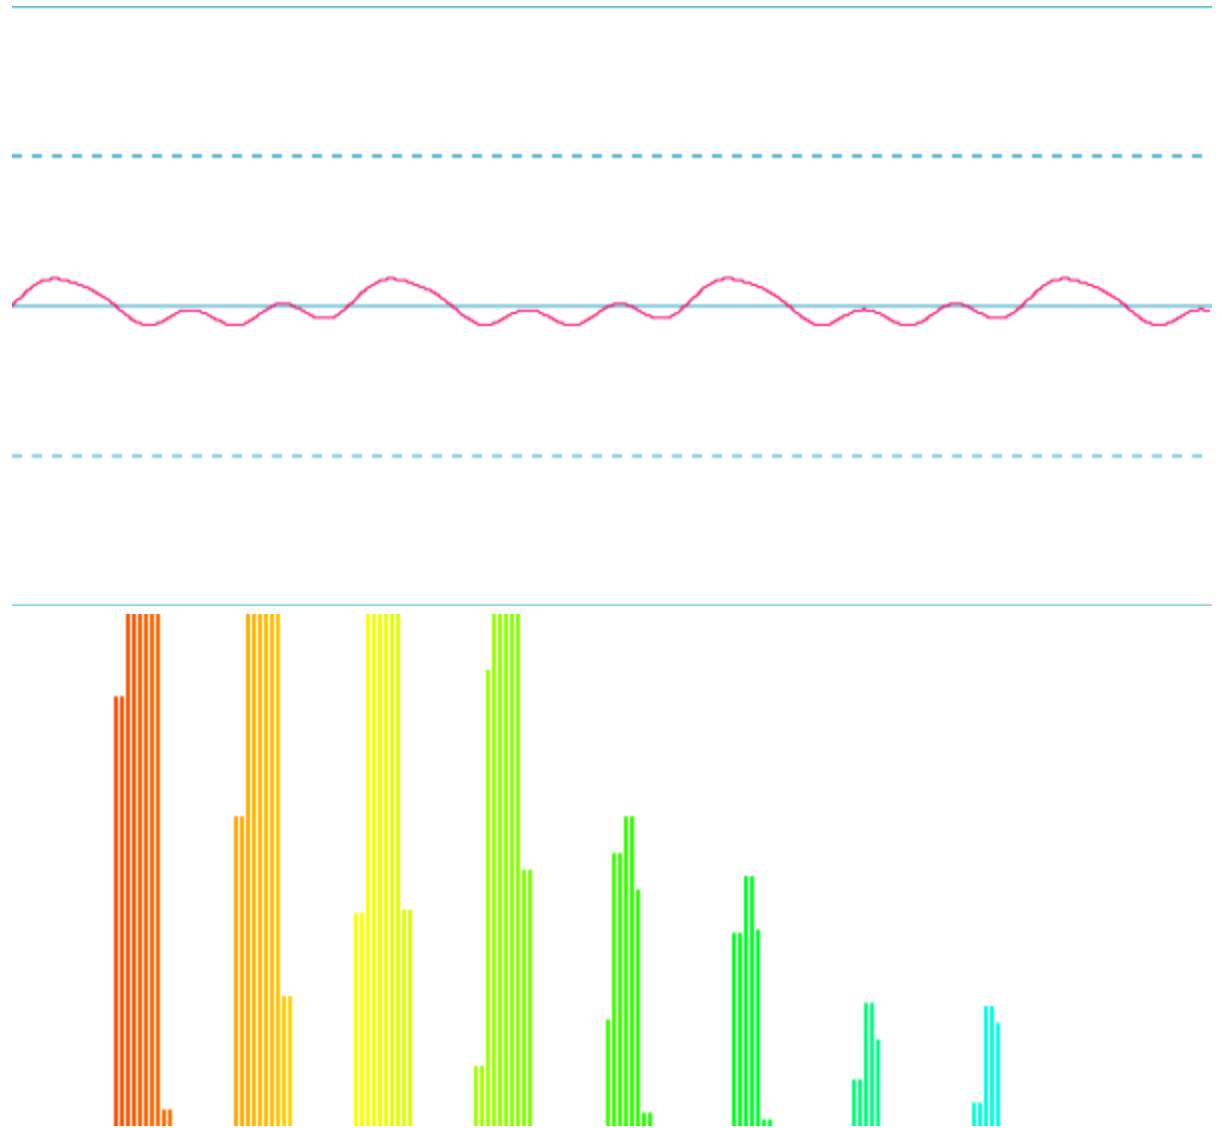
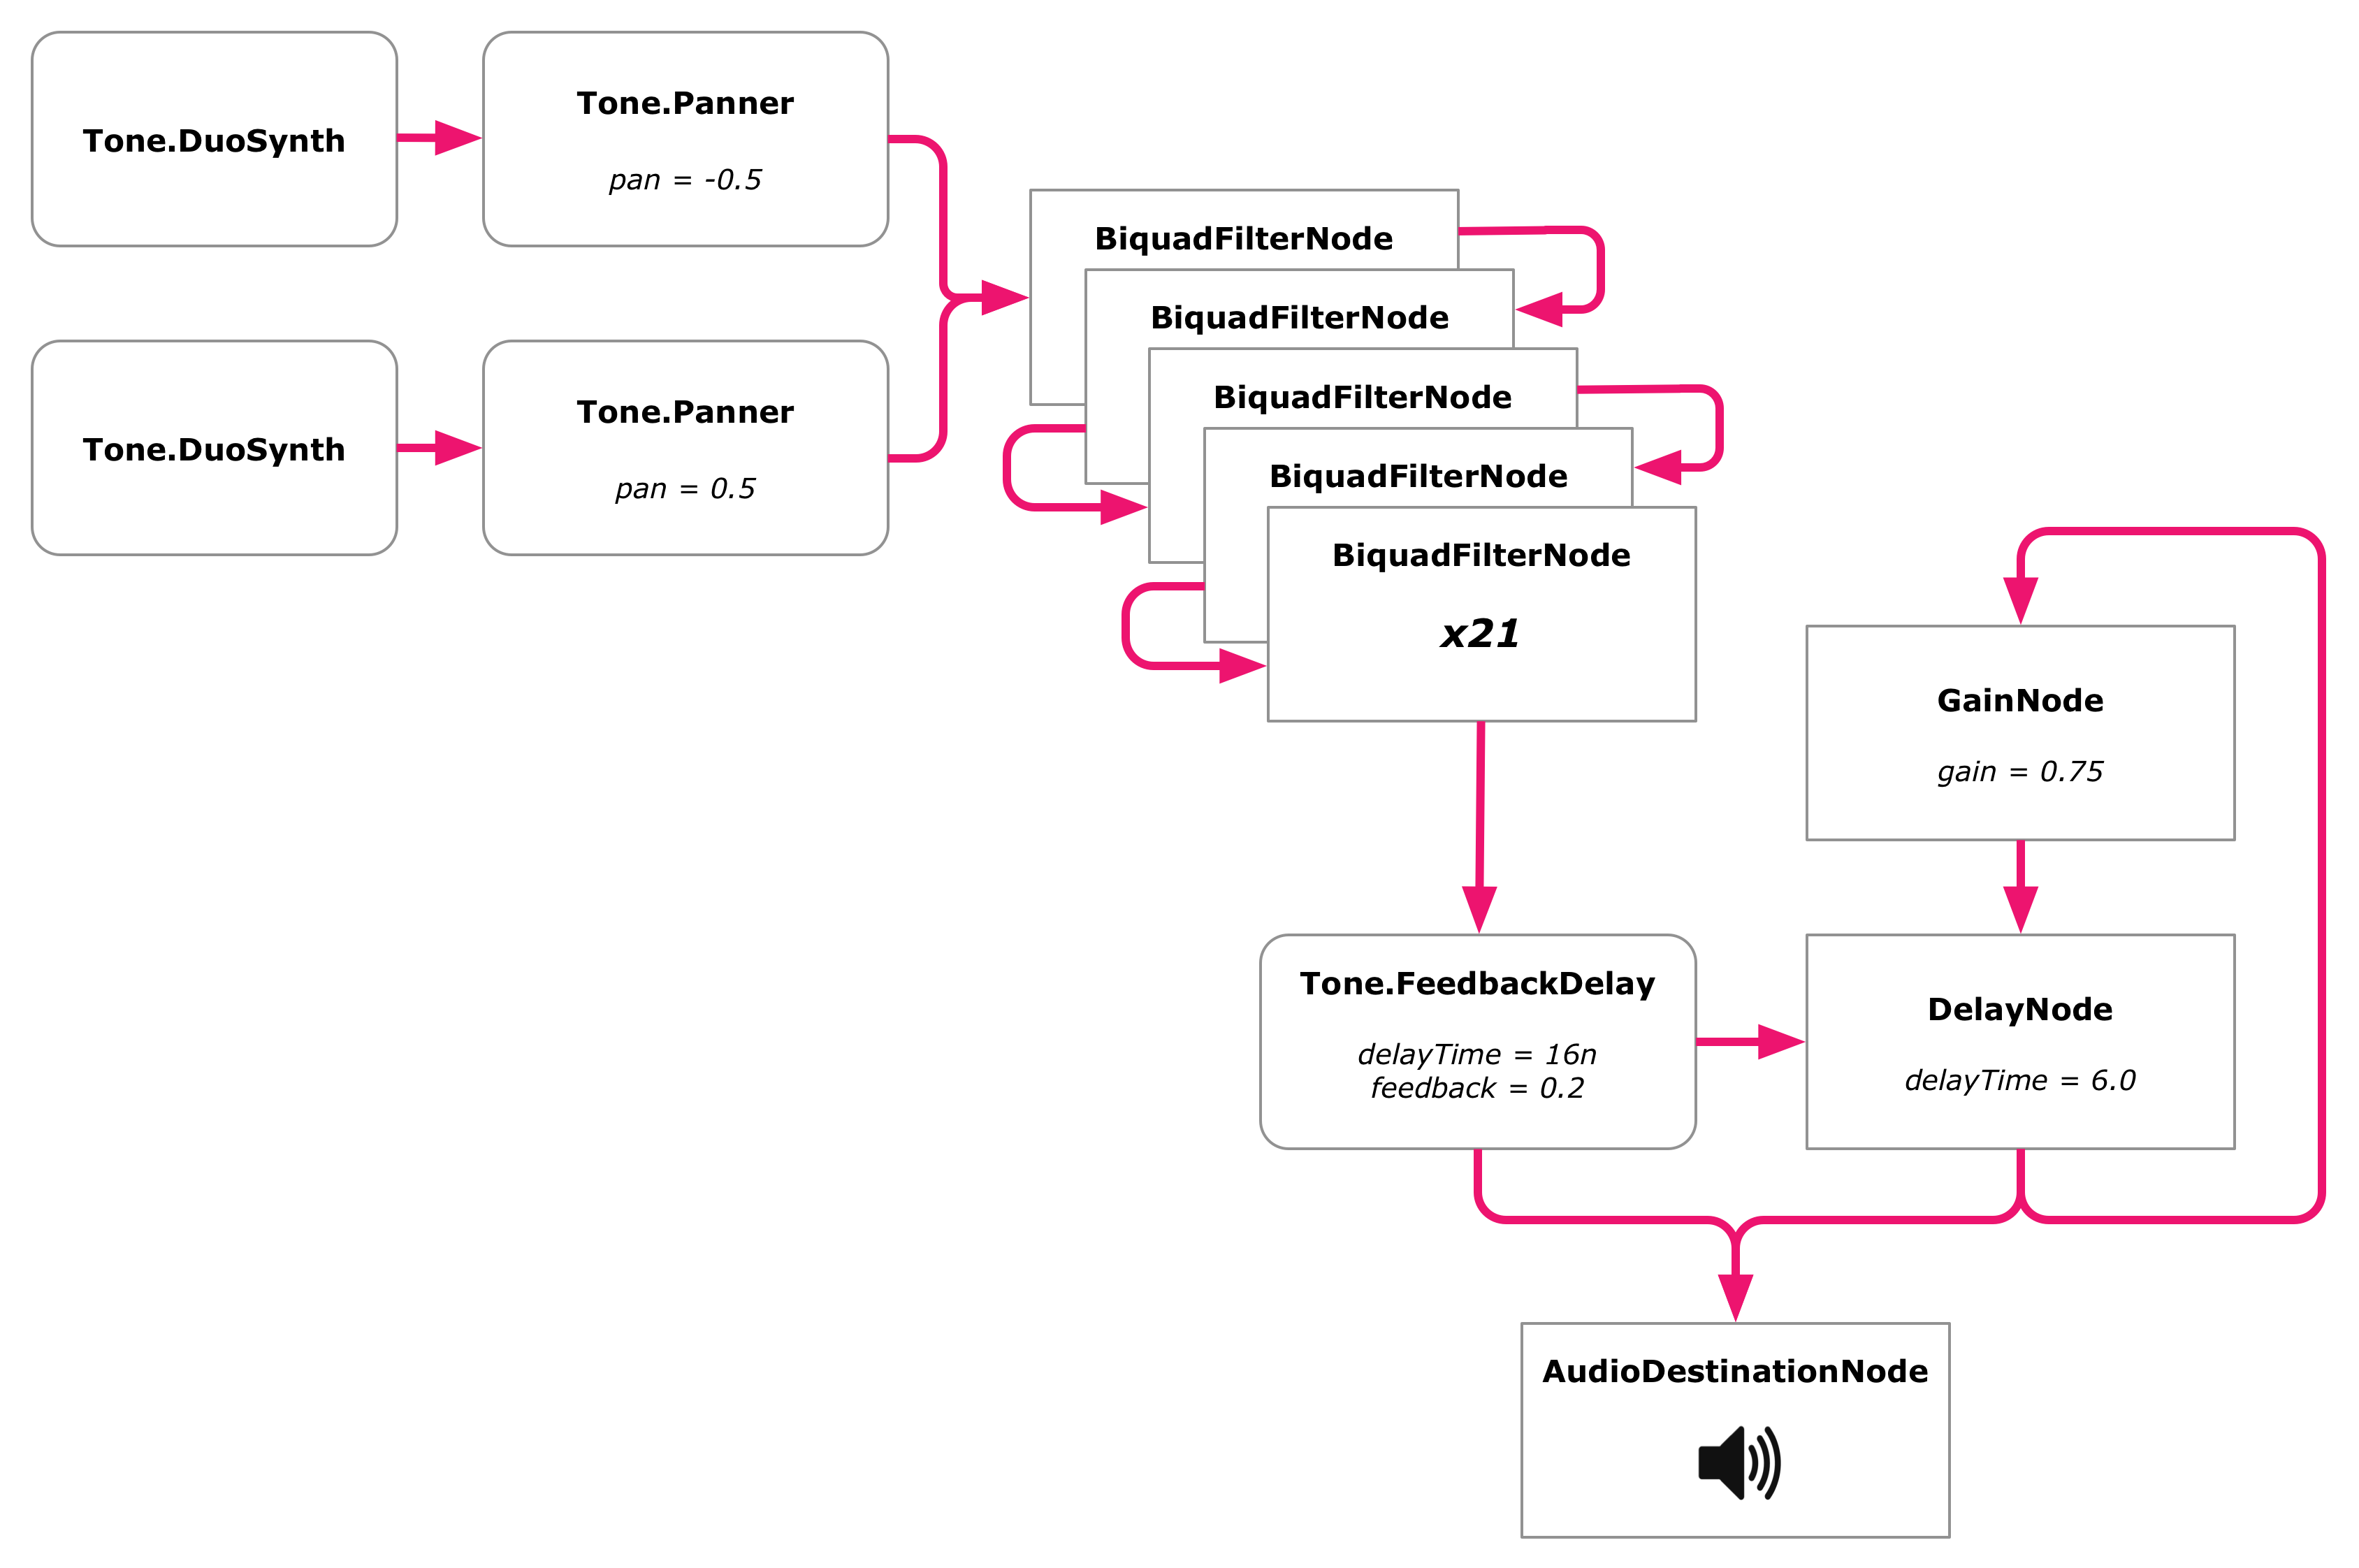
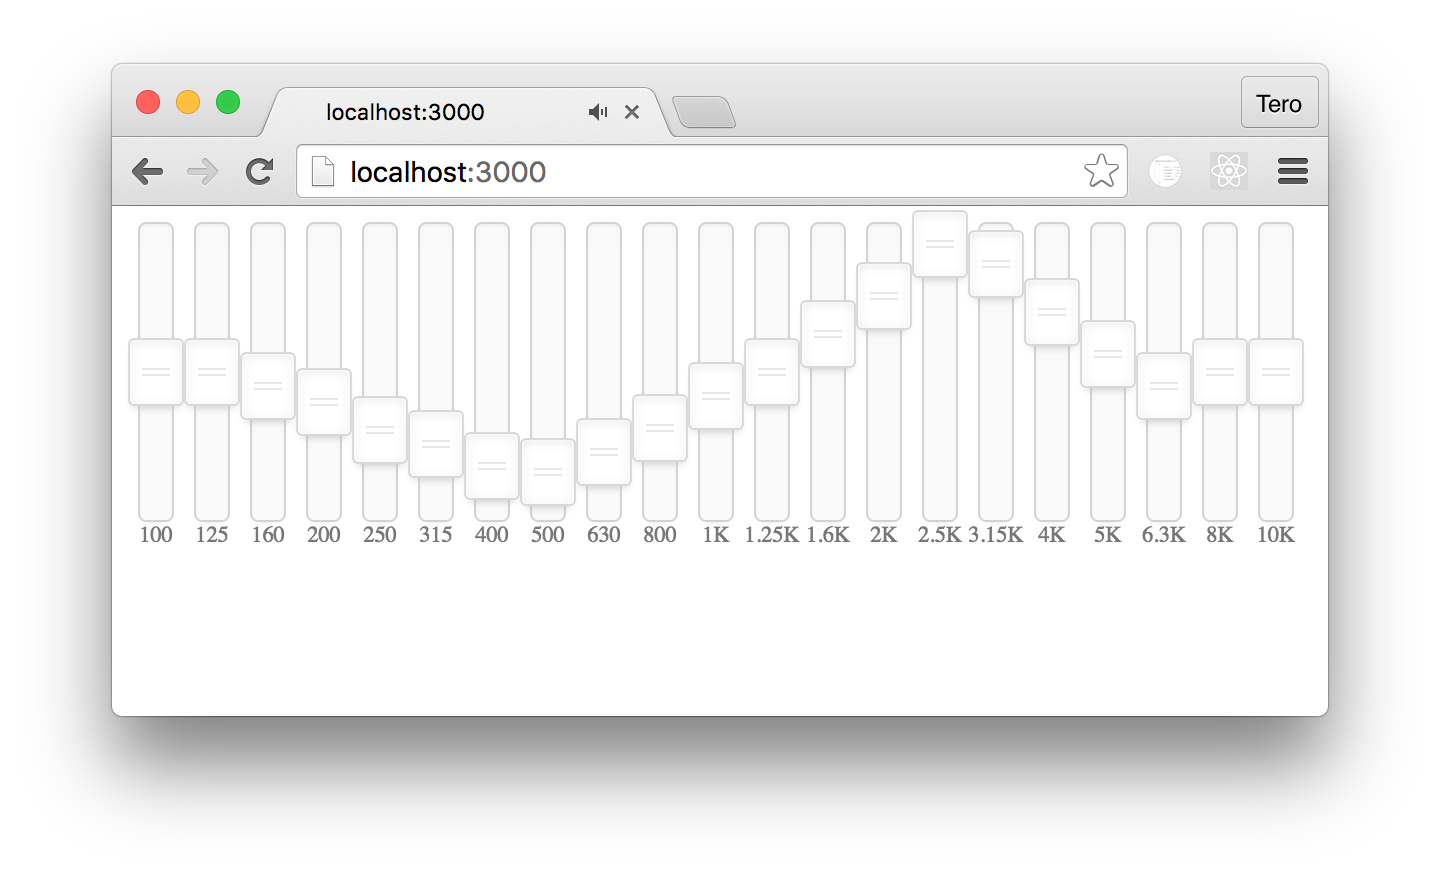 There's a tiny problem with it though, which is that it doesn't actually work. Sliding the knobs has no effect. This is simply because we haven't connected the slider values to the
.jpg)