A Comprehensive Guide to Test-First Development with Redux, React, and Immutable
Update 2016-02-24: Updated react-router to 2.0.0. In tests, replaced use of deprecated setProps() with ReactDOM.render(). Also now using the react-addons-test-utils package so that no imports of 'react/addons' are needed anywhere.
Update 2015-11-06: Updated to the new Babel 6 release. The Babel packages we need to install are now a bit different, and an additional "babel" section is needed in the package.json in both projects.
Update 2015-10-09: Updated to React 0.14, React Router 1.0.0 RC3, and jsdom 6.x. The changes include:
- Installing and using React and ReactDOM separately.
- Using the PureRenderMixin from a separate NPM package.
- Changing the way the routes are set up in
index.jsx - Changing the way the current route's contents are populated into
App.jsx - Removing the
getDOMNode()calls in unit tests, as the test helpers now directly return the DOM nodes.
Update 2015-09-19: Clarified which version of the React Router is used. Various other small fixes and improvements. Thanks to Jesus Rodriguez and everyone who has been suggesting fixed in the comments!
Redux is one of the most exciting things happening in JavaScript at the moment. It stands out from the landscape of libraries and frameworks by getting so many things absolutely right: A simple, predictable state model. An emphasis on functional programming and immutable data. A tiny, focused API... What's not to like?
Redux is a very small library and learning all of its APIs is not very difficult. But for many people, it creates a paradigm shift: The tiny amount of building blocks and the self-imposed limitations of pure functions and immutable data may make one feel constrained. How exactly do you get things done?
This tutorial will guide you through building a full-stack Redux and Immutable-js application from scratch. We'll go through all the steps of constructing a Node+Redux backend and a React+Redux frontend for a real-world application, using test-first development. In our toolbox will also be ES6, Babel, Socket.io, Webpack, and Mocha. It's an intriguing stack, and you'll be up to speed with it in no time!
Table of Contents
- Table of Contents
- What You Will Need
- The App
- The Architecture
-
The Server Application
- Designing The Application State Tree
- Project Setup
- Getting Comfortable With Immutable
- Writing The Application Logic With Pure Functions
- Introducing Actions and Reducers
- A Taste of Reducer Composition
- Introducing The Redux Store
- Setting Up a Socket.io Server
- Broadcasting State from A Redux Listener
- Receiving Remote Redux Actions
-
The Client Application
- Client Project Setup
- React and react-hot-loader
- Writing The UI for The Voting Screen
- Writing The UI for The Results Screen And Handling Routing
- Getting Data In from Redux to React
- Setting Up The Socket.io Client
- Receiving Actions From The Server
- Dispatching Actions From React Components
- Sending Actions To The Server Using Redux Middleware
- Exercises
What You Will Need
This tutorial is going to be most useful for developers who know how to write JavaScript aplications. We'll be using Node, ES6, React, Webpack, and Babel, so if you have some familiarity with these tools, you'll have no trouble following along. Even if you don't, you should be able to pick up the basics as we go.
If you're looking for a good introduction to webapp development with React, Webpack, and ES6, I suggest taking a look at the SurviveJS books.
In terms of tools, you'll need to have Node with NPM installed and your favourite text editor ready to go, but that's pretty much it.
The App
We'll be developing an application for organizing live votes for parties, conferences, meetings, and other gatherings of people.
The idea is that we'll have a collection of things to vote from: Movies, songs, programming languages, Horse JS quotes, anything. The app will put them against each other in pairs, so that on each round people can vote for their favorite of the pair. When there's just one thing left, that's the winner.
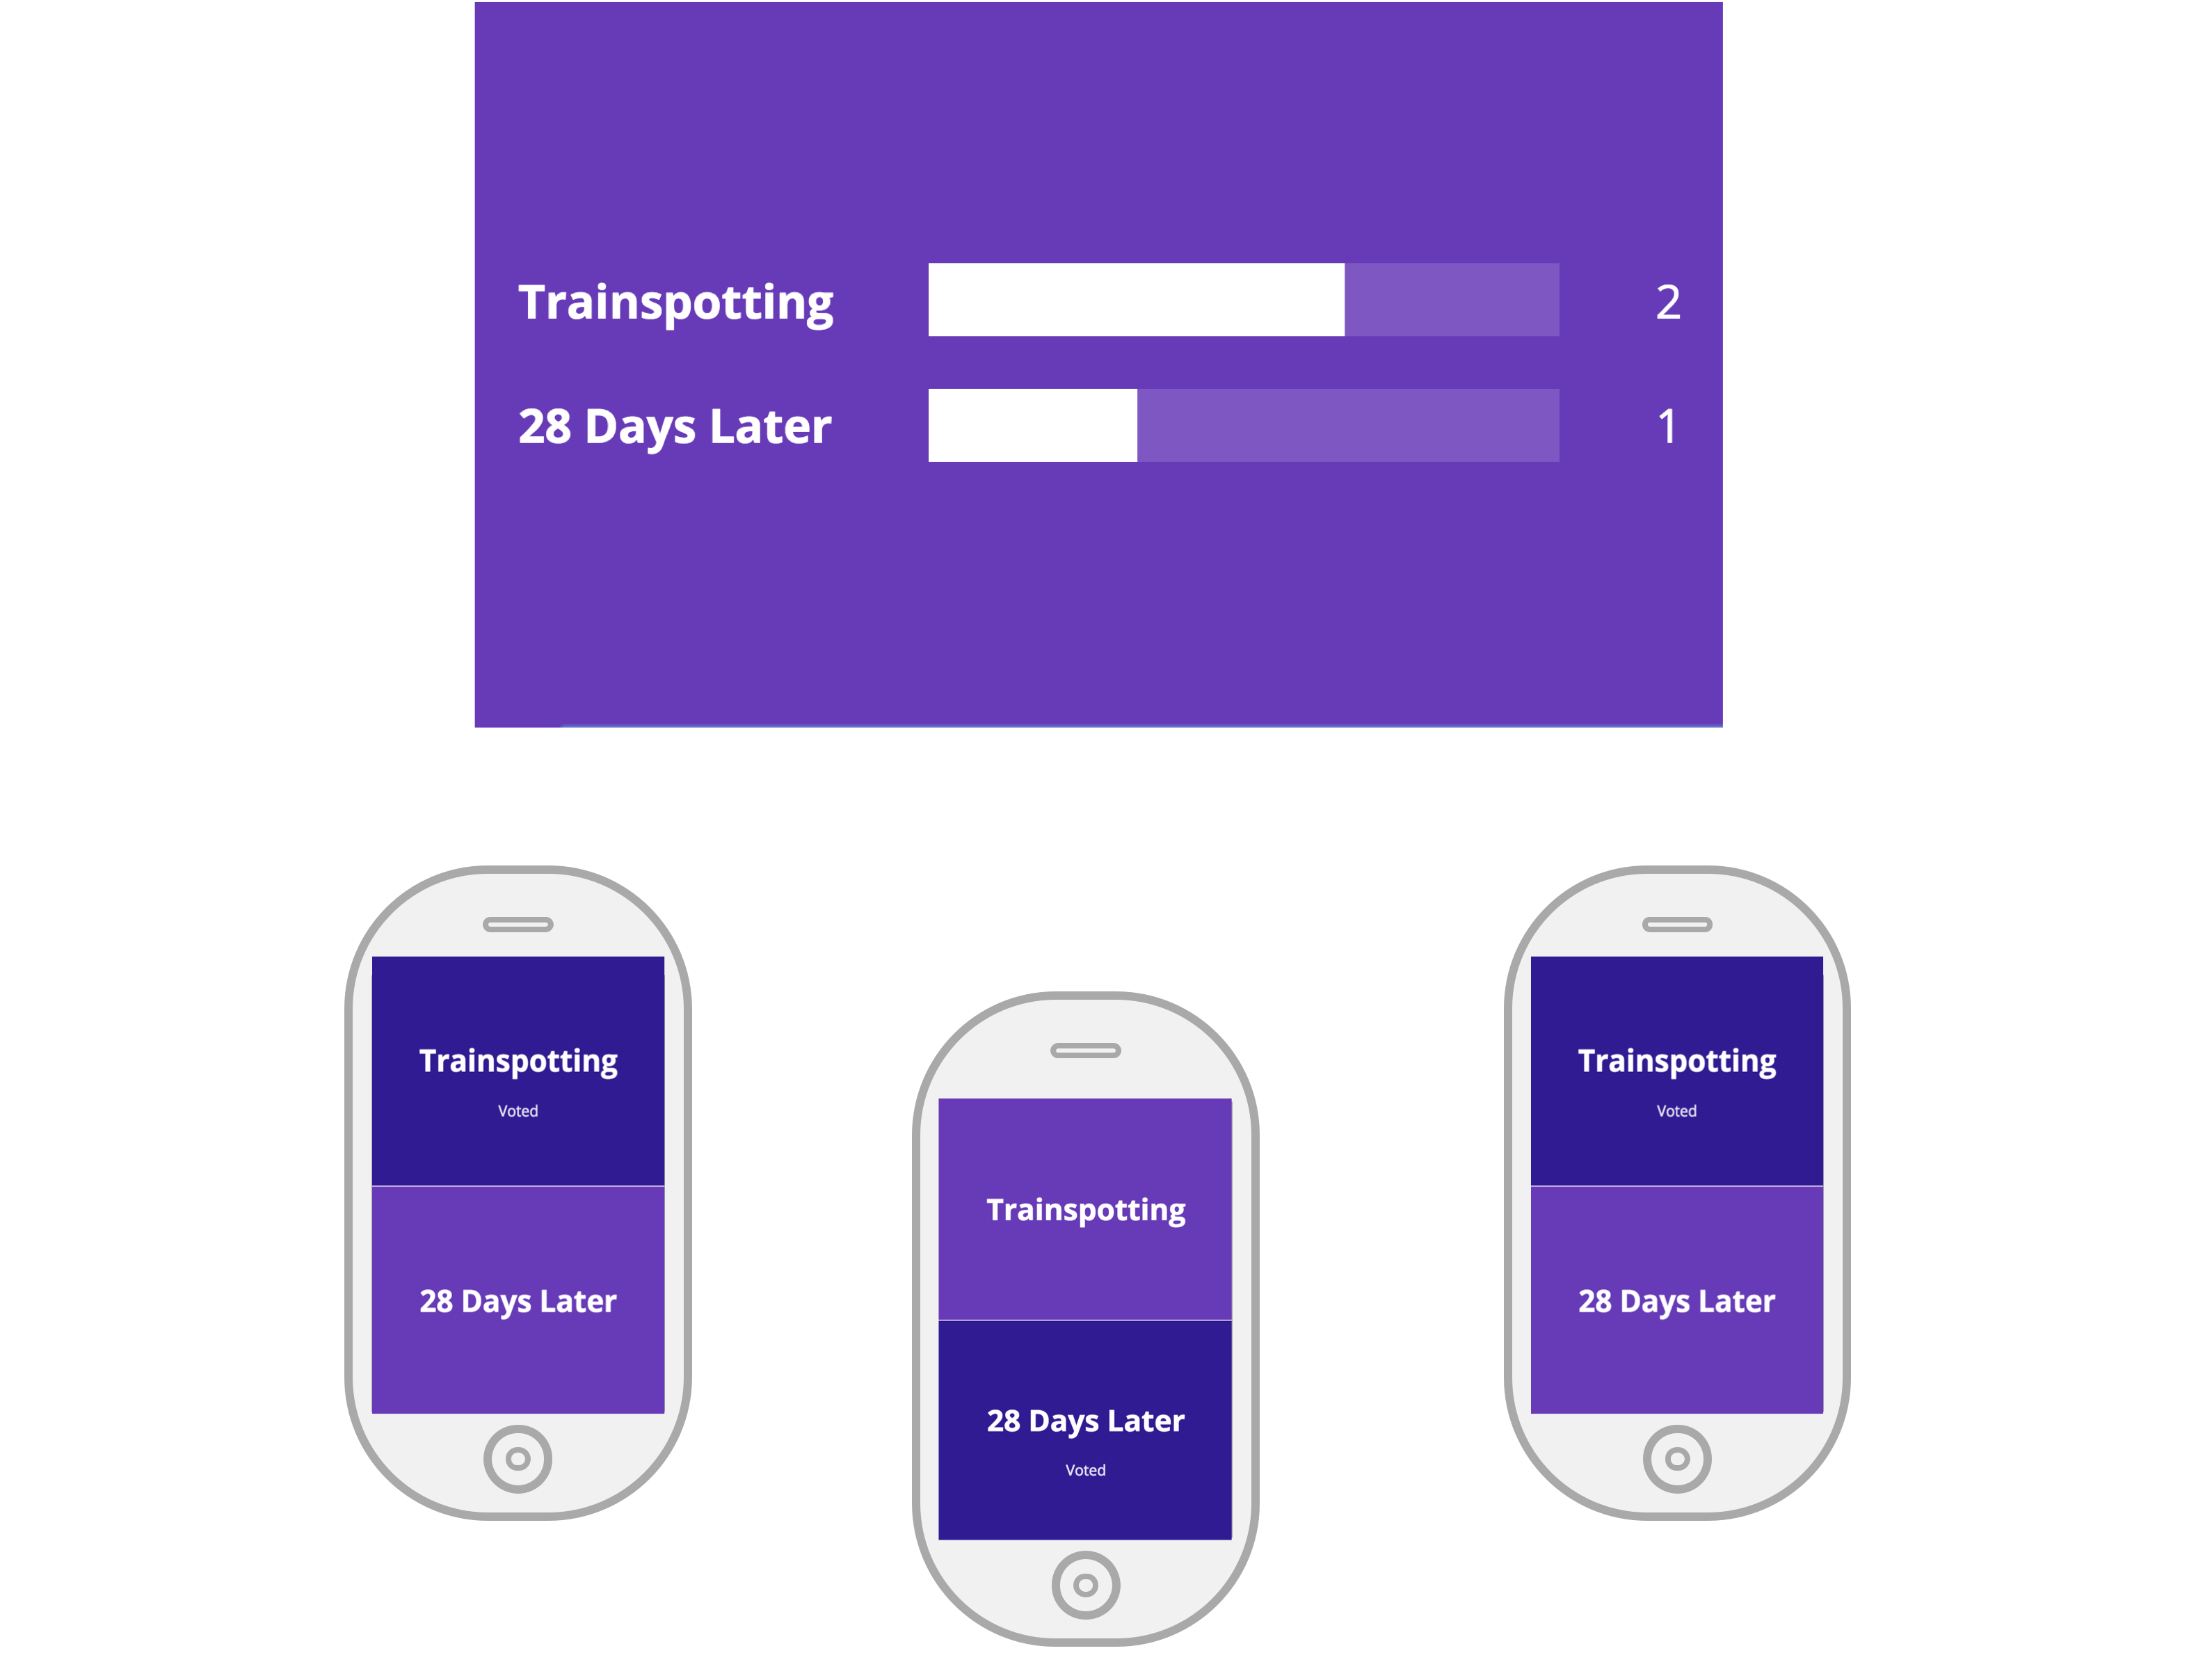
For example, here's how a vote on the best Danny Boyle film could go:

The app will have two separate user interfaces: The voting UI can be used on a mobile device, or anything else that has a web browser. The results UI is designed to be beamed on a projector or some other large screen. It'll show the results of the running vote in real time.
The Architecture
The system will technically consist of two applications: There's a browser app we'll make with React that provides both the user interfaces, and a server app we'll make for Node that handles the voting logic. Communication between the two will be done using WebSockets.
We're going to use Redux to organize the application code both on the client and on the server. For holding the state we'll use Immutable data structures.
Even though there'll be a lot of similarity between the client and server - both will use Redux, for example - this isn't really a universal/isomorphic application and the two won't actually share any code.
It'll be more like a distributed system formed by apps that communicate by passing messages.
The Server Application
We're going to write the Node application first and the React application after that. This will let us concentrate on the core logic before we start thinking about the UI.
As we create the server app, we'll get acquainted with Redux and Immutable, and will see how an application built with them holds together. Redux is most often associated with React applications, but it really isn't limited to that use case. Part of what we're going to learn is how useful Redux can be in other contexts as well!
I recommend following the tutorial by writing the app from scratch, but if you prefer you can grab the code from GitHub instead.
Designing The Application State Tree
Designing a Redux app often begins by thinking about the application state data structure. This is what describes what's going on in your application at any given time.
All kinds of frameworks and architectures have state. In Ember apps and Backbone apps, state is in Models. In Angular apps, state is often in Factories and Services. In most Flux implementations, it is in Stores. How does Redux differ from these?
The main difference is that in Redux, the application state is all stored in one single tree structure. In other words, everything there is to know about your application's state is stored in one data structure formed out of maps and arrays.
This has many consequences, as we will soon begin to see. One of the most important ones is how this lets you think about the application state in isolation from the application's behavior. The state is pure data. It doesn't have methods or functions. And it isn't tucked away inside objects. It's all in one place.
This may sound like a limitation, especially if you're coming to Redux from an object-oriented background. But it actually feels kind of liberating because of the way it lets you concentrate on the data and nothing but the data. And if you spend a little bit of time designing the application state, pretty much everything else will follow.
This is not to say that you always design your entire state tree first and then the rest of the app. Usually you end up evolving both in parallel. However, I find it quite helpful to have an initial idea of what the state tree should look like in different situations before I start coding.
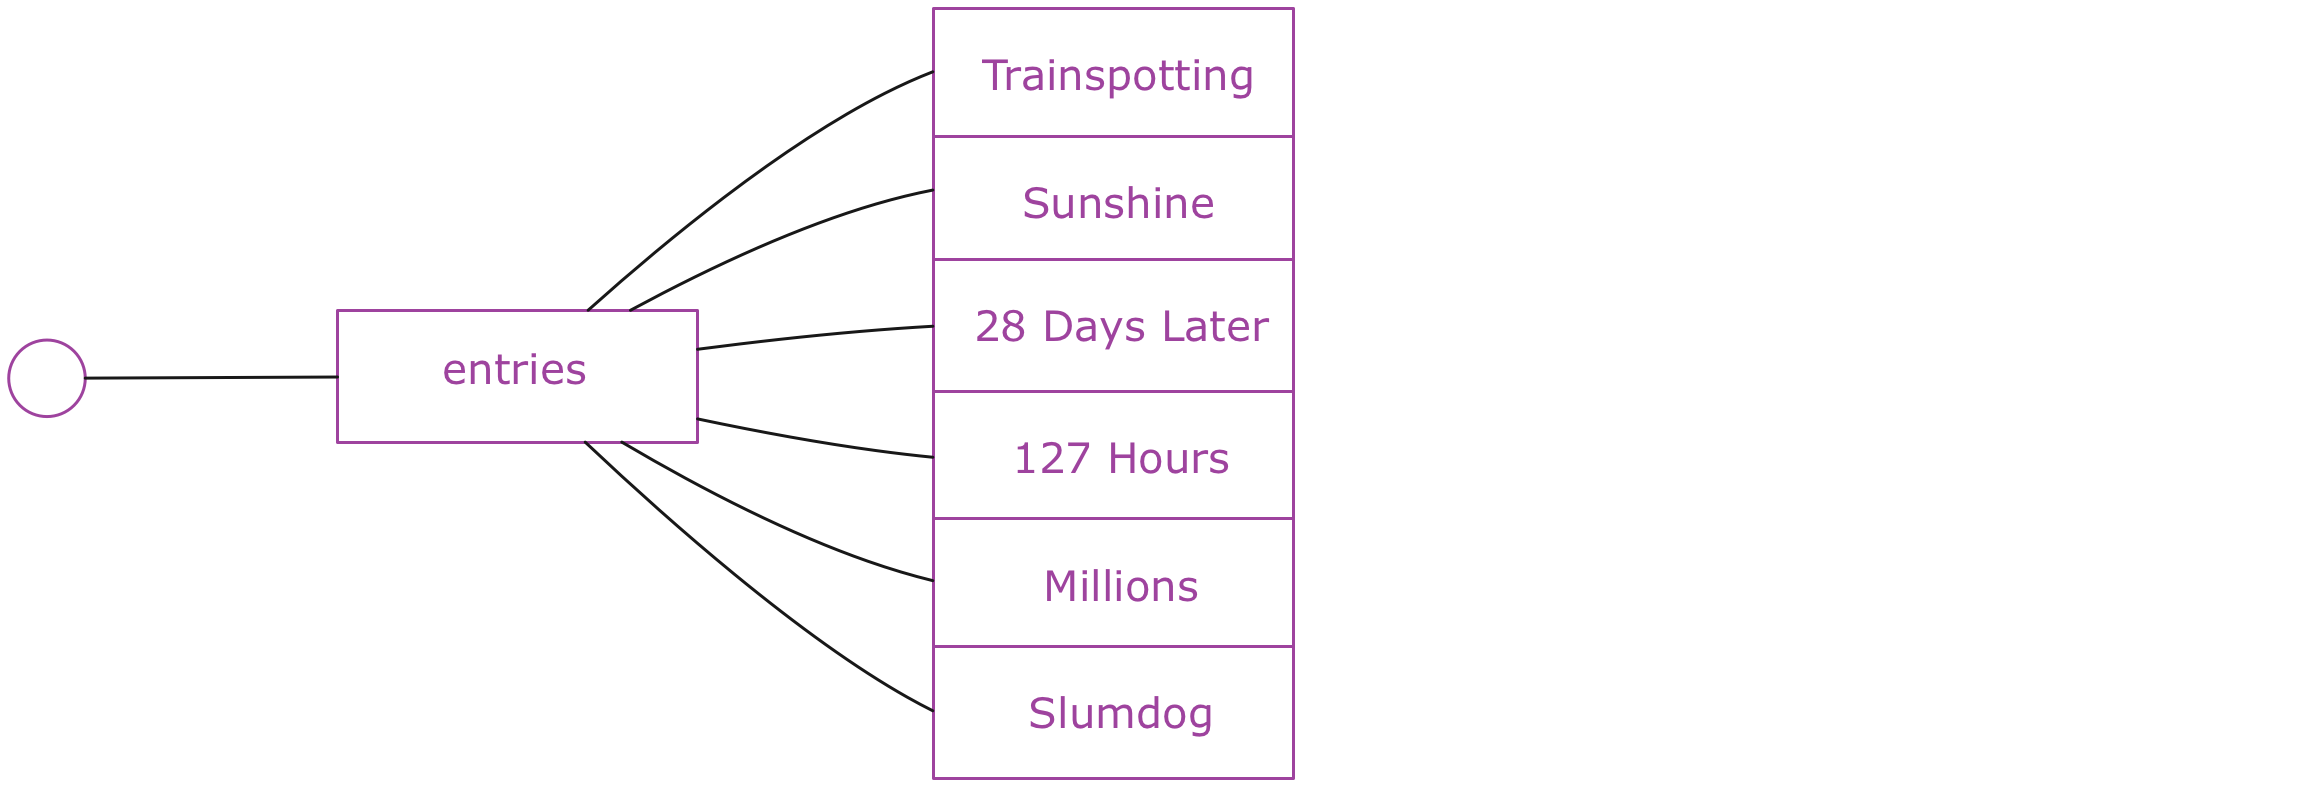
So, let's look at what the state tree of our voting app might be. The purpose of the app is to vote on a number of items (movies, bands, etc.). A reasonable initial state for the app might be just the collection of items that will be voted on. We'll call this collection entries:
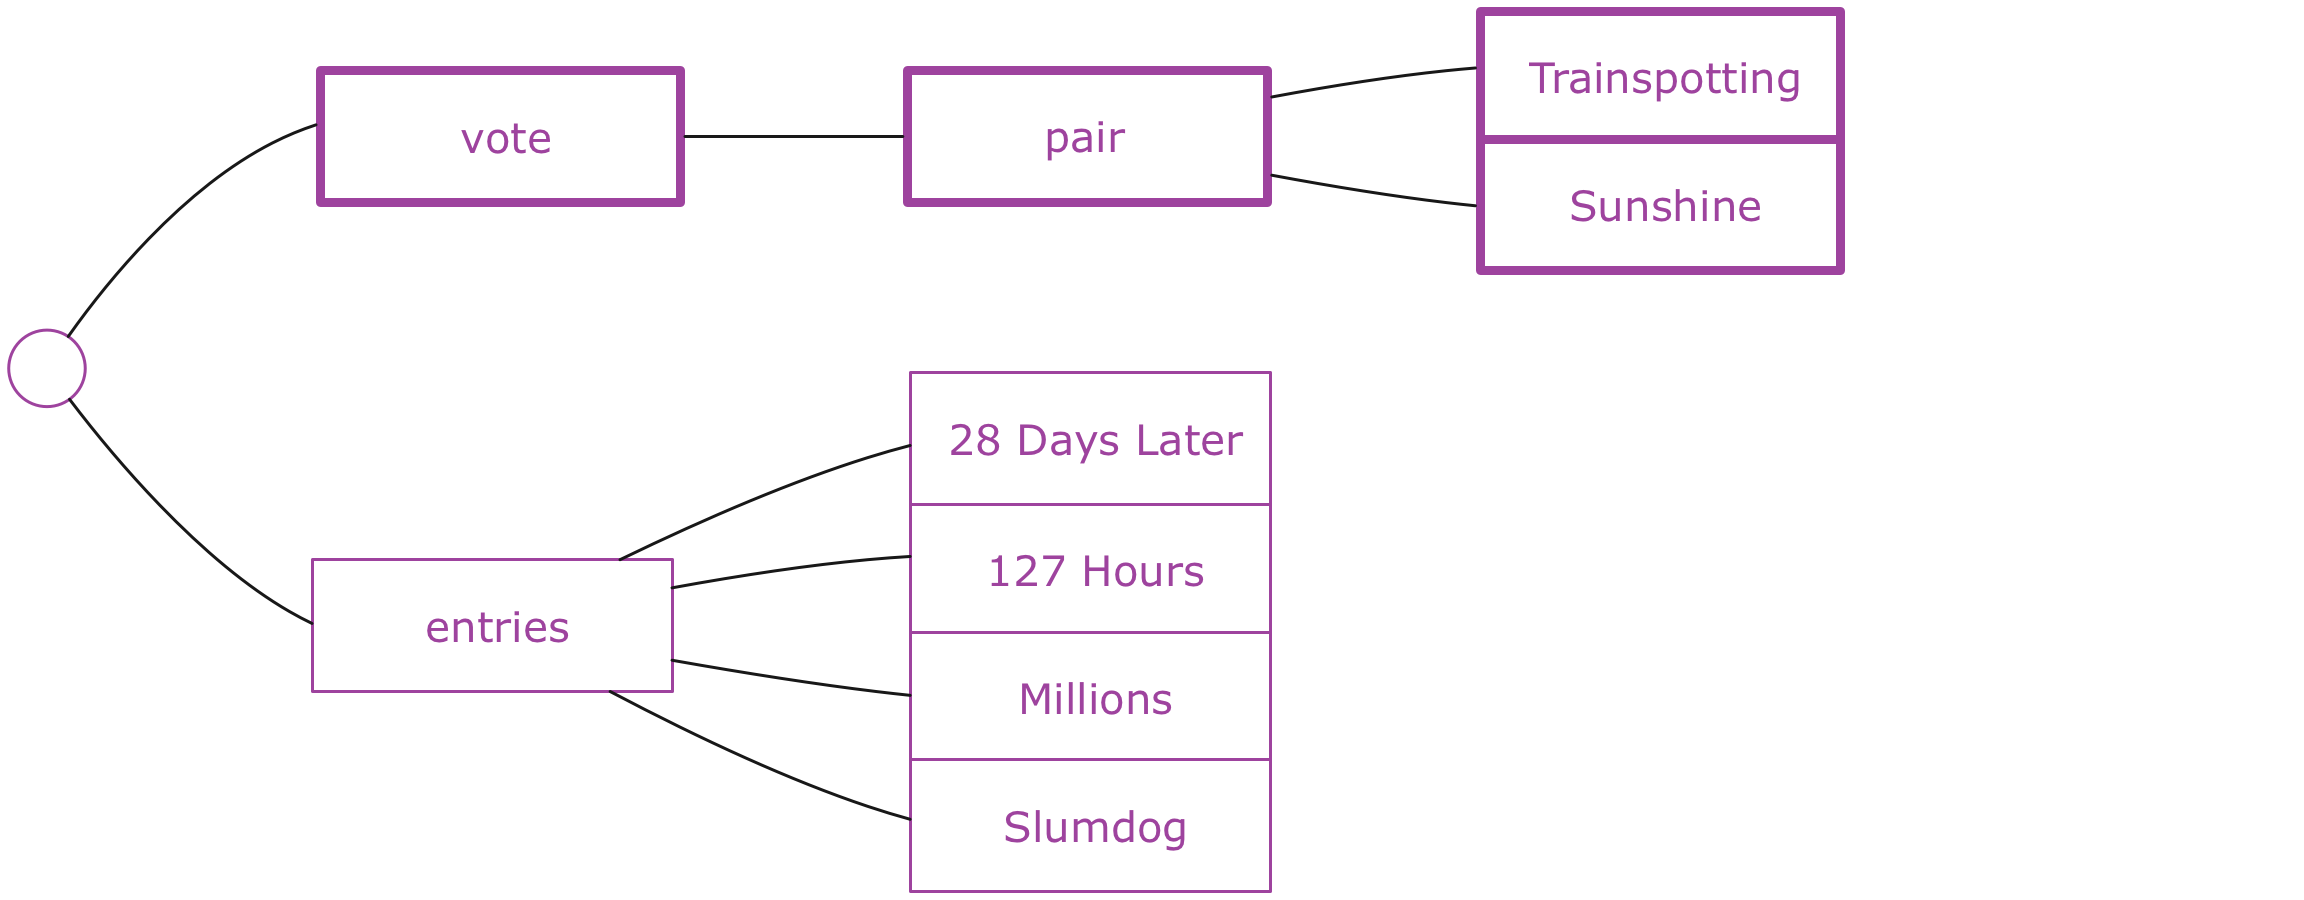
Once the first vote has begun, there should be some way to distinguish what is currently being voted on. In this state, there might be a vote entry in the state, which holds the pair of items currently under vote. The pair should probably also be taken out of the entries collection:
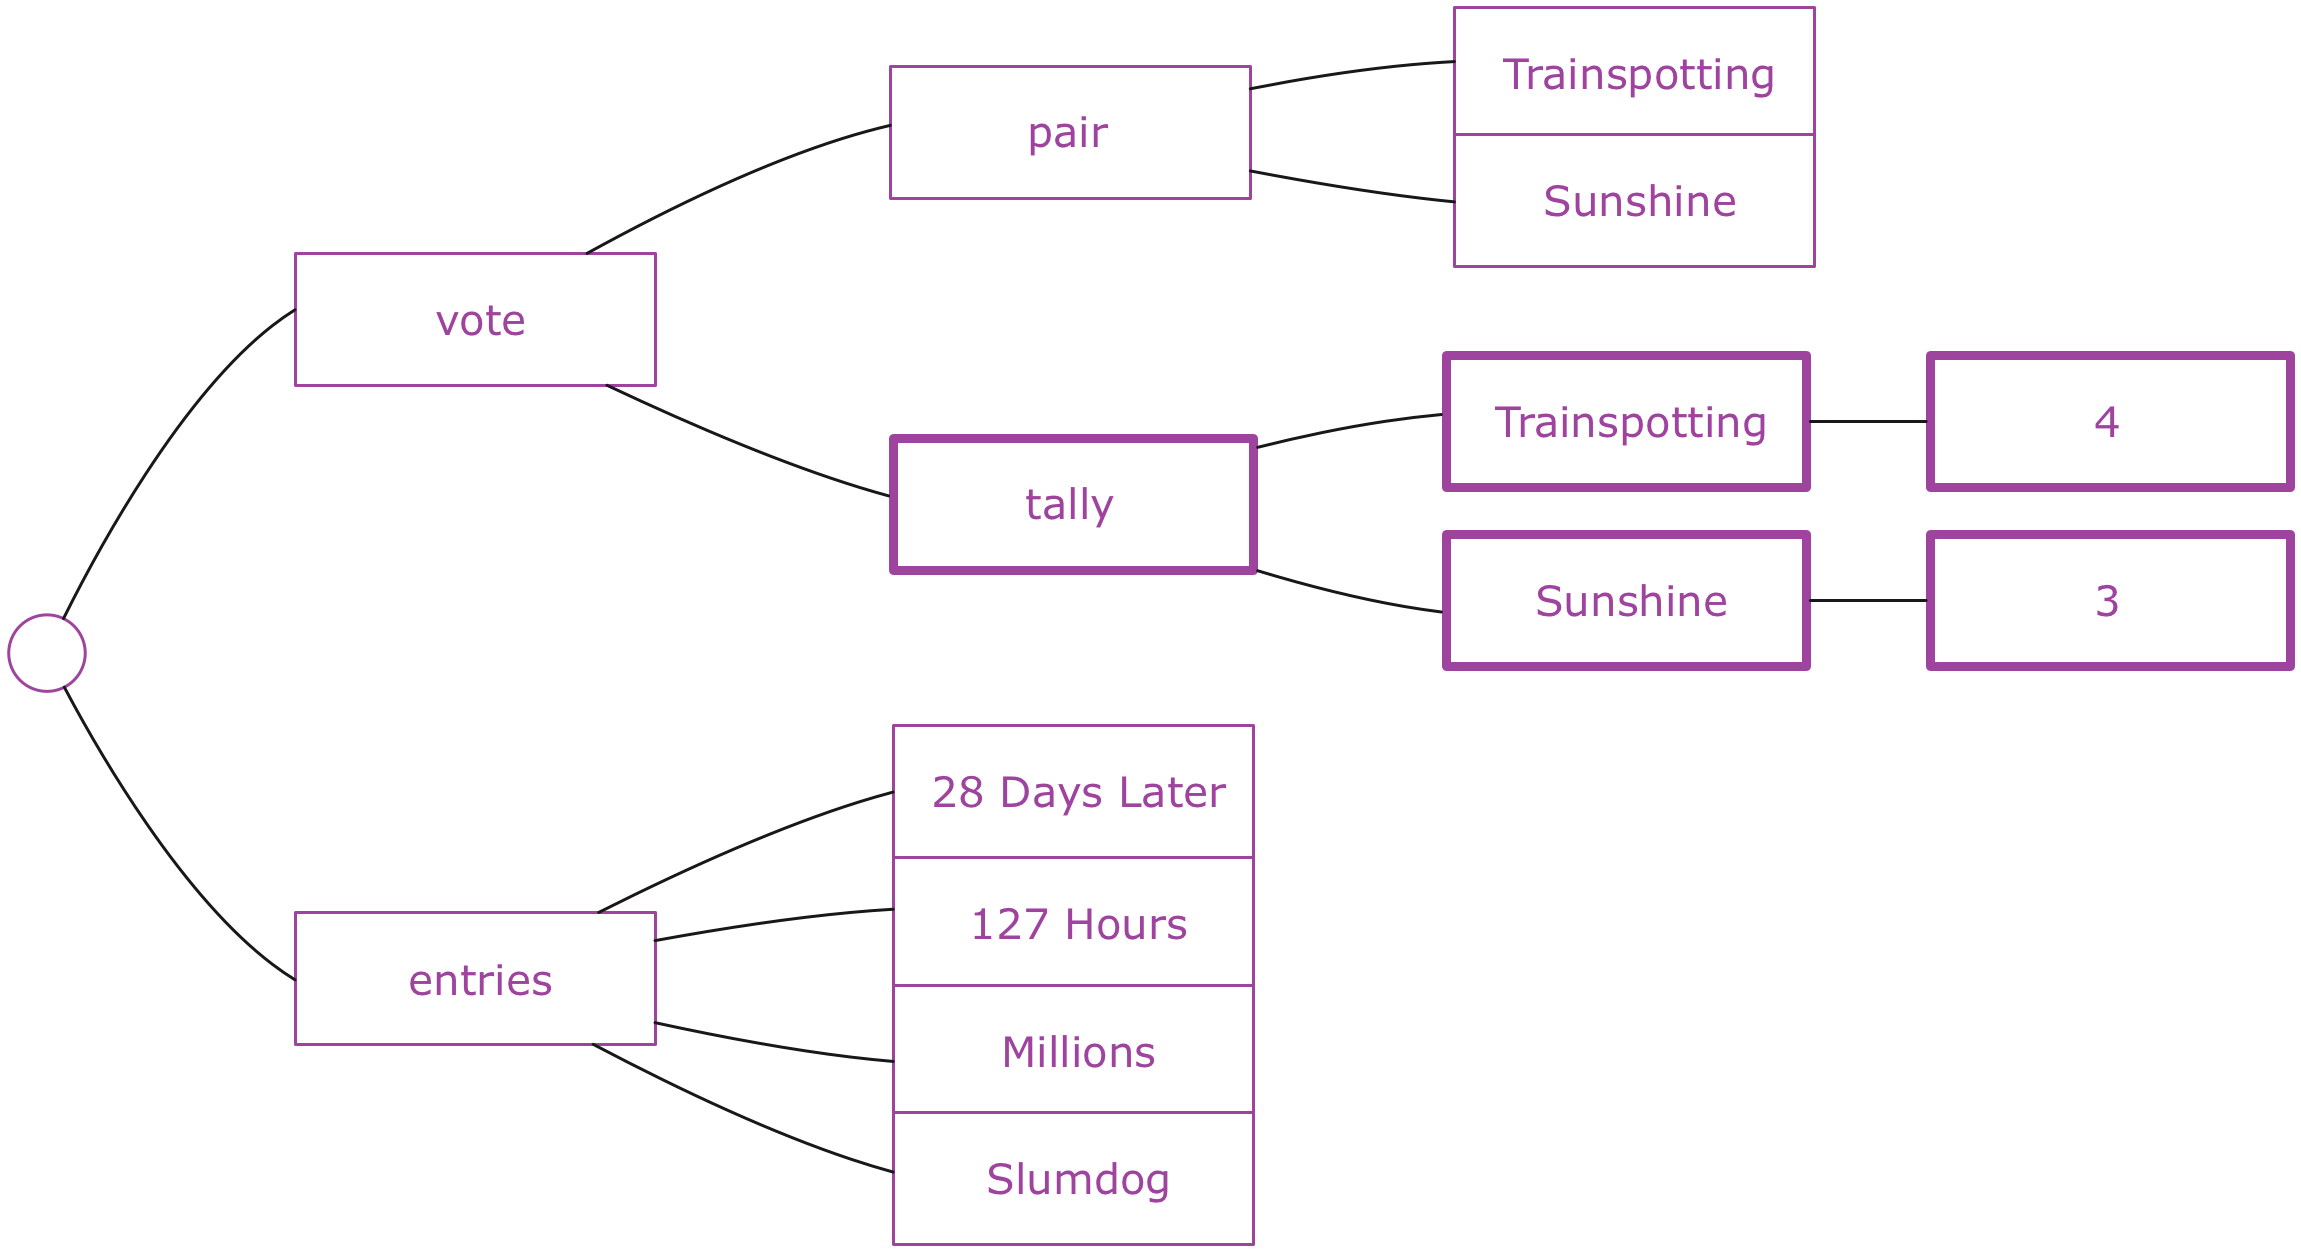
After the votes have started coming in, the tally of votes should be stored as well. We can do that with another data structure inside the vote:
Once a vote is done, the losing entry is thrown away and the winning entry is back in entries, as the last item. It will later be voted against something else. The next two entries will then also have been taken under vote:
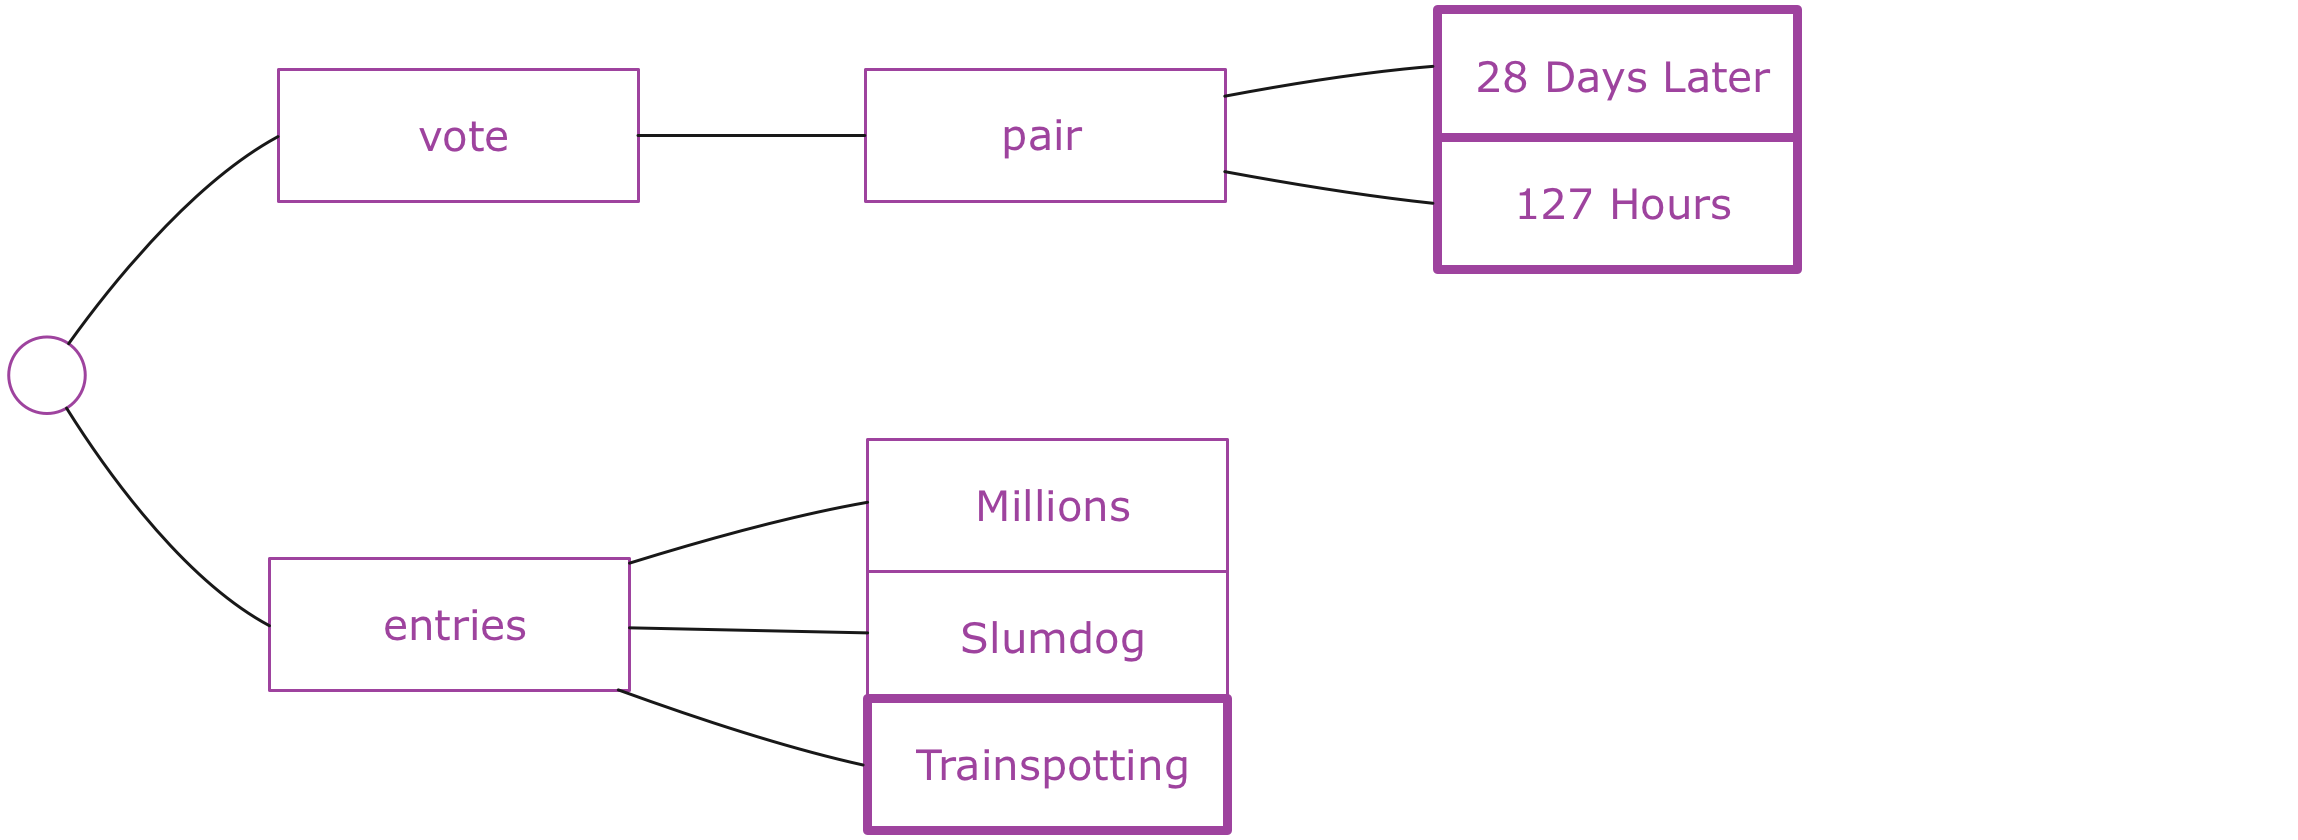
We can imagine these states cycling as long as there are entries left to vote on. At some point there's going to be just one entry left though. At that point, it can be declared as the winner and the vote will be over:

This seems like a reasonable design to get started with. There are many different ways to design the state for these requirements, and this might not be the optimal one. But that doesn't really matter. It just needs to be good enough to get started. The important thing is that we have formed a concrete idea of how the application will carry out its duties. That's before we've even thought about any of the code!
Project Setup
It's time to get our hands dirty. Before we do anything else, we need to create a project directory and initialize it as an NPM project:
mkdir voting-server
cd voting-server
npm init -y
This results in a directory with the single file package.json in it.
We're going to be writing our code in ES6. Altough Node supports many ES6 features starting at version 4.0.0, it still doesn't support modules, which we want to use. We'll need to add Babel to the project, so that we can use all the ES6 features we want and transpile the code to ES5:
npm install --save-dev babel-core babel-cli babel-preset-es2015
Since we'll be writing a bunch of unit tests, we'll also need some libraries to write them with:
npm install --save-dev mocha chai
Mocha is the test framework we'll be using and Chai is an assertion/expectation library we'll use inside our tests to specify what we expect to happen.
We'll be able to run tests with the mocha command that we have under node_modules:
./node_modules/mocha/bin/mocha --compilers js:babel-core/register --recursive
This command tells Mocha to recursively find all tests from the project and run them. It uses Babel to transpile ES6 code before running it.
It'll be easier in the long run to store this command in our package.json:
"scripts": {
  "test": "mocha --compilers js:babel-core/register --recursive"
},
Another thing we need to do is enable Babel's ES6/ES2015 language support. It's done by activating the babel-preset-es2015 package that we already installed. We just need to add a "babel" section to package.json:
"babel": {
  "presets": ["es2015"]
}
Now we can just run the tests with the npm command:
npm run test
Another command called test:watch will be useful for launching a process that watches for changes in our code and runs the tests after each change:
"scripts": {
  "test": "mocha --compilers js:babel-core/register --recursive",
  "test:watch": "npm run test -- --watch"
},
One of the first libraries we're going to be using is Facebook's Immutable, which provides a number of data structures for us to use. We're going to start discussing Immutable in the next section, but for now let's just add it to the project, along with the chai-immutable library that extends Chai to add support for comparing Immutable data structures:
npm install --save immutable
npm install --save-dev chai-immutable
We need to let plug in chai-immutable before any tests are run. That we can do in a little test helper file, which should create next:
import chai from 'chai';
import chaiImmutable from 'chai-immutable';

chai.use(chaiImmutable);
Then we need to have Mocha require this file before it starts running tests:
"scripts": {
  "test": "mocha --compilers js:babel-core/register --require ./test/test_helper.js  --recursive",
  "test:watch": "npm run test -- --watch"
},
That gives us everything we need to get started.
Getting Comfortable With Immutable
The second important point about the Redux architecture is that the state is not just a tree, but it is in fact an immutable tree.
Looking at the trees in the previous section, it might at first seem like a reasonable idea to have code that changes the state of the application by just making updates in the tree: Replacing things in maps, removing things from arrays, etc. However, this is not how things are done in Redux.
A Redux application's state tree is an immutable data structure. That means that once you have a state tree, it will never change as long as it exists. It will keep holding the same state forever. How you then go to the next state is by producing another state tree that reflects the changes you wanted to make.
This means any two successive states of the application are stored in two separate and independent trees. How you get from one to the next is by applying a function that takes the current state and returns a new state.

And why is this a good idea? Well, the first thing that people usually mention is that if you have all your state in one tree and you do these kinds of non-destructive updates, you can hold on to the history of your application state without doing much extra work: Just keep a collection of the previous state trees around. You can then do things like undo/redo for "free" - just set the current application state to the previous or next tree in the history. You can also serialize the history and save it for later, or send it to some storage so that you can replay it later, which can be hugely helpful when debugging.
However, I'd say that even beyond these extra features, the most important thing about immutable data is how it simplifies your code. You get to program with pure functions: Functions that take data and return data and do nothing else. These are functions that you can trust to behave predictably. You can call them as many times as you like and their behavior won't change. Give them the same arguments, and they'll return the same results. They're not going to change the state of the world. Testing becomes trivial, as you don't need to set up stubs or other fakes to "prepare the universe" before you call something. It's just data in, data out.
Immutable data structures are the material we'll build our application's state from, so let's spend some time getting comfortable with it by writing some unit tests that illustrate how it all works.
If you're already comfortable with immutable data and the Immutable library, feel free to skip to the next section.
To get acquainted with the idea of immutability, it may be helpful to first talk about the simplest possible data structure: What if you had a "counter" application whose state was nothing but a single number? The state would go from 0 to 1 to 2 to 3, etc.
We are already used to thinking of numbers as immutable data. When the counter increments, we don't mutate a number. It would in fact be impossible as there are no "setters" on numbers. You can't say 42.setValue(43).
What happens instead is we get another number, which is the result of adding 1 to the previous number. That we can do with a pure function. Its argument is the current state and its return value will be used as the next state. When it is called, it does not change the current state. Here is such a function and a unit test for it:
import {expect} from 'chai';

describe('immutability', () => {

  describe('a number', () => {

    function increment(currentState) {
      return currentState + 1;
    }

    it('is immutable', () => {
      let state = 42;
      let nextState = increment(state);

      expect(nextState).to.equal(43);
      expect(state).to.equal(42);
    });

  });

});
The fact that state doesn't change when increment is called should be obvious. How could it? Numbers are immutable!
You may have noticed that this test really has nothing to do with our application - we don't even have any application code yet!
The test is just a learning tool for us. I often find it useful to explore a new API or technique by writing unit tests that exercise the relevant ideas, which is what we're doing here. Kent Beck calls these kinds of tests "Learning Tests" in his original TDD book.
What we're going to do next is extend this same idea of immutability to all kinds of data structures, not just numbers.
With Immutable's Lists, we can, for example, have an application whose state is a list of movies. An operation that adds a movie produces a new list that is the old list and the new movie combined. Crucially, the old state remains unchanged after the operation:
import {expect} from 'chai';
import {List} from 'immutable';

describe('immutability', () => {

  // ...

  describe('A List', () => {

    function addMovie(currentState, movie) {
      return currentState.push(movie);
    }

    it('is immutable', () => {
      let state = List.of('Trainspotting', '28 Days Later');
      let nextState = addMovie(state, 'Sunshine');

      expect(nextState).to.equal(List.of(
        'Trainspotting',
        '28 Days Later',
        'Sunshine'
      ));
      expect(state).to.equal(List.of(
        'Trainspotting',
        '28 Days Later'
      ));
    });

  });

});
The old state would not have remained unchanged if we'd pushed into a regular array! Since we're using an Immutable List instead, we have the same semantics as we had with the number example.
The idea extends to full state trees as well. A state tree is just a nested data structure of Lists, Maps, and possibly other kinds of collections. Applying an operation to it involves producing a new state tree, leaving the previous one untouched. If the state tree is a Map with a key 'movies' that contains a List of movies, adding a movie means we need to create a new Map, where the movies key points to a new List:
import {expect} from 'chai';
import {List, Map} from 'immutable';

describe('immutability', () => {

  // ...

  describe('a tree', () => {

    function addMovie(currentState, movie) {
      return currentState.set(
        'movies',
        currentState.get('movies').push(movie)
      );
    }

    it('is immutable', () => {
      let state = Map({
        movies: List.of('Trainspotting', '28 Days Later')
      });
      let nextState = addMovie(state, 'Sunshine');

      expect(nextState).to.equal(Map({
        movies: List.of(
          'Trainspotting',
          '28 Days Later',
          'Sunshine'
        )
      }));
      expect(state).to.equal(Map({
        movies: List.of(
          'Trainspotting',
          '28 Days Later'
        )
      }));
    });

  });

});
This is exactly the same behavior as before, just extended to show that it works with nested data structures too. The same idea holds to all shapes and sizes of data.
For operations on nested data structures such as this one, Immutable provides several helper functions that make it easier to "reach into" the nested data to produce an updated value. We can use one called update in this case to make the code more concise:
function addMovie(currentState, movie) {
  return currentState.update('movies', movies => movies.push(movie));
}
This gives us an understanding of how immutable data feels like. It is what we'll be using for our application state. There's a lot of functionality packed into the Immutable API though, and we've only just scratched the surface.
While immutable data is a key aspect of Redux architectures, there is no hard requirement to use the Immutable library with it. In fact, the examples in the official Redux documentation mostly use plain old JavaScript objects and arrays, and simply refrain from mutating them by convention.
In this tutorial, we'll use the Immutable library instead, and there are several reasons for it:
- Immutable's data structures are designed from the ground up to be used immutably and thus provide an API that makes immutable operations convenient.
- I'm partial to Rich Hickey's view that there is no such as thing as immutability by convention. If you use data structures that allow mutations, sooner or later you or someone else is bound to make a mistake and mutate them. This is especially true when you're just getting started. Things like Object.freeze() may help with this.
- Immutable's data structures are persistent, meaning that they are internally structured so that producing new versions is efficient both in terms of time and memory, even for large state trees. Using plain objects and arrays may result in excessive amounts of copying, which hurts performance.
Writing The Application Logic With Pure Functions
Armed with an understanding of immutable state trees and the functions that operate on them, we can turn our attention to the logic of our voting application itself. The core of the app will be formed from the pieces that we have been discussing: A tree structure and a set of functions that produce new versions of that tree structure.
Loading Entries
First of all, as we discussed earlier, the application allows "loading in" a collection of entries that will be voted on. We could have a function called setEntries that takes a previous state and a collection of entries and produces a state where the entries are included. Here's a test for that:
import {List, Map} from 'immutable';
import {expect} from 'chai';

import {setEntries} from '../src/core';

describe('application logic', () => {

  describe('setEntries', () => {

    it('adds the entries to the state', () => {
      const state = Map();
      const entries = List.of('Trainspotting', '28 Days Later');
      const nextState = setEntries(state, entries);
      expect(nextState).to.equal(Map({
        entries: List.of('Trainspotting', '28 Days Later')
      }));
    });

  });

});
Our initial implementation of setEntries can just do the simplest thing possible: It can set an entries key in the state Map, and set the value as the given List of entries. That produces the first of the state trees we designed earlier.
export function setEntries(state, entries) {
  return state.set('entries', entries);
}
For convenience, we'll allow the input entries to be a regular JavaScript array (or actually anything iterable). It should still be an Immutable List by the time it's in the state tree:
it('converts to immutable', () => {
  const state = Map();
  const entries = ['Trainspotting', '28 Days Later'];
  const nextState = setEntries(state, entries);
  expect(nextState).to.equal(Map({
    entries: List.of('Trainspotting', '28 Days Later')
  }));
});
In the implementation we should pass the given entries into the List constructor to satisfy this requirement:
import {List} from 'immutable';

export function setEntries(state, entries) {
  return state.set('entries', List(entries));
}
Starting The Vote
We can begin the voting by calling a function called next on a state that already has entries set. That means, going from the first to the second of the state trees we designed.
The function takes no additional arguments. It should create a vote Map on the state, where the two first entries are included under the key pair. The entries under vote should no longer be in the entries List:
import {List, Map} from 'immutable';
import {expect} from 'chai';
import {setEntries, next} from '../src/core';

describe('application logic', () => {

  // ..

  describe('next', () => {

    it('takes the next two entries under vote', () => {
      const state = Map({
        entries: List.of('Trainspotting', '28 Days Later', 'Sunshine')
      });
      const nextState = next(state);
      expect(nextState).to.equal(Map({
        vote: Map({
          pair: List.of('Trainspotting', '28 Days Later')
        }),
        entries: List.of('Sunshine')
      }));
    });

  });

});
The implementation for this will merge an update into the old state, where the first two entries are put in one List, and the rest in the new version of entries:
import {List, Map} from 'immutable';

// ...

export function next(state) {
  const entries = state.get('entries');
  return state.merge({
    vote: Map({pair: entries.take(2)}),
    entries: entries.skip(2)
  });
}
Voting
When a vote is ongoing, it should be possible for people to vote on entries. When a new vote is cast for an entry, a "tally" for it should appear in the vote. If there already is a tally for the entry, it should be incremented:
import {List, Map} from 'immutable';
import {expect} from 'chai';
import {setEntries, next, vote} from '../src/core';

describe('application logic', () => {

  // ...

  describe('vote', () => {

    it('creates a tally for the voted entry', () => {
      const state = Map({
        vote: Map({
          pair: List.of('Trainspotting', '28 Days Later')
        }),
        entries: List()
      });
      const nextState = vote(state, 'Trainspotting');
      expect(nextState).to.equal(Map({
        vote: Map({
          pair: List.of('Trainspotting', '28 Days Later'),
          tally: Map({
            'Trainspotting': 1
          })
        }),
        entries: List()
      }));
    });

    it('adds to existing tally for the voted entry', () => {
      const state = Map({
        vote: Map({
          pair: List.of('Trainspotting', '28 Days Later'),
          tally: Map({
            'Trainspotting': 3,
            '28 Days Later': 2
          })
        }),
        entries: List()
      });
      const nextState = vote(state, 'Trainspotting');
      expect(nextState).to.equal(Map({
        vote: Map({
          pair: List.of('Trainspotting', '28 Days Later'),
          tally: Map({
            'Trainspotting': 4,
            '28 Days Later': 2
          })
        }),
        entries: List()
      }));
    });

  });

});
You could build all these nested Maps and Lists more concisely using the fromJS function from Immutable.
We can make these tests pass with the following:
export function vote(state, entry) {
  return state.updateIn(
    ['vote', 'tally', entry],
    0,
    tally => tally + 1
  );
}
Using updateIn makes this pleasingly succinct. What the code expresses is "reach into the nested data structure path ['vote', 'tally', 'Trainspotting'], and apply this function there. If there are keys missing along the path, create new Maps in their place. If the value at the end is missing, initialize it with 0".
It packs a lot of punch, but this is exactly the kind of code that makes working with immutable data structures pleasant, so it's worth spending a bit of time getting comfortable with it.
Moving to The Next Pair
Once the vote for a given pair is over, we should proceed to the next one. The winning entry from the current vote should be kept, and added back to the end of the entries, so that it will later be paired with something else. The losing entry is thrown away. If there is a tie, both entries are kept.
We'll add this logic to the existing implementation of next:
describe('next', () => {

  // ...

  it('puts winner of current vote back to entries', () => {
    const state = Map({
      vote: Map({
        pair: List.of('Trainspotting', '28 Days Later'),
        tally: Map({
          'Trainspotting': 4,
          '28 Days Later': 2
        })
      }),
      entries: List.of('Sunshine', 'Millions', '127 Hours')
    });
    const nextState = next(state);
    expect(nextState).to.equal(Map({
      vote: Map({
        pair: List.of('Sunshine', 'Millions')
      }),
      entries: List.of('127 Hours', 'Trainspotting')
    }));
  });

  it('puts both from tied vote back to entries', () => {
    const state = Map({
      vote: Map({
        pair: List.of('Trainspotting', '28 Days Later'),
        tally: Map({
          'Trainspotting': 3,
          '28 Days Later': 3
        })
      }),
      entries: List.of('Sunshine', 'Millions', '127 Hours')
    });
    const nextState = next(state);
    expect(nextState).to.equal(Map({
      vote: Map({
        pair: List.of('Sunshine', 'Millions')
      }),
      entries: List.of('127 Hours', 'Trainspotting', '28 Days Later')
    }));
  });

});
In the implementation we'll just concatenate the "winners" of the current vote to the entries. We can find those winners with a new function called getWinners:
function getWinners(vote) {
  if (!vote) return [];
  const [a, b] = vote.get('pair');
  const aVotes = vote.getIn(['tally', a], 0);
  const bVotes = vote.getIn(['tally', b], 0);
  if      (aVotes > bVotes)  return [a];
  else if (aVotes < bVotes)  return [b];
  else                       return [a, b];
}

export function next(state) {
  const entries = state.get('entries')
                       .concat(getWinners(state.get('vote')));
  return state.merge({
    vote: Map({pair: entries.take(2)}),
    entries: entries.skip(2)
  });
}
Ending The Vote
At some point there's just going to be one entry left when a vote ends. At that point we have a winning entry. What we should do is, instead of trying to form a next vote, just set the winner in the state explicitly. The vote is over.
describe('next', () => {

  // ...

  it('marks winner when just one entry left', () => {
    const state = Map({
      vote: Map({
        pair: List.of('Trainspotting', '28 Days Later'),
        tally: Map({
          'Trainspotting': 4,
          '28 Days Later': 2
        })
      }),
      entries: List()
    });
    const nextState = next(state);
    expect(nextState).to.equal(Map({
      winner: 'Trainspotting'
    }));
  });

});
In the implementation of next we should have a special case for the situation where the entries has a size of 1 after we've processed the current vote:
export function next(state) {
  const entries = state.get('entries')
                       .concat(getWinners(state.get('vote')));
  if (entries.size === 1) {
    return state.remove('vote')
                .remove('entries')
                .set('winner', entries.first());
  } else {
    return state.merge({
      vote: Map({pair: entries.take(2)}),
      entries: entries.skip(2)
    });
  }
}
We could have just returned Map({winner: entries.first()}) here. But instead we still take the old state as the starting point and explicitly remove 'vote' and 'entries' keys from it. The reason for this is future-proofing: At some point we might have some unrelated data in the state, and it should pass through this function unchanged. It is generally a good idea in these state transformation functions to always morph the old state into the new one instead of building the new state completely from scratch.
Here we have an acceptable version of the core logic of our app, expressed as a few functions. We also have unit tests for them, and writing those tests has been relatively easy: No setup, no mocks, no stubs. That's the beauty of pure functions. We can just call them and inspect the return values.
Note that we haven't even installed Redux yet. We've been able to focus totally on the logic of the app itself, without bringing the "framework" in. There's something very pleasing about that.
Introducing Actions and Reducers
We have the core functions of our app, but in Redux you don't actually call those functions directly. There is a layer of indirection between the functions and the outside world: Actions.
An action is a simple data structure that describes a change that should occur in your app state. It's basically a description of a function call packaged into a little object. By convention, every action has a type attribute that describes which operation the action is for. Each action may also carry additional attributes. Here are a few example actions that match the core functions we have just written:
{type: 'SET_ENTRIES', entries: ['Trainspotting', '28 Days Later']}

{type: 'NEXT'}

{type: 'VOTE', entry: 'Trainspotting'}
If actions are expressed like this, we also need a way to turn them into the actual core function calls. For example, given the VOTE action, the following call should be made:
// This action
let voteAction = {type: 'VOTE', entry: 'Trainspotting'}
// should cause this to happen
return vote(state, voteAction.entry);
What we're going to write is a generic function that takes any kind of action - along with the current state - and invokes the core function that matches the action. This function is called a reducer:
export default function reducer(state, action) {
  // Figure out which function to call and call it
}
We should test that the reducer can indeed handle each of our three actions:
import {Map, fromJS} from 'immutable';
import {expect} from 'chai';

import reducer from '../src/reducer';

describe('reducer', () => {

  it('handles SET_ENTRIES', () => {
    const initialState = Map();
    const action = {type: 'SET_ENTRIES', entries: ['Trainspotting']};
    const nextState = reducer(initialState, action);

    expect(nextState).to.equal(fromJS({
      entries: ['Trainspotting']
    }));
  });

  it('handles NEXT', () => {
    const initialState = fromJS({
      entries: ['Trainspotting', '28 Days Later']
    });
    const action = {type: 'NEXT'};
    const nextState = reducer(initialState, action);

    expect(nextState).to.equal(fromJS({
      vote: {
        pair: ['Trainspotting', '28 Days Later']
      },
      entries: []
    }));
  });

  it('handles VOTE', () => {
    const initialState = fromJS({
      vote: {
        pair: ['Trainspotting', '28 Days Later']
      },
      entries: []
    });
    const action = {type: 'VOTE', entry: 'Trainspotting'};
    const nextState = reducer(initialState, action);

    expect(nextState).to.equal(fromJS({
      vote: {
        pair: ['Trainspotting', '28 Days Later'],
        tally: {Trainspotting: 1}
      },
      entries: []
    }));
  });

});
Our reducer should delegate to one of the core functions based on the type of the action. It also knows how to unpack the additional arguments of each function from the action object:
import {setEntries, next, vote} from './core';

export default function reducer(state, action) {
  switch (action.type) {
  case 'SET_ENTRIES':
    return setEntries(state, action.entries);
  case 'NEXT':
    return next(state);
  case 'VOTE':
    return vote(state, action.entry)
  }
  return state;
}
Note that if the reducer doesn't recognize the action, it just returns the current state.
An important additional requirement of reducers is that if they are called with an undefined state, they know how to initialize it to a meaningful value. In our case, the initial value is a Map. So, giving an undefined state should work as if an empty Map had been given:
describe('reducer', () => {

  // ...

  it('has an initial state', () => {
    const action = {type: 'SET_ENTRIES', entries: ['Trainspotting']};
    const nextState = reducer(undefined, action);
    expect(nextState).to.equal(fromJS({
      entries: ['Trainspotting']
    }));
  });

});
Since our application's logic is in core.js, it makes sense to introduce the initial state there:
export const INITIAL_STATE = Map();
In the reducer we'll import it and use it as the default value of the state argument:
import {setEntries, next, vote, INITIAL_STATE} from './core';

export default function reducer(state = INITIAL_STATE, action) {
  switch (action.type) {
  case 'SET_ENTRIES':
    return setEntries(state, action.entries);
  case 'NEXT':
    return next(state);
  case 'VOTE':
    return vote(state, action.entry)
  }
  return state;
}
What is interesting about the way this reducer works is how it can be generically used to take the application from one state to the next, given any type of action. Actually, given a collection of past actions, you can actually just reduce that collection into the current state. That's why the function is called a reducer: It fulfills the contract of a reduce callback function.
it('can be used with reduce', () => {
  const actions = [
    {type: 'SET_ENTRIES', entries: ['Trainspotting', '28 Days Later']},
    {type: 'NEXT'},
    {type: 'VOTE', entry: 'Trainspotting'},
    {type: 'VOTE', entry: '28 Days Later'},
    {type: 'VOTE', entry: 'Trainspotting'},
    {type: 'NEXT'}
  ];
  const finalState = actions.reduce(reducer, Map());

  expect(finalState).to.equal(fromJS({
    winner: 'Trainspotting'
  }));
});
This ability to batch and/or replay a collection of actions is a major benefit of the action/reducer model of state transitions, when compared to calling the core functions directly. For example, given that actions are just objects that you can also serialize to JSON, you could easily send them over to a Web Worker and run your reducer logic there. Or you can even send them over the network, as we're going to do later!
Note that we are using plain objects as actions instead of Immutable data structures. This is something Redux actually requires us to do.
A Taste of Reducer Composition
Our core functionality is currently defined so that each function takes the whole state of the application and returns the whole, next state of the application.
It is easy to see how keeping to this pattern may not be a good idea in large applications. If each and every operation in the application needs to be aware of the structure of the whole state, things can easily get brittle. If you wanted to change the shape of the state, it would require a whole lot of changes.
It is a much better idea to, whenever you can, make operations work on the smallest piece (or subtree) of the state possible. What we're talking about is modularization: Have the functionality that deals with a given piece of data deal with only that part of the data, as if the rest didn't exist.
Our application is so tiny that we don't have a problem of this kind yet, but we do already have one opportunity to improve on this: There is no reason for the vote function to receive the whole app state, since it only works on the 'vote' part of it. That's the only thing it should know about. We can modify the existing unit tests for vote to reflect this idea:
describe('vote', () => {

  it('creates a tally for the voted entry', () => {
    const state = Map({
      pair: List.of('Trainspotting', '28 Days Later')
    });
    const nextState = vote(state, 'Trainspotting')
    expect(nextState).to.equal(Map({
      pair: List.of('Trainspotting', '28 Days Later'),
      tally: Map({
        'Trainspotting': 1
      })
    }));
  });

  it('adds to existing tally for the voted entry', () => {
    const state = Map({
      pair: List.of('Trainspotting', '28 Days Later'),
      tally: Map({
        'Trainspotting': 3,
        '28 Days Later': 2
      })
    });
    const nextState = vote(state, 'Trainspotting');
    expect(nextState).to.equal(Map({
      pair: List.of('Trainspotting', '28 Days Later'),
      tally: Map({
        'Trainspotting': 4,
        '28 Days Later': 2
      })
    }));
  });

});
As we see, this also simplifies the test code, which is usually a good sign!
The vote implementation should now just take the vote part of the state, and update its tally:
export function vote(voteState, entry) {
  return voteState.updateIn(
    ['tally', entry],
    0,
    tally => tally + 1
  );
}
Now it becomes the job of our reducer to pick apart the state so that it gives only the relevant part to the vote function:
export default function reducer(state = INITIAL_STATE, action) {
  switch (action.type) {
  case 'SET_ENTRIES':
    return setEntries(state, action.entries);
  case 'NEXT':
    return next(state);
  case 'VOTE':
    return state.update('vote',
                        voteState => vote(voteState, action.entry));
  }
  return state;
}
This is a small example of the kind of pattern that becomes much more important the larger an application gets: The main reducer function only hands parts of the state to lower-level reducer functions. We separate the job of finding the right location in the state tree from applying the update to that location.
The Redux documentation for reducers goes into these patterns of reducer composition in a lot more detail, and also describes some helper functions that makes reducer composition easier in many cases.
Introducing The Redux Store
Now that we have a reducer, we can start looking at how this all plugs into Redux itself.
As we just saw, if you had a collection of all the actions that are ever going to occur in your application, you could just call reduce. Out pops the final state of your app. Of course, you usually don't have a collection of all those actions. They will arrive spread out over time, as things happen in the world: When users interact with the app, when data is received from networks, or when timeouts trigger.
To deal with this reality, we can use a Redux Store. It is an object that, as the name implies, stores the state of your application over time.
A Redux Store is initialized with a reducer function, such as the one we have just implemented:
import {createStore} from 'redux';

const store = createStore(reducer);
What you can then do is dispatch actions to that Store. The Store will internally use your reducer to apply the actions to the current state, and store the resulting, next state:
store.dispatch({type: 'NEXT'});
At any point in time, you can obtain the current state from inside the Store:
store.getState();
We're going to set up and export a Redux Store in a file called store.js. Let's test it first. We should be able to make a store, read its initial state, dispatch action, and witness the changed state:
import {Map, fromJS} from 'immutable';
import {expect} from 'chai';

import makeStore from '../src/store';

describe('store', () => {

  it('is a Redux store configured with the correct reducer', () => {
    const store = makeStore();
    expect(store.getState()).to.equal(Map());

    store.dispatch({
      type: 'SET_ENTRIES',
      entries: ['Trainspotting', '28 Days Later']
    });
    expect(store.getState()).to.equal(fromJS({
      entries: ['Trainspotting', '28 Days Later']
    }));
  });

});
Before we can create the Store, we need to add Redux into the project:
npm install --save redux
Then we can create store.js, where we simply call createStore with our reducer:
import {createStore} from 'redux';
import reducer from './reducer';

export default function makeStore() {
  return createStore(reducer);
}
So, the Redux store ties things together into something we'll be able to use as the central point of our application: It holds the current state, and over time can receive actions that evolve the state from one version to the next, using the core application logic we have written and exposed through the reducer.
Question: How many variables do you need in a Redux application?
Answer: One. The one inside the store.
This notion may sound ludicrous at first - at least if you haven't done much functional programming. How can you do anything useful with just one variable?
But the fact is we don't need any more variables than that. The current state tree is the only thing that varies over time in our core application. The rest is all constants and immutable values.
It is quite remarkable just how small the integration surface area between our application code and Redux actually is. Because we have a generic reducer function, that's the only thing we need to let Redux know about. The rest is all in our own, non-framework-specific, highly portable and purely functional code!
If we now create the index.js entry point for the application, we can have it create and export a store:
import makeStore from './src/store';

export const store = makeStore();
Since we also export the store, you could now fire up a Node REPL (with e.g. babel-node), require the index.js file and interact with the application using the store.
Setting Up a Socket.io Server
Our application is going to act as a server for a separate browser application that provides the UIs for voting and viewing results. For that purpose, we need a way for the clients to communicate with the server, and vice versa.
This is an app that benefits from real-time communication, since it's fun for voters to see their own actions and those of others immediately when they occur. For that reason, we're going to use WebSockets to communicate. More specifically, we're going to use the Socket.io library that provides a nice abstraction for WebSockets that works across browsers. It also has a number of fallback mechanisms for clients that don't support WebSockets.
Let's add Socket.io to the project:
npm install --save socket.io
Then, let's create a file called server.js which exports a function that creates a Socket.io server:
import Server from 'socket.io';

export default function startServer() {
  const io = new Server().attach(8090);
}
This creates a Socket.io server, as well as a regular HTTP server bound to port 8090. The choice of port is arbitrary, but it needs to match the port we'll later use to connect from clients.
We can then have index.js call this function, so that a server is started when the app starts:
import makeStore from './src/store';
import startServer from './src/server';

export const store = makeStore();
startServer();
If we now add a start command to our package.json, we'll make startup a bit simpler:
"scripts": {
  "start": "babel-node index.js",
  "test": "mocha --compilers js:babel-core/register  --require ./test/test_helper.js  --recursive",
  "test:watch": "npm run test -- --watch"
},
Now we can simply start the server (and create the Redux store) by typing:
npm run start
The babel-node command comes from the babel-cli package that we installed earlier. It allows us to easily run Node code with Babel transpiling support enabled. It adds some performance overhead so it isn't generally recommended for production use, but it works well for the purposes of our tutorial.
Broadcasting State from A Redux Listener
We have a Socket.io server and we have a Redux state container but they aren't yet integrated in any way. The next thing we'll do is change that.
Our server should be able to let clients know about the current state of the application (i.e. "what is being voted on?", "What is the current tally of votes?", "Is there a winner yet?"). It can do so by emitting a Socket.io event to all connected clients whenever something changes.
And how can we know when something has changed? Well, Redux provides something for exactly this purpose: You can subscribe to a Redux store. You do that by providing a function that the store will call after every action it applies, when the state has potentially changed. It is essentially a callback to state changes within the store.
We'll do this in startServer, so let's give it the Redux store first:
import makeStore from './src/store';
import {startServer} from './src/server';

export const store = makeStore();
startServer(store);
What we'll do is subscribe a listener to the store that reads the current state, turns it into a plain JavaScript object, and emits it as a state event on the Socket.io server. The result will be that a JSON-serialized snapshot of the state is sent over all active Socket.io connections.
import Server from 'socket.io';

export function startServer(store) {
  const io = new Server().attach(8090);

  store.subscribe(
    () => io.emit('state', store.getState().toJS())
  );
}
We are now publishing the whole state to everyone whenever any changes occur. This may end up causing a lot of data transfer. One could think of various ways of optimizing this (e.g. just sending the relevant subset, sending diffs instead of snapshots...), but this implementation has the benefit of being easy to write, so we'll just use it for our example app.
In addition to sending a state snapshot whenever state changes, it will be useful for clients to immediately receive the current state when they connect to the application. That lets them sync their client-side state to the latest server state right away.
We can listen to 'connection' events on our Socket.io server. We get one each time a client connects. In the event listener we can emit the current state right away:
import Server from 'socket.io';

export function startServer(store) {
  const io = new Server().attach(8090);

  store.subscribe(
    () => io.emit('state', store.getState().toJS())
  );

  io.on('connection', (socket) => {
    socket.emit('state', store.getState().toJS());
  });

}
Receiving Remote Redux Actions
In addition to emitting the application state out to clients, we should also be able to receive updates from them: Voters will be assigning votes, and the vote organizer will be moving the contest forward using the NEXT action.
The solution we'll use for this is actually quite simple. What we can do is simply have our clients emit 'action' events that we feed directly into our Redux store:
import Server from 'socket.io';

export function startServer(store) {
  const io = new Server().attach(8090);

  store.subscribe(
    () => io.emit('state', store.getState().toJS())
  );

  io.on('connection', (socket) => {
    socket.emit('state', store.getState().toJS());
    socket.on('action', store.dispatch.bind(store));
  });

}
This is where we start to go beyond "regular Redux", since we are now essentially accepting remote actions into our store. However, the Redux architecture makes it remarkably easy to do: Since actions are just JavaScript objects, and JavaScript objects can easily be sent over the network, we immediately got a system with which any number of clients can participate in voting. That's no small feat!
There are some obvious security considerations here. We're allowing any connected Socket.io client to dispatch any action into the Redux store.
In most real-world cases, there should be some kind of firewall here, probably not dissimilar to the one in the Vert.x Event Bus Bridge. Apps that have an authentication mechanism should also plug it in here.
Our server now operates essentially like this:
- A client sends an action to the server.
- The server hands the action to the Redux Store.
- The Store calls the reducer and the reducer executes the logic related to the action.
- The Store updates its state based on the return value of the reducer.
- The Store executes the listener function subscribed by the server.
- The server emits a
'state'event. - All connected clients - including the one that initiated the original action - receive the new state.
Before we're done with the server, let's have it load up a set of test entries for us to play with, so that we have something to look at once we have the whole system going. We can add an entries.json file that lists the contest entries. For example, the list of Danny Boyle's feature films to date - feel free to substitute your favorite subject matter though!
[
  "Shallow Grave",
  "Trainspotting",
  "A Life Less Ordinary",
  "The Beach",
  "28 Days Later",
  "Millions",
  "Sunshine",
  "Slumdog Millionaire",
  "127 Hours",
  "Trance",
  "Steve Jobs"
]
We can just load this in into index.js and then kick off the vote by dispatching a NEXT action:
import makeStore from './src/store';
import {startServer} from './src/server';

export const store = makeStore();
startServer(store);

store.dispatch({
  type: 'SET_ENTRIES',
  entries: require('./entries.json')
});
store.dispatch({type: 'NEXT'});
And with that, we're ready to switch our focus to the client application.
The Client Application
During the remainder of this tutorial we'll be writing a React application that connects to the server we now have and makes the voting system come alive to users.
We're going to use Redux again on the client. This is arguably the most common use case for Redux: As the underlying engine of a React application. We've already seen how Redux itself works, and soon we'll learn exactly how it fits together with React and how using it influences the design of React apps.
I recommend following the steps and writing the app from scratch, but if you prefer you can get the code from GitHub.
Client Project Setup
Update 2016-08-02: There is now an easier, officially supported way to get going with a React+Webpack+Babel application than the one explained in this guide: The Create React App tool. I encourage you to try it instead of setting up manually as we do here, by following their instructions for getting started.
You will need to eject the tool once we get to hot reloading and unit testing, because those are not supported by the tool at the moment.
The very first thing we're going to do is start a fresh NPM project, just like we did with the server.
mkdir voting-client
cd voting-client
npm init -y
We're going to need an HTML host page for the app. Let's put that in dist/index.html:
<!DOCTYPE html>
<html>
<body>
  <div id="app"></div>
  <script src="bundle.js"></script>
</body>
</html>
This document just contains a <div> with id app, into which we'll put our application. It expects there to be a JavaScript file called bundle.js in the same directory.
Let's also create the first JavaScript file for this app. This will be the application's entry point file. For now we can just put a simple logging statement in it:
console.log('I am alive!');
To ease our client development workflow, we're going to use Webpack along with its development server, so let's add both to the project:
npm install --save-dev webpack webpack-dev-server
If you don't have them already, also install the same packages globally so that you'll be able to conveniently launch them from the command line: npm install -g webpack webpack-dev-server.
Next, let's add a Webpack configuration file at the root of the project, that matches the files and directories we've created:
module.exports = {
  entry: [
    './src/index.js'
  ],
  output: {
    path: __dirname + '/dist',
    publicPath: '/',
    filename: 'bundle.js'
  },
  devServer: {
    contentBase: './dist'
  }
};
This will find our index.js entrypoint, and build everything into the dist/bundle.js bundle. It'll also use the dist directory as the base of the development server.
You should now be able to run Webpack to produce bundle.js:
webpack
You should also be able to start the dev server, after which the test page (including the logging statement from index.js) should be accessible in localhost:8080.
webpack-dev-server
Since we're going to use both ES6 and React's JSX syntax in the client code, we need some tooling for those. Babel knows how to process both, so let's plug it in. We need both Babel itself and its Webpack loader:
npm install --save-dev babel-core babel-loader babel-preset-es2015 babel-preset-react
In package.json we need to enable Babel support for both ES6/ES2015 and React JSX, by activating the presets we have just installed:
"babel": {
  "presets": ["es2015", "react"]
}
In the Webpack config file we can now change things so that Webpack will find .jsx files along with .js files, and process both through Babel:
module.exports = {
  entry: [
    './src/index.js'
  ],
  module: {
    loaders: [{
      test: /\.jsx?$/,
      exclude: /node_modules/,
      loader: 'babel'
    }]
  },
  resolve: {
    extensions: ['', '.js', '.jsx']
  },
  output: {
    path: __dirname + '/dist',
    publicPath: '/',
    filename: 'bundle.js'
  },
  devServer: {
    contentBase: './dist'
  }
};
In this tutorial we won't be spending any time on CSS. If you'd like the app to look nicer, you can of course add your own styles as you go along.
Alternatively, you can grab some styling from this commit. In addition to a CSS file, it adds Webpack support for including (and autoprefixing) it, as well as a slightly improved result visualization component.
Unit Testing support
We'll be writing some unit tests for the client code too. We can use the same unit test libraries that we used on the server - Mocha and Chai - to test it:
npm install --save-dev mocha chai
We're going to test our React components as well, and that's going to require a DOM. One alternative would be to run tests in an actual web browser with a library like Karma. However, we don't actually need to do that because we can get away with using jsdom, a pure JavaScript DOM implementation that runs in Node:
npm install --save-dev jsdom
The latest versions of jsdom require io.js or Node.js 4.0.0. If you are running an older Node version, you need to explicitly install an older version: npm install --save-dev jsdom@3
We also need a bit of setup code for jsdom before it's ready for React to use. We essentially need to create jsdom versions of the document and window objects that would normally be provided by the web browser. Then we need to put them on the global object, so that they will be discovered by React when it accesses document or window. We can set up a test helper file for this kind of setup code:
import jsdom from 'jsdom';

const doc = jsdom.jsdom('<!doctype html><html><body></body></html>');
const win = doc.defaultView;

global.document = doc;
global.window = win;
Additionally, we need to take all the properties that the jsdom window object contains, such as navigator, and hoist them on to the Node.js global object. This is done so that properties provided by window can be used without the window. prefix, which is what would happen in a browser environment. Some of the code inside React relies on this:
import jsdom from 'jsdom';

const doc = jsdom.jsdom('<!doctype html><html><body></body></html>');
const win = doc.defaultView;

global.document = doc;
global.window = win;

Object.keys(window).forEach((key) => {
  if (!(key in global)) {
    global[key] = window[key];
  }
});
We're also going to be using Immutable collections, so we need to repeat the same trick we applied on the server to add Chai expectation support for them. We should install both the immutable and the chai-immutable package:
npm install --save immutable
npm install --save-dev chai-immutable
Then we should enable it in the test helper file:
import jsdom from 'jsdom';
import chai from 'chai';
import chaiImmutable from 'chai-immutable';

const doc = jsdom.jsdom('<!doctype html><html><body></body></html>');
const win = doc.defaultView;

global.document = doc;
global.window = win;

Object.keys(window).forEach((key) => {
  if (!(key in global)) {
    global[key] = window[key];
  }
});

chai.use(chaiImmutable);
The final step before we can run tests is to come up with the command that will run them, and put it in our package.json. Here it is:
"scripts": {
  "test": "mocha --compilers js:babel-core/register --require ./test/test_helper.js \"test/**/*@(.js|.jsx)\""
},
This is almost the same command that we used in the server's package.json. There only difference is in the test file specification: On the server we just used --recursive, but that option won't find .jsx files. We need to use a glob that will find all .js and .jsx test files.
It will be useful to continuously run tests whenever code changes occur. We can add a test:watch command for this. It is identical to the one for the server:
"scripts": {
  "test": "mocha --compilers js:babel-core/register --require ./test/test_helper.js 'test/**/*.@(js|jsx)'",
  "test:watch": "npm run test -- --watch"
},
React and react-hot-loader
With the Webpack and Babel infrastructure in place, let's talk about React!
What's really cool about the way React applications get built with Redux and Immutable is that we can write everything as so-called Pure Components (also sometimes called "Dumb Components"). As a concept, this is similar to pure functions, in that there are a couple of rules to follow:
- A pure component receives all its data as props, like a function receives all its data as arguments. It should have no side effects, including reading data from anywhere else, initiating network requests, etc.
- A pure component generally has no internal state. What it renders is fully driven by its input props. Rendering the same pure component twice with the same props should result in the same UI. There's no hidden state inside the component that would cause the UI to differ between the two renders.
This has a similar simplifying effect as using pure functions does: We can figure out what a component does by looking at what it receives as inputs and what it renders. There's nothing else we need to know about the component. We can also test it really easily - almost as easily as we were able to test our pure application logic.
If components can't have state, where will the state be? In an immutable data structure inside a Redux store! We've already seen how that works. The big idea is to separate the state from the user interface code. The React components are just a stateless projection of the state at a given point in time.
But, first things first, let's go ahead and add React to the project:
npm install --save react react-dom
We should also set up react-hot-loader. It will make our development workflow much faster by reloading code for us without losing the current state of the app.
npm install --save-dev react-hot-loader
It would be silly of us not to use react-hot-loader, since we'll have an architecture that makes using it really easy. In fact, the creation of both Redux and react-hot-loader are all part of the same story!
We need to make several updates to webpack.config.js to enable the hot loader. Here's the updated version:
var webpack = require('webpack');

module.exports = {
  entry: [
    'webpack-dev-server/client?http://localhost:8080',
    'webpack/hot/only-dev-server',
    './src/index.js'
  ],
  module: {
    loaders: [{
      test: /\.jsx?$/,
      exclude: /node_modules/,
      loader: 'react-hot!babel'
    }]
  },
  resolve: {
    extensions: ['', '.js', '.jsx']
  },
  output: {
    path: __dirname + '/dist',
    publicPath: '/',
    filename: 'bundle.js'
  },
  devServer: {
    contentBase: './dist',
    hot: true
  },
  plugins: [
    new webpack.HotModuleReplacementPlugin()
  ]
};
In the entry section we include two new things to our app's entry points: The client-side library of the Webpack dev server and the Webpack hot module loader. These provide the Webpack infrastructure for hot module replacement. The hot module replacement support isn't loaded by default, so we also need to load its plugin in the plugins section and enable it in the devServer section.
In the loaders section we configure the react-hot loader to be used with our .js and .jsx files, in addition to Babel.
If you now start or restart the development server, you should see a message about Hot Module Replacement being enabled in the console. We're good to go ahead with writing our first component.
Writing The UI for The Voting Screen
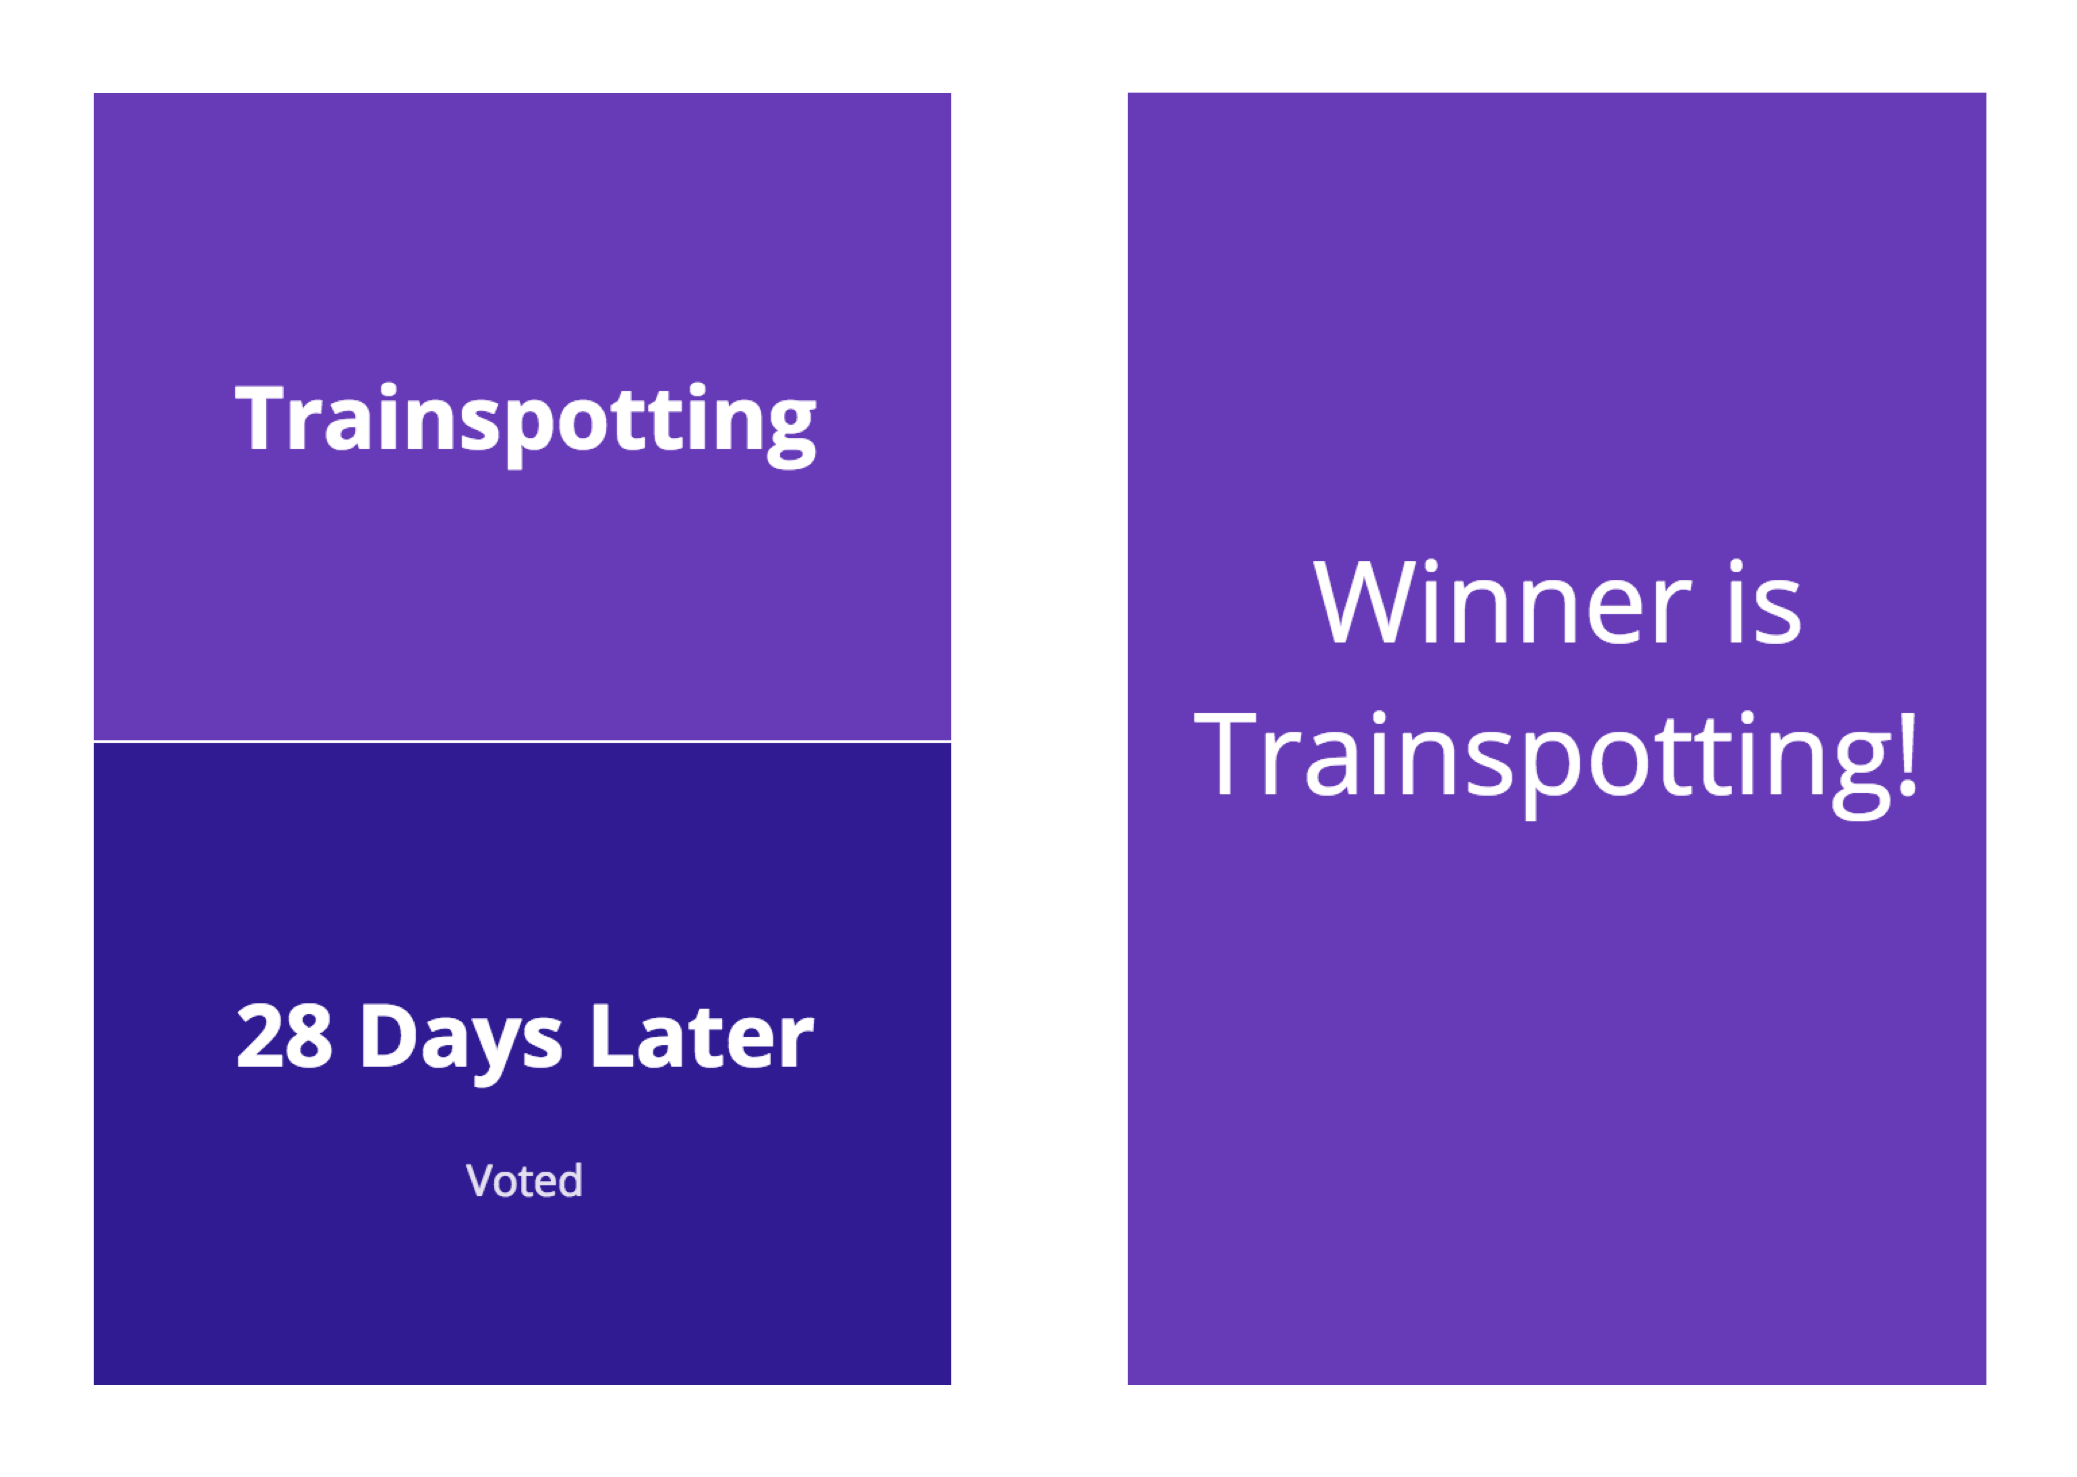
The voting screen of the application will be quite simple: While voting is ongoing, it'll always display two buttons - one for each of the entries being voted on. When the vote is over, it'll display the winner.
 We've been mainly doing test-first development so far, but for the React components we'll switch our workflow around: We'll write the components first and the tests second. This is because Webpack and react-hot-loader provide an even tighter feedback loop for development than unit tests do. Also, there's no better feedback when writing a UI than to actually see it in action!
Let's just assume we're going to have a Voting component and render it in the application entry point. We can mount it into the #app div that we added to index.html earlier. We should also rename index.js to index.jsx since it'll now contain some JSX markup:
import React from 'react';
import ReactDOM from 'react-dom';
import Voting from './components/Voting';

const pair = ['Trainspotting', '28 Days Later'];

ReactDOM.render(
  <Voting pair={pair} />,
  document.getElementById('app')
);
The Voting component takes the current pair of entries as props. For now we can just hardcode that pair, and later we'll substitute it with real data. The component itself is pure and doesn't care where the data comes from.
The entrypoint filename must also be changed in webpack.config.js:
entry: [
  'webpack-dev-server/client?http://localhost:8080',
  'webpack/hot/only-dev-server',
  './src/index.jsx'
],
If you start (or restart) webpack-dev-server now, you'll see it complain about the missing Voting component. Let's fix that by writing our first version of it:
import React from 'react';

export default React.createClass({
  getPair: function() {
    return this.props.pair || [];
  },
  render: function() {
    return <div className="voting">
      {this.getPair().map(entry =>
        <button key={entry}>
          <h1>{entry}</h1>
        </button>
      )}
    </div>;
  }
});
This renders the pair of entries as buttons. You should be able to see them in your web browser. Try making some changes to the component code and see how they're immediately applied in the browser. No restarts, no page reloads. Talk about fast feedback!
If you don't see what you expect, check the webpack-dev-server output as well as the console log in your browser's development tools for problems.
Now we can add our first unit test as well, for the functionality that we've got. It'll go in a file called Voting_spec.jsx:
import Voting from '../../src/components/Voting';

describe('Voting', () => {

});
To test that the component renders those buttons based on the pair prop, we should render it and see what the output was. To render a component in a unit test, we can use a helper function called renderIntoDocument, which will be in the React test utilities package that we first need to install:
npm install --save react-addons-test-utils
import React from 'react';
import ReactDOM from 'react-dom';
import {
  renderIntoDocument
} from 'react-addons-test-utils';
import Voting from '../../src/components/Voting';

describe('Voting', () => {

  it('renders a pair of buttons', () => {
    const component = renderIntoDocument(
      <Voting pair={["Trainspotting", "28 Days Later"]} />
    );
  });

});
Once the component is rendered, we can use another React helper function called scryRenderedDOMComponentsWithTag to find the button elements we expect there to be. We expect two of them, and we expect their text contents to be the two entries, respectively:
import React from 'react';
import ReactDOM from 'react-dom';
import {
  renderIntoDocument,
  scryRenderedDOMComponentsWithTag
} from 'react-addons-test-utils';
import Voting from '../../src/components/Voting';
import {expect} from 'chai';

describe('Voting', () => {

  it('renders a pair of buttons', () => {
    const component = renderIntoDocument(
      <Voting pair={["Trainspotting", "28 Days Later"]} />
    );
    const buttons = scryRenderedDOMComponentsWithTag(component, 'button');

    expect(buttons.length).to.equal(2);
    expect(buttons[0].textContent).to.equal('Trainspotting');
    expect(buttons[1].textContent).to.equal('28 Days Later');
  });

});
If you run the test now, you should see it pass:
npm run test
When one of those voting buttons is clicked, the component should invoke a callback function. Like the entry pair, the callback function should also be given to the component as a prop.
Let's go ahead and add a unit test for this too. We can test this by simulating a click using the Simulate object from React's test utilities:
import React from 'react';
import ReactDOM from 'react-dom';
import {
  renderIntoDocument,
  scryRenderedDOMComponentsWithTag,
  Simulate
} from 'react-addons-test-utils';
import Voting from '../../src/components/Voting';
import {expect} from 'chai';

describe('Voting', () => {

  // ...

  it('invokes callback when a button is clicked', () => {
    let votedWith;
    const vote = (entry) => votedWith = entry;

    const component = renderIntoDocument(
      <Voting pair={["Trainspotting", "28 Days Later"]}
              vote={vote}/>
    );
    const buttons = scryRenderedDOMComponentsWithTag(component, 'button');
    Simulate.click(buttons[0]);

    expect(votedWith).to.equal('Trainspotting');
  });

});
Getting this test to pass is simple enough. We just need an onClick handler on the buttons that invokes vote with the correct entry:
import React from 'react';

export default React.createClass({
  getPair: function() {
    return this.props.pair || [];
  },
  render: function() {
    return <div className="voting">
      {this.getPair().map(entry =>
        <button key={entry}
                onClick={() => this.props.vote(entry)}>
          <h1>{entry}</h1>
        </button>
      )}
    </div>;
  }
});
This is generally how we'll manage user input and actions with pure components: The components don't try to do much about those actions themselves. They merely invoke callback props.
Here we switched back to test-first development by writing the test first and the functionality second. I find it's often easier to initially test user input code from tests than through the browser.
In general, we'll be switching between the test-first and test-last workflows during UI development, based on whichever feels more useful at each step.
Once the user has already voted for a pair, we probably shouldn't let them vote again. While we could handle this internally in the component state, we're really trying to keep our components pure, so we should try to externalize that logic. The component could just take a hasVoted prop, for which we'll just hardcode a value for now:
import React from 'react';
import ReactDOM from 'react-dom';
import Voting from './components/Voting';

const pair = ['Trainspotting', '28 Days Later'];

ReactDOM.render(
  <Voting pair={pair} hasVoted="Trainspotting" />,
  document.getElementById('app')
);
We can make this work quite easily:
import React from 'react';

export default React.createClass({
  getPair: function() {
    return this.props.pair || [];
  },
  isDisabled: function() {
    return !!this.props.hasVoted;
  },
  render: function() {
    return <div className="voting">
      {this.getPair().map(entry =>
        <button key={entry}
                disabled={this.isDisabled()}
                onClick={() => this.props.vote(entry)}>
          <h1>{entry}</h1>
        </button>
      )}
    </div>;
  }
});
Let's also add a little label to the button that the user has voted on, so that it is clear to them what has happened. The label should become visible for the button whose entry matches the hasVoted prop. We can make a new helper method hasVotedFor to decide whether to render the label or not:
import React from 'react';

export default React.createClass({
  getPair: function() {
    return this.props.pair || [];
  },
  isDisabled: function() {
    return !!this.props.hasVoted;
  },
  hasVotedFor: function(entry) {
    return this.props.hasVoted === entry;
  },
  render: function() {
    return <div className="voting">
      {this.getPair().map(entry =>
        <button key={entry}
                disabled={this.isDisabled()}
                onClick={() => this.props.vote(entry)}>
          <h1>{entry}</h1>
          {this.hasVotedFor(entry) ?
            <div className="label">Voted</div> :
            null}
        </button>
      )}
    </div>;
  }
});
The final requirement for the voting screen is that once there is a winner, it will show just that, instead of trying to render any voting buttons. There might another prop for the winner. Again, we can simply hardcode a value for it temporarily until we have real data to plug in:
import React from 'react';
import ReactDOM from 'react-dom';
import Voting from './components/Voting';

const pair = ['Trainspotting', '28 Days Later'];

ReactDOM.render(
  <Voting pair={pair} winner="Trainspotting" />,
  document.getElementById('app')
);
We could handle this in the component by conditionally rendering a winner div or the buttons:
import React from 'react';

export default React.createClass({
  getPair: function() {
    return this.props.pair || [];
  },
  isDisabled: function() {
    return !!this.props.hasVoted;
  },
  hasVotedFor: function(entry) {
    return this.props.hasVoted === entry;
  },
  render: function() {
    return <div className="voting">
      {this.props.winner ?
        <div ref="winner">Winner is {this.props.winner}!</div> :
        this.getPair().map(entry =>
          <button key={entry}
                  disabled={this.isDisabled()}
                  onClick={() => this.props.vote(entry)}>
            <h1>{entry}</h1>
            {this.hasVotedFor(entry) ?
              <div className="label">Voted</div> :
              null}
          </button>
        )}
    </div>;
  }
});
This is the functionality that we need, but the rendering code is now slightly messy. It might be better if we extract some separate components from this, so that the Voting screen component renders either a Winner component or a Vote component. Starting with the Winner component, it can just render a div:
import React from 'react';

export default React.createClass({
  render: function() {
    return <div className="winner">
      Winner is {this.props.winner}!
    </div>;
  }
});
The Vote component will be pretty much exactly like the Voting component was before - just concerned with the voting buttons:
import React from 'react';

export default React.createClass({
  getPair: function() {
    return this.props.pair || [];
  },
  isDisabled: function() {
    return !!this.props.hasVoted;
  },
  hasVotedFor: function(entry) {
    return this.props.hasVoted === entry;
  },
  render: function() {
    return <div className="voting">
      {this.getPair().map(entry =>
        <button key={entry}
                disabled={this.isDisabled()}
                onClick={() => this.props.vote(entry)}>
          <h1>{entry}</h1>
          {this.hasVotedFor(entry) ?
            <div className="label">Voted</div> :
            null}
        </button>
      )}
    </div>;
  }
});
The Voting component itself now merely makes a decision about which of these two components to render:
import React from 'react';
import Winner from './Winner';
import Vote from './Vote';

export default React.createClass({
  render: function() {
    return <div>
      {this.props.winner ?
        <Winner ref="winner" winner={this.props.winner} /> :
        <Vote {...this.props} />}
    </div>;
  }
});
Notice that we added a ref for the Winner component. It's something we'll use in unit tests to grab the corresponding DOM node.
That's our pure Voting component! Notice how we haven't really implemented any logic yet: There are buttons but we haven't specified what they do, except invoke a callback. Our components are concerned with rendering the UI and only that. The application logic will come in later, when we connect the UI to a Redux store.
Before we move on though, time to writes some more unit tests for the new features we've added. Firstly, the presence of the hasVoted props should cause the voting buttons to become disabled:
it('disables buttons when user has voted', () => {
  const component = renderIntoDocument(
    <Voting pair={["Trainspotting", "28 Days Later"]}
            hasVoted="Trainspotting" />
  );
  const buttons = scryRenderedDOMComponentsWithTag(component, 'button');

  expect(buttons.length).to.equal(2);
  expect(buttons[0].hasAttribute('disabled')).to.equal(true);
  expect(buttons[1].hasAttribute('disabled')).to.equal(true);
});
A 'Voted' label should be present on the button whose entry matches the value of hasVoted:
it('adds label to the voted entry', () => {
  const component = renderIntoDocument(
    <Voting pair={["Trainspotting", "28 Days Later"]}
            hasVoted="Trainspotting" />
  );
  const buttons = scryRenderedDOMComponentsWithTag(component, 'button');

  expect(buttons[0].textContent).to.contain('Voted');
});
When there's a winner, there should be no buttons, but instead an element with the winner ref:
it('renders just the winner when there is one', () => {
  const component = renderIntoDocument(
    <Voting winner="Trainspotting" />
  );
  const buttons = scryRenderedDOMComponentsWithTag(component, 'button');
  expect(buttons.length).to.equal(0);

  const winner = ReactDOM.findDOMNode(component.refs.winner);
  expect(winner).to.be.ok;
  expect(winner.textContent).to.contain('Trainspotting');
});
We could also have written unit tests for each component separately, but I find it more appropriate in this case to treat the Voting screen as the "unit" to test. We test the component's external behavior, and the fact that it uses smaller components internally is an implementation detail.
Immutable Data And Pure Rendering
We have discussed the virtues of using immutable data, but there's one additional, very practical benefit that we get when using it together with React: If we only use immutable data in component props, and write the component as a pure component, we can have React use a more efficient strategy for detecting changes in the props.
This is done by applying the PureRenderMixin that is available as an add-on package. When this mixin is added to a component, it changes the way React checks for changes in the component's props (and state). Instead of a deep compare it does a shallow compare, which is much, much faster.
The reason we can do this is that by definition, there can never be changes within immutable data structures. If the props of a component are all immutable values, and the props keep pointing to the same values between renders, there can be no reason to re-render the component, and it can be skipped completely!
We can concretely see what this is about by writing some unit tests. Our component is supposed to be pure, so if we did give it a mutable array, and then caused a mutation inside the array, it should not be re-rendered:
it('renders as a pure component', () => {
  const pair = ['Trainspotting', '28 Days Later'];
  const container = document.createElement('div');
  let component = ReactDOM.render(
    <Voting pair={pair} />,
    container
  );

  let firstButton = scryRenderedDOMComponentsWithTag(component, 'button')[0];
  expect(firstButton.textContent).to.equal('Trainspotting');

  pair[0] = 'Sunshine';
  component = ReactDOM.render(
    <Voting pair={pair} />,
    container
  );
  firstButton = scryRenderedDOMComponentsWithTag(component, 'button')[0];
  expect(firstButton.textContent).to.equal('Trainspotting');
});
Instead of renderIntoDocument we're manually constructing a parent <div> and rendering into it twice so that we can simulate a re-rendering.
We should have to explicitly set a new immutable list in the props to have the change reflected in the UI:
import React from 'react';
import ReactDOM from 'react-dom';
import {
  renderIntoDocument,
  scryRenderedDOMComponentsWithTag,
  Simulate
} from 'react-addons-test-utils';
import {List} from 'immutable';
import Voting from '../../src/components/Voting';
import {expect} from 'chai';

describe('Voting', () => {

  // ...

  it('does update DOM when prop changes', () => {
    const pair = List.of('Trainspotting', '28 Days Later');
    const container = document.createElement('div');
    let component = ReactDOM.render(
      <Voting pair={pair} />,
      container
    );

    let firstButton = scryRenderedDOMComponentsWithTag(component, 'button')[0];
    expect(firstButton.textContent).to.equal('Trainspotting');

    const newPair = pair.set(0, 'Sunshine');
    component = ReactDOM.render(
      <Voting pair={newPair} />,
      container
    );
    firstButton = scryRenderedDOMComponentsWithTag(component, 'button')[0];
    expect(firstButton.textContent).to.equal('Sunshine');
  });

});
I wouldn't usually bother writing tests like this one, and would just assume that PureRenderMixin is being used. In this case the tests just happen to help us understand what exactly is going on.
Running the tests at this point will show how the component is not currently behaving as we expect: It'll update the UI in both cases, which means it is doing deep checks within the props, which is what we wanted to avoid since we're going to be using immutable data.
Everything falls into place when we enable the pure render mixin in our components. We need to install its package first:
npm install --save react-addons-pure-render-mixin
If we now mix it into our components, tests start passing and we're done:
import React from 'react';
import PureRenderMixin from 'react-addons-pure-render-mixin';
import Winner from './Winner';
import Vote from './Vote';

export default React.createClass({
  mixins: [PureRenderMixin],
  // ...
});
import React from 'react';
import PureRenderMixin from 'react-addons-pure-render-mixin';

export default React.createClass({
  mixins: [PureRenderMixin],
  // ...
});
import React from 'react';
import PureRenderMixin from 'react-addons-pure-render-mixin';

export default React.createClass({
  mixins: [PureRenderMixin],
  // ...
});
Strictly speaking, the tests would start to pass if we only enabled the pure render mixin for Voting and didn't bother with the two other components. That's because when React doesn't notice any changes in the Voting props, it skips re-rendering for the whole component subtree.
However, I find it more appropriate to consistently use the pure render mixin in all my components, both to make it explicit that the components are pure, and to make sure they will behave as I expect even after I rearrange them.
Writing The UI for The Results Screen And Handling Routing
With that Voting screen all done, let's move on to the other main screen of the app: The one where results will be shown.
The data displayed here is the same pair of entries as in the voting screen, and the tally of votes for each. Additionally, there's a little button on the bottom with which the person managing the vote can move on to the next pair.
What we have here are two separate screens, exactly one of which should be shown at any given time. To choose between the two, using URL paths might be a good idea: We could set the root path #/ to show the voting screen, and a #/results path to show the results screen.
That kind of thing can easily be done with the react-router library, with which we can associate different components to different paths. Let's add it to the project:
npm install --save react-router@2.0.0
We can now configure our route paths. The Router comes with a React component called Route, which can be used to declaratively define a routing table. For now, we'll have just one route:
import React from 'react';
import ReactDOM from 'react-dom';
import {Route} from 'react-router';
import App from './components/App';
import Voting from './components/Voting';

const pair = ['Trainspotting', '28 Days Later'];

const routes = <Route component={App}>
  <Route path="/" component={Voting} />
</Route>;

ReactDOM.render(
  <Voting pair={pair} />,
  document.getElementById('app')
);
We have a single route that we have configured to point to the Voting component. The other thing we've done here is define a component for the root Route in the configuration, which will be shared for all the concrete routes within. It's pointing to an App component, which we'll soon create.
The purpose of the root route component is to render all the markup that is common across all routes. Here's what our root component App should look like:
import React from 'react';
import {List} from 'immutable';

const pair = List.of('Trainspotting', '28 Days Later');

export default React.createClass({
  render: function() {
    return React.cloneElement(this.props.children, {pair: pair});
  }
});
This component does nothing except render its child components, expected to be given in as the children prop. This is something that the react-router package does for us. It plugs in the component(s) defined for whatever the current route happens to be. Since we currently just have the one route for Voting, at the moment this component always renders Voting.
Notice that we've moved the placeholder pair data from index.jsx to App.jsx. We use React's cloneElement API to create a clone of the original components with our custom pair prop attached. This is just a temporary measure, and we'll be able to remove the cloning call later.
Earlier we discussed how it's generally a good idea to use the pure render mixin across all components. The App component is an exception to this rule. The reason is that it would cause route changes not to fire, because of an implementation issue between the router and React itself. This situation may well change in the near future.
We can now switch back to index.js where we can kickstart the Router itself, and have it initialize our application:
import React from 'react';
import ReactDOM from 'react-dom';
import {Router, Route, hashHistory} from 'react-router';
import App from './components/App';
import Voting from './components/Voting';

const routes = <Route component={App}>
  <Route path="/" component={Voting} />
</Route>;

ReactDOM.render(
  <Router history={hashHistory}>{routes}</Router>,
  document.getElementById('app')
);
We now supply the Router component from the react-router package as the root component of our application, instructing it to use the #hash based history mechanism (as opposed to the HTML5 history API). We plug our route table into it by passing it in as a child component.
With this, we've restored the previous functionality of our app: It just renders the Voting component. But this time it is done with the React router baked in, which means we can now easily add more routes. Let's do that for our results screen, which will be served by a new component called Results:
import React from 'react';
import ReactDOM from 'react-dom';
import {Router, Route, hashHistory} from 'react-router';
import App from './components/App';
import Voting from './components/Voting';
import Results from './components/Results';

const routes = <Route component={App}>
  <Route path="/results" component={Results} />
  <Route path="/" component={Voting} />
</Route>;

ReactDOM.render(
  <Router history={hashHistory}>{routes}</Router>,
  document.getElementById('app')
);
Here we use the <Route> component again to specify that for a path named "/results", the Results component should be used. Everything else will still be handled by Voting.
Let's make a simple implementation of Results so that we can see how the routing works:
import React from 'react';
import PureRenderMixin from 'react-addons-pure-render-mixin';

export default React.createClass({
  mixins: [PureRenderMixin],
  render: function() {
    return <div>Hello from results!</div>
  }
});
If you now point your browser to http://localhost:8080/#/results, you should see the little message from the Results component. The root path, on the other hand, should show the voting buttons. You can also use the back and forward buttons to switch between the routes, and the visible component is switched while the application remains alive. That's the router in action!
This is all we're going to do with the React Router in this application. The library is capable of a lot more though. Take a look at its documentation to find out about all the things you can do with it.
Now that we have a placeholder Results component, let's go right ahead and make it do something useful. It should display the same two entries currently being voted on that the Voting component does:
import React from 'react';
import PureRenderMixin from 'react-addons-pure-render-mixin';

export default React.createClass({
  mixins: [PureRenderMixin],
  getPair: function() {
    return this.props.pair || [];
  },
  render: function() {
    return <div className="results">
      {this.getPair().map(entry =>
        <div key={entry} className="entry">
          <h1>{entry}</h1>
        </div>
      )}
    </div>;
  }
});
Since this is the results screen, it should also actually show the tally of votes. That's what people want to see when they're on this screen. Let's pass in a placeholder tally Map to the component from our root App component first:
import React from 'react';
import {List, Map} from 'immutable';

const pair = List.of('Trainspotting', '28 Days Later');
const tally = Map({'Trainspotting': 5, '28 Days Later': 4});

export default React.createClass({
  render: function() {
    return React.cloneElement(this.props.children, {
      pair: pair,
      tally: tally
    });
  }
});
Now we can tweak the Results component to show those numbers:
import React from 'react';
import PureRenderMixin from 'react-addons-pure-render-mixin';

export default React.createClass({
  mixins: [PureRenderMixin],
  getPair: function() {
    return this.props.pair || [];
  },
  getVotes: function(entry) {
    if (this.props.tally && this.props.tally.has(entry)) {
      return this.props.tally.get(entry);
    }
    return 0;
  },
  render: function() {
    return <div className="results">
      {this.getPair().map(entry =>
        <div key={entry} className="entry">
          <h1>{entry}</h1>
          <div className="voteCount">
            {this.getVotes(entry)}
          </div>
        </div>
      )}
    </div>;
  }
});
At this point, let's switch gears and add a unit test for the current behavior of the Results component to make sure we won't break it later.
We expect the component to render a div for each entry, and display both the entry name and the number of votes within that div. For entries that have no votes, a vote count of zero should be shown:
import React from 'react';
import {
  renderIntoDocument,
  scryRenderedDOMComponentsWithClass
} from 'react-addons-test-utils';
import {List, Map} from 'immutable';
import Results from '../../src/components/Results';
import {expect} from 'chai';

describe('Results', () => {

  it('renders entries with vote counts or zero', () => {
    const pair = List.of('Trainspotting', '28 Days Later');
    const tally = Map({'Trainspotting': 5});
    const component = renderIntoDocument(
      <Results pair={pair} tally={tally} />
    );
    const entries = scryRenderedDOMComponentsWithClass(component, 'entry');
    const [train, days] = entries.map(e => e.textContent);

    expect(entries.length).to.equal(2);
    expect(train).to.contain('Trainspotting');
    expect(train).to.contain('5');
    expect(days).to.contain('28 Days Later');
    expect(days).to.contain('0');
  });

});
Next, let's talk about the "Next" button, which is used to move the voting to the next entry.
From the component's point of view, there should just be a callback function in the props. The component should invoke that callback when the "Next" button inside it is clicked. We can formulate a unit test for this, which is quite similar to the ones we made for the voting buttons:
import React from 'react';
import ReactDOM from 'react-dom';
import {
  renderIntoDocument,
  scryRenderedDOMComponentsWithClass,
  Simulate
} from 'react-addons-test-utils';
import {List, Map} from 'immutable';
import Results from '../../src/components/Results';
import {expect} from 'chai';


describe('Results', () => {

  // ...

  it('invokes the next callback when next button is clicked', () => {
    let nextInvoked = false;
    const next = () => nextInvoked = true;

    const pair = List.of('Trainspotting', '28 Days Later');
    const component = renderIntoDocument(
      <Results pair={pair}
               tally={Map()}
               next={next}/>
    );
    Simulate.click(ReactDOM.findDOMNode(component.refs.next));

    expect(nextInvoked).to.equal(true);
  });

});
The implementation is also similar to the voting buttons. It is just slightly simpler, as there are no arguments to pass:
import React from 'react';
import PureRenderMixin from 'react-addons-pure-render-mixin';

export default React.createClass({
  mixins: [PureRenderMixin],
  getPair: function() {
    return this.props.pair || [];
  },
  getVotes: function(entry) {
    if (this.props.tally && this.props.tally.has(entry)) {
      return this.props.tally.get(entry);
    }
    return 0;
  },
  render: function() {
    return <div className="results">
      <div className="tally">
        {this.getPair().map(entry =>
          <div key={entry} className="entry">
            <h1>{entry}</h1>
            <div class="voteCount">
              {this.getVotes(entry)}
            </div>
          </div>
        )}
      </div>
      <div className="management">
        <button ref="next"
                className="next"
                onClick={this.props.next}>
          Next
        </button>
      </div>
    </div>;
  }
});
Finally, just like the Voting screen, the Results screen should display the winner once we have one:
it('renders the winner when there is one', () => {
  const component = renderIntoDocument(
    <Results winner="Trainspotting"
             pair={["Trainspotting", "28 Days Later"]}
             tally={Map()} />
  );
  const winner = ReactDOM.findDOMNode(component.refs.winner);
  expect(winner).to.be.ok;
  expect(winner.textContent).to.contain('Trainspotting');
});
We can implement this by simply reusing the Winner component we already developed for the Voting screen. If there's a winner, we render it instead of the regular Results screen:
import React from 'react';
import PureRenderMixin from 'react-addons-pure-render-mixin';
import Winner from './Winner';

export default React.createClass({
  mixins: [PureRenderMixin],
  getPair: function() {
    return this.props.pair || [];
  },
  getVotes: function(entry) {
    if (this.props.tally && this.props.tally.has(entry)) {
      return this.props.tally.get(entry);
    }
    return 0;
  },
  render: function() {
    return this.props.winner ?
      <Winner ref="winner" winner={this.props.winner} /> :
      <div className="results">
        <div className="tally">
          {this.getPair().map(entry =>
            <div key={entry} className="entry">
              <h1>{entry}</h1>
              <div className="voteCount">
                {this.getVotes(entry)}
              </div>
            </div>
          )}
        </div>
        <div className="management">
          <button ref="next"
                   className="next"
                   onClick={this.props.next}>
            Next
          </button>
        </div>
      </div>;
  }
});
This component would also benefit from being broken down into smaller ones. Perhaps a Tally component for displaying the pair of entries. Go ahead and do the refactoring if you feel like it!
And that's pretty much what our simple application will need in terms of UI! The components we've written don't yet do anything because they're not connected to any real data or actions. It is remarkable, however, just how far we're able to get without needing any of that. We have been able to just inject some simple placeholder data to these components and concentrate on the structure of the UI.
Now that we do have the UI though, let's talk about how to make it come alive by connecting its inputs and outputs to a Redux store.
Introducing A Client-Side Redux Store
Redux is really designed to be used as the state container for UI applications, exactly like the one we are in the process of building. We've only used Redux on the server so far though, and discovered it's actually pretty useful there too! Now we're ready to look at how Redux works with a React application, which is arguably where it's most commonly used.
Just like on the server, we'll begin by thinking about the state of the application. That state is going to be quite similar to the one on the server, which is not by accident.
We have a UI with two screens. On both of them we display the pair of entries that's being voted on. It would make sense to have a state which included a vote entry with such a pair:

In addition to this, the results screen displays the current tally of votes. That should also be in the vote state:
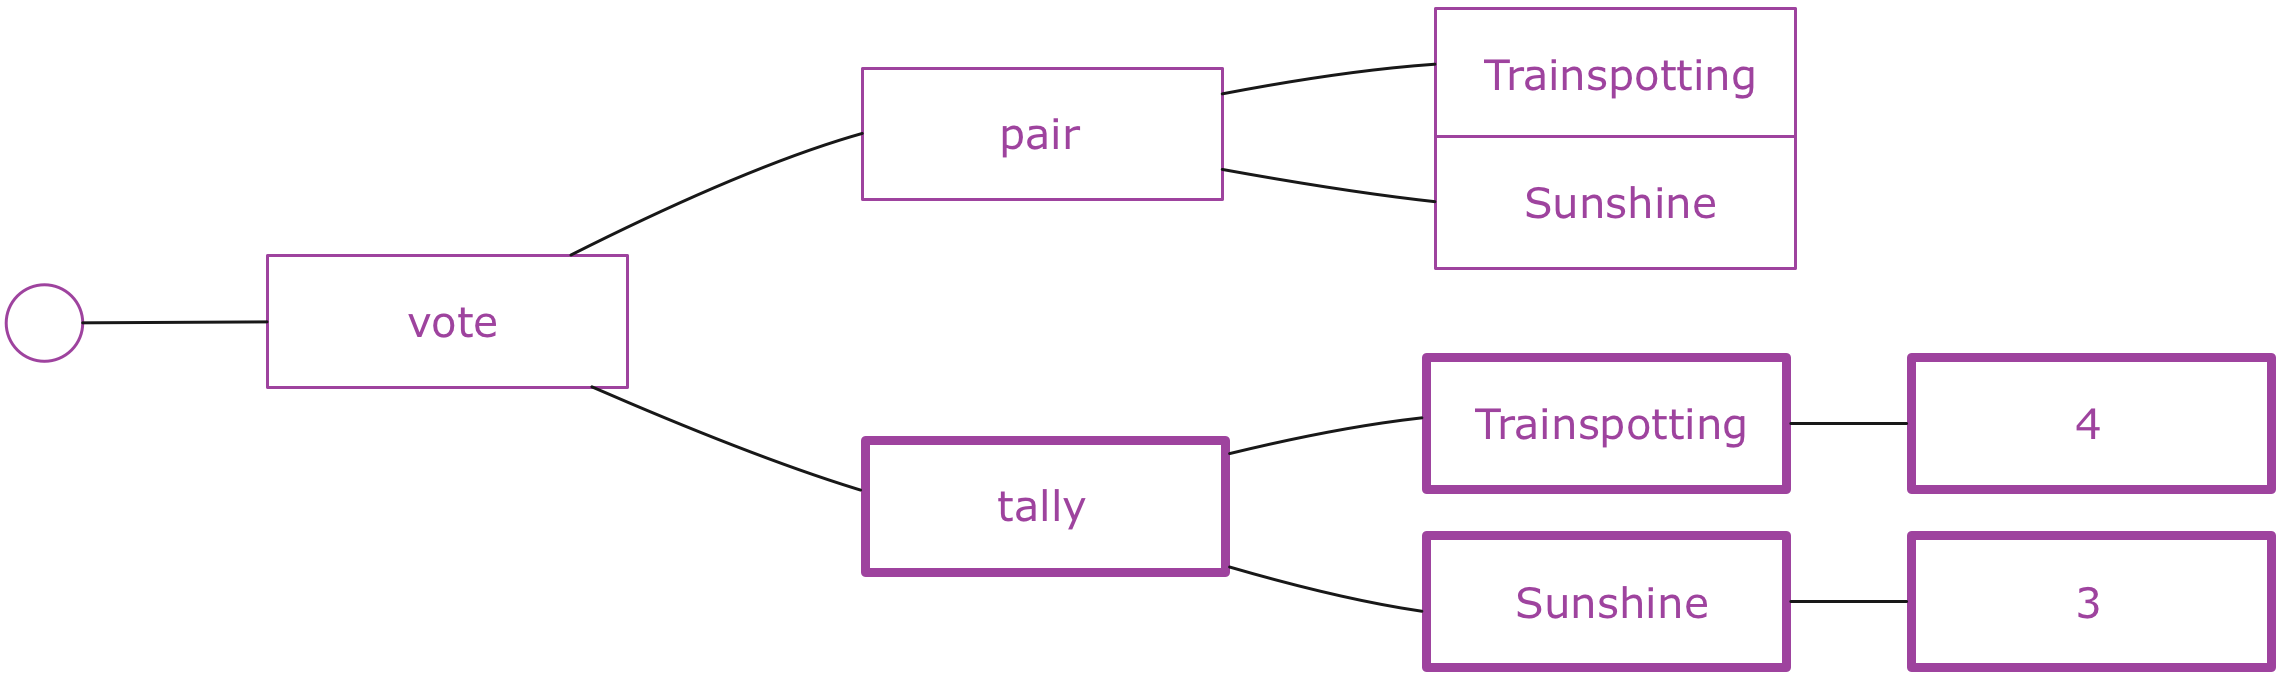
The Voting component renders differently when the user has already voted in the current pair. This is something that the state also needs to track:
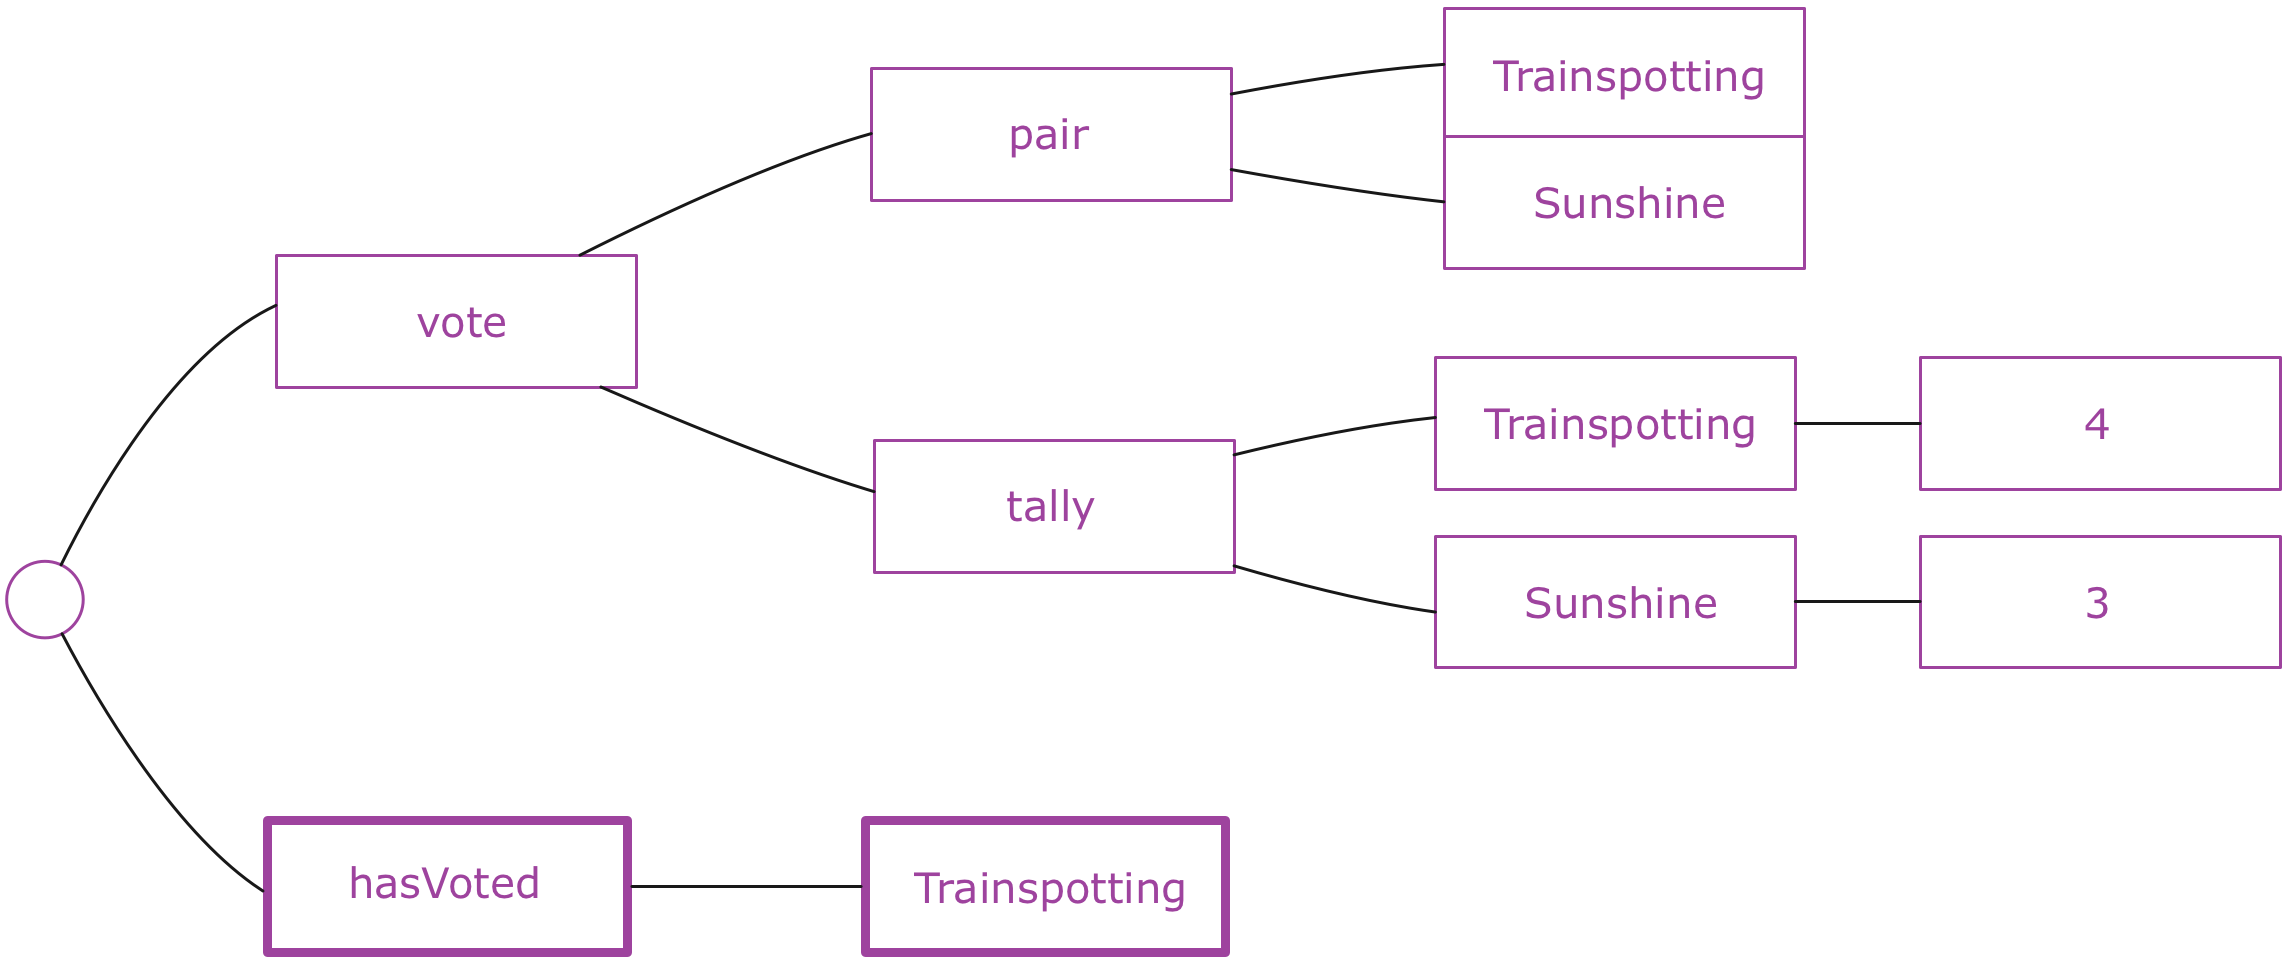
When there is a winner, we need that and only that in the state:
Notice that everything in here is a subset of the server state, except for the hasVoted entry.
This brings us to the implementation of the core logic and the actions and reducers that our Redux Store will use. What should they be?
We can think about this in terms of what can happen while the application is running that could cause the state to change. One source of state changes are the user's actions. We currently have two possible user interactions built into the UI:
- The user clicks one of the vote buttons on the voting screen.
- The user click on the Next button on the results screen./li>
Additionally, we know that our server is set up to send us its current state. We will soon be writing the code for receiving it. That is a third source of state change.
We can begin with the server state update, since that is going to be the most straightforward one to do. Earlier we set the server up to emit a state event, whose payload is almost exactly the shape of the client-side state trees that we have drawn. This is no coincidence since that's how we designed it. From the point of view of our client's reducer, it would make sense to have an action that receives the state snapshot from the server and just merges it into the client state. The action would look something like this:
{
  type: 'SET_STATE',
  state: {
    vote: {...}
  }
}
Let's add some unit tests to see how this might work out. We're expecting to have a reducer that, given an action like the one above, merges its payload into the current state:
import {List, Map, fromJS} from 'immutable';
import {expect} from 'chai';

import reducer from '../src/reducer';

describe('reducer', () => {

  it('handles SET_STATE', () => {
    const initialState = Map();
    const action = {
      type: 'SET_STATE',
      state: Map({
        vote: Map({
          pair: List.of('Trainspotting', '28 Days Later'),
          tally: Map({Trainspotting: 1})
        })
      })
    };
    const nextState = reducer(initialState, action);

    expect(nextState).to.equal(fromJS({
      vote: {
        pair: ['Trainspotting', '28 Days Later'],
        tally: {Trainspotting: 1}
      }
    }));
  });

});
The reducers should be able to receive plain JavaScript data structure, as opposed to an Immutable data structure, since that's what actually get from the socket. It should still be turned into an immutable data structure by the time it is returned as the next value:
it('handles SET_STATE with plain JS payload', () => {
  const initialState = Map();
  const action = {
    type: 'SET_STATE',
    state: {
      vote: {
        pair: ['Trainspotting', '28 Days Later'],
        tally: {Trainspotting: 1}
      }
    }
  };
  const nextState = reducer(initialState, action);

  expect(nextState).to.equal(fromJS({
    vote: {
      pair: ['Trainspotting', '28 Days Later'],
      tally: {Trainspotting: 1}
    }
  }));
});
As part of the reducer contract, an undefined initial state should also be correctly initialized into an Immutable data structure by the reducer:
it('handles SET_STATE without initial state', () => {
  const action = {
    type: 'SET_STATE',
    state: {
      vote: {
        pair: ['Trainspotting', '28 Days Later'],
        tally: {Trainspotting: 1}
      }
    }
  };
  const nextState = reducer(undefined, action);

  expect(nextState).to.equal(fromJS({
    vote: {
      pair: ['Trainspotting', '28 Days Later'],
      tally: {Trainspotting: 1}
    }
  }));
});
That's our spec. Let's see how to fulfill it. We should have a reducer function exported by the reducer module:
import {Map} from 'immutable';

export default function(state = Map(), action) {

  return state;
}
The reducer should handle the SET_STATE action. In its handler function we can actually just merge the given new state to the old state, using the merge function from Map. That makes our tests pass!
import {Map} from 'immutable';

function setState(state, newState) {
  return state.merge(newState);
}

export default function(state = Map(), action) {
  switch (action.type) {
  case 'SET_STATE':
    return setState(state, action.state);
  }
  return state;
}
Notice that here we are not bothering with a "core" module separated from the reducer module. That's because the logic in our reducer is so simple that it doesn't really warrant one. We're just doing a merge, whereas on the server we have our whole voting system's logic in there. It might later be more appropriate to add some separation of concerns in the client as well, if the need arises.
The two remaining causes for state change are the user actions: Voting and clicking "Next". Since these are both actions that involve server interaction, we'll return to them a bit later, after we've got the architecture for server communication in place.
Now that we have a reducer though, we can spin up a Redux Store from it. Time to add Redux to the project:
npm install --save redux
The entry point index.jsx is a good place to set up the Store. Let's also kick it off with some state by dispatching the SET_STATE action on it (this is only temporary until we get real data in):
import React from 'react';
import ReactDOM from 'react-dom';
import {Router, Route, hashHistory} from 'react-router';
import {createStore} from 'redux';
import reducer from './reducer';
import App from './components/App';
import Voting from './components/Voting';
import Results from './components/Results';

const store = createStore(reducer);
store.dispatch({
  type: 'SET_STATE',
  state: {
    vote: {
      pair: ['Sunshine', '28 Days Later'],
      tally: {Sunshine: 2}
    }
  }
});

const routes = <Route component={App}>
  <Route path="/results" component={Results} />
  <Route path="/" component={Voting} />
</Route>;

ReactDOM.render(
  <Router history={hashHistory}>{routes}</Router>,
  document.getElementById('app')
);
There's our Store. Now, how do we get the data from the Store into the React components?
Getting Data In from Redux to React
We have a Redux Store that holds our immutable application state. We have stateless React components that take immutable data as inputs. The two would be a great fit: If we can figure out a way to always get the latest data from the Store to the components, that would be perfect. React would re-render when the state changes, and the pure render mixin would make sure that the parts of the UI that have no need to re-render won't be.
Rather than writing such synchronization code ourselves, we can make use of the Redux React bindings that are available in the react-redux package:
npm install --save react-redux
The big idea of react-redux is to take our pure components and wire them up into a Redux Store by doing two things:
- Mapping the Store state into component input props.
- Mapping actions into component output callback props.
Before any of this is possible, we need to wrap our top-level application component inside a react-redux Provider component. This connects our component tree to a Redux store, enabling us to make the mappings for individual components later.
We'll put in the Provider around the Router component. That'll cause the Provider to be an ancestor to all of our application components:
import React from 'react';
import ReactDOM from 'react-dom';
import {Router, Route, hashHistory} from 'react-router';
import {createStore} from 'redux';
import {Provider} from 'react-redux';
import reducer from './reducer';
import App from './components/App';
import {VotingContainer} from './components/Voting';
import Results from './components/Results';

const store = createStore(reducer);
store.dispatch({
  type: 'SET_STATE',
  state: {
    vote: {
      pair: ['Sunshine', '28 Days Later'],
      tally: {Sunshine: 2}
    }
  }
});

const routes = <Route component={App}>
  <Route path="/results" component={Results} />
  <Route path="/" component={VotingContainer} />
</Route>;

ReactDOM.render(
  <Provider store={store}>
    <Router history={hashHistory}>{routes}</Router>
  </Provider>,
  document.getElementById('app')
);

});
Next, we should think about which of our components need to be "wired up" so that all the data will come from the Store. We have five component, which we can divide in three categories:
- The root component
Appdoesn't really need anything since it doesn't use any data. VoteandWinnerare only used by parent components that give them all the props they need. They don't need wiring up either.- What's left are the components we use in routes:
VotingandResults. They are currently getting data in as hardcoded placeholder props fromApp. These are the components that need to be wired up to the Store.
Let's begin with the Voting component. With react-redux we get a function called connect that can do the wiring-up of a component. It takes a mapping function as an argument and returns another function that takes a React component class:
connect(mapStateToProps)(SomeComponent);
The role of the mapping function is to map the state from the Redux Store into an object of props. Those props will then be merged into the props of the component that's being connected. In the case of Voting, we just need to map the pair and winner from the state:
import React from 'react';
import PureRenderMixin from 'react-addons-pure-render-mixin'
import {connect} from 'react-redux';
import Winner from './Winner';
import Vote from './Vote';

const Voting = React.createClass({
  mixins: [PureRenderMixin],
  render: function() {
    return <div>
      {this.props.winner ?
        <Winner ref="winner" winner={this.props.winner} /> :
        <Vote {...this.props} />}
    </div>;
  }
});

function mapStateToProps(state) {
  return {
    pair: state.getIn(['vote', 'pair']),
    winner: state.get('winner')
  };
}

connect(mapStateToProps)(Voting);

export default Voting;
This isn't quite right though. True to functional style, the connect function doesn't actually go and mutate the Voting component. Voting remains a pure, unconnected component. Instead, connect returns a connected version of Voting. That means our current code isn't really doing anything. We need to grab that return value, which we'll call VotingContainer:
import React from 'react';
import PureRenderMixin from 'react-addons-pure-render-mixin';
import {connect} from 'react-redux';
import Winner from './Winner';
import Vote from './Vote';

export const Voting = React.createClass({
  mixins: [PureRenderMixin],
  render: function() {
    return <div>
      {this.props.winner ?
        <Winner ref="winner" winner={this.props.winner} /> :
        <Vote {...this.props} />}
    </div>;
  }
});

function mapStateToProps(state) {
  return {
    pair: state.getIn(['vote', 'pair']),
    winner: state.get('winner')
  };
}

export const VotingContainer = connect(mapStateToProps)(Voting);
The module now exports two components: The pure component Voting and the connected component VotingContainer. The react-redux documentation calls the former a "dumb" component and the latter a "smart" component. I prefer "pure" and "connected". Call them what you will, understanding the difference is key:
- The pure/dumb component is fully driven by the props it is given. It is the component equivalent of a pure function.
- The connected/smart component, on the other hand, wraps the pure version with some logic that will keep it in sync with the changing state of the Redux Store. That logic is provided by react-redux.
We should update our routing table, so that it uses VotingContainer instead of Voting. Once we've done that, the voting screen will come alive with the data we've put in the Redux store:
import React from 'react';
import ReactDOM from 'react-dom';
import {Router, Route, hashHistory} from 'react-router';
import {createStore} from 'redux';
import {Provider} from 'react-redux';
import reducer from './reducer';
import App from './components/App';
import {VotingContainer} from './components/Voting';
import Results from './components/Results';

const store = createStore(reducer);
store.dispatch({
  type: 'SET_STATE',
  state: {
    vote: {
      pair: ['Sunshine', '28 Days Later'],
      tally: {Sunshine: 2}
    }
  }
});

const routes = <Route component={App}>
  <Route path="/results" component={Results} />
  <Route path="/" component={VotingContainer} />
</Route>;

ReactDOM.render(
  <Provider store={store}>
    <Router history={hashHistory}>{routes}</Router>
  </Provider>,
  document.getElementById('app')
);
In the unit tests for Voting we need to change the way the import is done, as we no longer have Voting as the default export:
import React from 'react';
import ReactDOM from 'react-dom';
import {
  renderIntoDocument,
  scryRenderedDOMComponentsWithTag,
  Simulate
} from 'react-addons-test-utils';
import {List} from 'immutable';
import {Voting} from '../../src/components/Voting';
import {expect} from 'chai';
No other changes are needed for tests. They are written for the pure Voting component, and it isn't changed in any way. We've just added a wrapper for it that connects it to a Redux store.
Now we should just apply the same trick for the Results screen. It also needs the pair and winner attributes of the state. Additionally it needs tally, in order to show the vote counts:
import React from 'react';
import PureRenderMixin from 'react-addons-pure-render-mixin';
import {connect} from 'react-redux';
import Winner from './Winner';

export const Results = React.createClass({
  mixins: [PureRenderMixin],
  getPair: function() {
    return this.props.pair || [];
  },
  getVotes: function(entry) {
    if (this.props.tally && this.props.tally.has(entry)) {
      return this.props.tally.get(entry);
    }
    return 0;
  },
  render: function() {
    return this.props.winner ?
      <Winner ref="winner" winner={this.props.winner} /> :
      <div className="results">
        <div className="tally">
          {this.getPair().map(entry =>
            <div key={entry} className="entry">
              <h1>{entry}</h1>
              <div className="voteCount">
                {this.getVotes(entry)}
              </div>
            </div>
          )}
        </div>
        <div className="management">
          <button ref="next"
                   className="next"
                   onClick={this.props.next}>
            Next
          </button>
      </div>
      </div>;
  }
});

function mapStateToProps(state) {
  return {
    pair: state.getIn(['vote', 'pair']),
    tally: state.getIn(['vote', 'tally']),
    winner: state.get('winner')
  }
}

export const ResultsContainer = connect(mapStateToProps)(Results);
In index.jsx we should change the results route to then use ResultsContainer instead of Results:
import React from 'react';
import ReactDOM from 'react-dom';
import {Router, Route, hashHistory} from 'react-router';
import {createStore} from 'redux';
import {Provider} from 'react-redux';
import reducer from './reducer';
import App from './components/App';
import {VotingContainer} from './components/Voting';
import {ResultsContainer} from './components/Results';

const store = createStore(reducer);
store.dispatch({
  type: 'SET_STATE',
  state: {
    vote: {
      pair: ['Sunshine', '28 Days Later'],
      tally: {Sunshine: 2}
    }
  }
});

const routes = <Route component={App}>
  <Route path="/results" component={ResultsContainer} />
  <Route path="/" component={VotingContainer} />
</Route>;

ReactDOM.render(
  <Provider store={store}>
    <Router history={hashHistory}>{routes}</Router>
  </Provider>,
  document.getElementById('app')
);
Finally, in the Results test we should update the import statement to use the named export for Results:
import React from 'react';
import ReactDOM from 'react-dom';
import {
  renderIntoDocument,
  scryRenderedDOMComponentsWithClass,
  Simulate
} from 'react-addons-test-utils';
import {List, Map} from 'immutable';
import {Results} from '../../src/components/Results';
import {expect} from 'chai';
And that's how you can connect pure React components to a Redux store, so that they get their data in from the store.
For very small apps that just have a single root component and no routing, connecting the root component will be enough in most cases. The root can then just propagate the data to its children as props. For apps with routing, such as the one we're making, connecting each of the router's components is usually a good idea. But any component can be separately connected, so different strategies can be used for different app architectures. I think it's a good idea to use plain props whenever you can, because with props it is easy to see what data is going in and it is also less work since you don't need to manage the "wiring" code.
Now that we've got the Redux data in our UI, we no longer need the hardcoded props in App.jsx, so it becomes even simpler than before:
import React from 'react';

export default React.createClass({
  render: function() {
    return this.props.children;
  }
});
Setting Up The Socket.io Client
Now that we have a Redux app going in the client, we can talk about how we can connect it to the other Redux app we have running on the server. The two currently reside in their own universes, with no connection between them whatsoever.
The server is already prepared to take incoming socket connections and emit the voting state to them. The client, on the other hand, has a Redux store into which we could easily dispatch incoming data. All we need to do is to draw the connection.
This begins by getting the infrastructure in place. We need a way to make a Socket.io connection from the browser to the server. For that purpose we can use the socket.io-client library, which is the client-side equivalent to the socket.io library that we used on the server:
npm install --save socket.io-client
Importing this library gives us an io function that can be used to connect to a Socket.io server. Let's connect to one that we assume to be on the same host as our client, in port 8090 (matching the port we used on the server):
import React from 'react';
import ReactDOM from 'react-dom';
import {Router, Route, hashHistory} from 'react-router';
import {createStore} from 'redux';
import {Provider} from 'react-redux';
import io from 'socket.io-client';
import reducer from './reducer';
import App from './components/App';
import {VotingContainer} from './components/Voting';
import {ResultsContainer} from './components/Results';

const store = createStore(reducer);
store.dispatch({
  type: 'SET_STATE',
  state: {
    vote: {
      pair: ['Sunshine', '28 Days Later'],
      tally: {Sunshine: 2}
    }
  }
});

const socket = io(`${location.protocol}//${location.hostname}:8090`);

const routes = <Route component={App}>
  <Route path="/results" component={ResultsContainer} />
  <Route path="/" component={VotingContainer} />
</Route>;

ReactDOM.render(
  <Provider store={store}>
    <Router history={hashHistory}>{routes}</Router>
  </Provider>,
  document.getElementById('app')
);
If you now make sure you have the server running, open the client app in a browser and inspect the network traffic, you should see it make a WebSocket connection and start transmitting Socket.io heartbeats on it.
During development there will actually be two Socket.io connections on the page. One is ours and the other is supporting Webpack's hot reloading.
Receiving Actions From The Server
Given that we now have a Socket.io connection, there's actually not much we need to do to get data in from it. The server is sending us state events - once when we connect and then every time something changes. We just need to listen to those events. When we get one, we can simply dispatch a SET_STATE action to our Store. We already have a reducer that will handle it:
import React from 'react';
import ReactDOM from 'react-dom';
import {Router, Route, hashHistory} from 'react-router';
import {createStore} from 'redux';
import {Provider} from 'react-redux';
import io from 'socket.io-client';
import reducer from './reducer';
import App from './components/App';
import {VotingContainer} from './components/Voting';
import {ResultsContainer} from './components/Results';

const store = createStore(reducer);

const socket = io(`${location.protocol}//${location.hostname}:8090`);
socket.on('state', state =>
  store.dispatch({type: 'SET_STATE', state})
);

const routes = <Route component={App}>
  <Route path="/results" component={ResultsContainer} />
  <Route path="/" component={VotingContainer} />
</Route>;

ReactDOM.render(
  <Provider store={store}>
    <Router history={hashHistory}>{routes}</Router>
  </Provider>,
  document.getElementById('app')
);
Note that we've removed the hardcoded SET_STATE dispatch. We no longer need it because the server will give us the real state.
Looking at the UI - either the voting or the results one - will now show the first pair of entries, as defined by the server. Our server and client are connected!
Dispatching Actions From React Components
We know how to get data in from the Redux Store to the UI. Let's discuss how we can get actions out from the UI.
The best place for us to start thinking about this is the voting buttons. When we were building the UI, we assumed that the Voting component will receive a vote prop whose value is a callback function. The component invokes that function when the user clicks on one of the buttons. But we haven't actually supplied the callback yet - except in unit tests.
What should actually happen when a user votes on something? Well, the vote should probably be sent to the server, and that's something we'll discuss a bit later, but there's also client-side logic involved: The hasVoted prop should be set on the component, so that the user can't vote for the same pair again.
This will be the second client-side Redux action we have, after SET_STATE. We can call it VOTE. It should populate a hasVoted entry in the state Map:
it('handles VOTE by setting hasVoted', () => {
  const state = fromJS({
    vote: {
      pair: ['Trainspotting', '28 Days Later'],
      tally: {Trainspotting: 1}
    }
  });
  const action = {type: 'VOTE', entry: 'Trainspotting'};
  const nextState = reducer(state, action);

  expect(nextState).to.equal(fromJS({
    vote: {
      pair: ['Trainspotting', '28 Days Later'],
      tally: {Trainspotting: 1}
    },
    hasVoted: 'Trainspotting'
  }));
});
It might also be a good idea to not set that entry if, for any reason, a VOTE action is coming in for an entry that's not under vote at the moment:
it('does not set hasVoted for VOTE on invalid entry', () => {
  const state = fromJS({
    vote: {
      pair: ['Trainspotting', '28 Days Later'],
      tally: {Trainspotting: 1}
    }
  });
  const action = {type: 'VOTE', entry: 'Sunshine'};
  const nextState = reducer(state, action);

  expect(nextState).to.equal(fromJS({
    vote: {
      pair: ['Trainspotting', '28 Days Later'],
      tally: {Trainspotting: 1}
    }
  }));
});
Here's the reducer extension that'll do the trick:
import {Map} from 'immutable';

function setState(state, newState) {
  return state.merge(newState);
}

function vote(state, entry) {
  const currentPair = state.getIn(['vote', 'pair']);
  if (currentPair && currentPair.includes(entry)) {
    return state.set('hasVoted', entry);
  } else {
    return state;
  }
}

export default function(state = Map(), action) {
  switch (action.type) {
  case 'SET_STATE':
    return setState(state, action.state);
  case 'VOTE':
    return vote(state, action.entry);
  }
  return state;
}
The hasVoted entry should not remain in the state forever. It should be re-set when the vote moves on to the next pair, so that the user can vote on that one. We should handle this in SET_STATE, where we can check if the pair in the new state contains the entry the user has voted on. If it doesn't, we should erase the hasVoted entry:
it('removes hasVoted on SET_STATE if pair changes', () => {
  const initialState = fromJS({
    vote: {
      pair: ['Trainspotting', '28 Days Later'],
      tally: {Trainspotting: 1}
    },
    hasVoted: 'Trainspotting'
  });
  const action = {
    type: 'SET_STATE',
    state: {
      vote: {
        pair: ['Sunshine', 'Slumdog Millionaire']
      }
    }
  };
  const nextState = reducer(initialState, action);

  expect(nextState).to.equal(fromJS({
    vote: {
      pair: ['Sunshine', 'Slumdog Millionaire']
    }
  }));
});
We can implement this by composing another function, called resetVote on the SET_STATE action handler:
import {List, Map} from 'immutable';

function setState(state, newState) {
  return state.merge(newState);
}

function vote(state, entry) {
  const currentPair = state.getIn(['vote', 'pair']);
  if (currentPair && currentPair.includes(entry)) {
    return state.set('hasVoted', entry);
  } else {
    return state;
  }
}

function resetVote(state) {
  const hasVoted = state.get('hasVoted');
  const currentPair = state.getIn(['vote', 'pair'], List());
  if (hasVoted && !currentPair.includes(hasVoted)) {
    return state.remove('hasVoted');
  } else {
    return state;
  }
}

export default function(state = Map(), action) {
  switch (action.type) {
  case 'SET_STATE':
    return resetVote(setState(state, action.state));
  case 'VOTE':
    return vote(state, action.entry);
  }
  return state;
}
This logic for determining whether the hasVoted entry is for the current pair is slightly problematic. See the exercises for a way to improve it.
We aren't yet connecting the hasVoted entry to the props on Voting, so we should do that too:
function mapStateToProps(state) {
  return {
    pair: state.getIn(['vote', 'pair']),
    hasVoted: state.get('hasVoted'),
    winner: state.get('winner')
  };
}
Now we still need a way to give a vote callback to Voting, which will cause this new action to be dispatched. We should keep Voting itself pure and unaware of actions or Redux. Instead, this is another job for the connect function from react-redux.
In addition to wiring up input props, react-redux can be used to wire up output actions. Before we can do that though, we need to introduce another core Redux concept: Action creators.
As we have seen, Redux actions are just simple objects that (by convention) have a type attribute and other, action-specific data. We have been creating these actions whenever needed by simply using object literals. It is preferable, however, to use little factory functions for making actions instead. Functions such as this one:
function vote(entry) {
  return {type: 'VOTE', entry};
}
These functions are called action creators. There's really not much to them - they are pure functions that just return action objects - but what they do is encapsulate the internal structure of the action objects so that the rest of your codebase doesn't need to be concerned with that. Actions creators also conveniently document all the actions that can be dispatched in a given application. That information would be more difficult to gather if it was sprinkled all over the codebase in object literals.
Let's create a new file that defines the action creators for our two existing client-side actions:
export function setState(state) {
  return {
    type: 'SET_STATE',
    state
  };
}

export function vote(entry) {
  return {
    type: 'VOTE',
    entry
  };
}
We could also very easily write unit tests for these functions, but I usually don't bother with that unless an action creator actually does something more than just returns an object. Feel free to add the unit tests, however, if you consider them useful!
In index.jsx we can now use the setState action creator in the Socket.io event handler:
import React from 'react';
import ReactDOM from 'react-dom';
import {Router, Route, hashHistory} from 'react-router';
import {createStore} from 'redux';
import {Provider} from 'react-redux';
import io from 'socket.io-client';
import reducer from './reducer';
import {setState} from './action_creators';
import App from './components/App';
import {VotingContainer} from './components/Voting';
import {ResultsContainer} from './components/Results';

const store = createStore(reducer);

const socket = io(`${location.protocol}//${location.hostname}:8090`);
socket.on('state', state =>
  store.dispatch(setState(state))
);

const routes = <Route component={App}>
  <Route path="/results" component={ResultsContainer} />
  <Route path="/" component={VotingContainer} />
</Route>;

ReactDOM.render(
  <Provider store={store}>
    <Router history={hashHistory}>{routes}</Router>
  </Provider>,
  document.getElementById('app')
);
A really neat thing about action creators is the way react-redux can connect them to React components: We have a vote callback prop on Voting, and a vote action creator. Both have the same name and the same function signature: A single argument, which is the entry being voted. What we can do is simply give our action creators to the react-redux connect function as the second argument, and the connection will be made:
import React from 'react';
import PureRenderMixin from 'react-addons-pure-render-mixin';
import {connect} from 'react-redux';
import Winner from './Winner';
import Vote from './Vote';
import * as actionCreators from '../action_creators';

export const Voting = React.createClass({
  mixins: [PureRenderMixin],
  render: function() {
    return <div>
      {this.props.winner ?
        <Winner ref="winner" winner={this.props.winner} /> :
        <Vote {...this.props} />}
    </div>;
  }
});

function mapStateToProps(state) {
  return {
    pair: state.getIn(['vote', 'pair']),
    hasVoted: state.get('hasVoted'),
    winner: state.get('winner')
  };
}

export const VotingContainer = connect(
  mapStateToProps,
  actionCreators
)(Voting);
The effect of this is that a vote prop will be given to Voting. That prop is a function that creates an action using the vote action creator, and also dispatches that action to the Redux Store. Thus, clicking a vote button now dispatches an action! You should be able to see the effects in the browser immediately: When you vote on something, the buttons will become disabled.
Sending Actions To The Server Using Redux Middleware
The final aspect of our application that we need to address is getting the results of the user's actions to the server. This should happen when the user votes on something, as well as when the vote manager hits the Next button on the result screen.
Let's begin by discussing Voting. Here's an inventory of what we already have in place:
- A
VOTEaction is created and dispatched to the client-side Redux Store when the user votes. VOTEactions are handled by the client-side reducer by setting thehasVotedstate.- The server is ready to receive actions from clients via the
actionSocket.io event. It dispatches all received actions to the serverside Redux Store. VOTEactions are handled by the serverside reducer by registering the vote and updating the tally.
It would seem like we actually have almost everything we need! All that is missing is the actual sending of the client-side VOTE action to the server, so that it would be dispatched to both of the Redux stores. That's what we'll do next.
How should we approach this? There's nothing built into Redux for this purpose, since supporting a distributed system like ours isn't really part of its core functionality. It is left to us to decide where and how we send client-side actions to the server.
What Redux does provide is a generic way to tap into actions that are being dispatched to Redux stores: Middleware.
A Redux middleware is a function that gets invoked when an action is dispatched, before the action hits the reducer and the store itself. Middleware can be used for all kinds of things, from logging and exception handling to modifying actions, caching results, or even changing how or when the action will reach the store. What we are going to use them for is sending client-side actions to the server.
Note the difference between Redux middleware and Redux listeners: Middleware are called before an action hits the store, and they may affect what happens to the action. Listeners are called after an action has been dispatched, and they can't really do anything about it. Different tools for different purposes.
What we're going to do is create a "remote action middleware" that causes an action to be dispatched not only to the original store, but also to a remote store using a Socket.io connection.
Let's set up the skeleton for this middleware. It is a function that takes a Redux store, and returns another function that takes a "next" callback. That function returns a third function that takes a Redux action. The innermost function is where the middleware implementation will actually go:
export default store => next => action => {

}
The code above may look a bit foreign but it's really just a more concise way of expressing this:
export default function(store) {
  return function(next) {
    return function(action) {

    }
  }
}
This style of nesting single-argument functions is called currying. In this case it's used so that the Middleware is easily configurable: If we had all the arguments in just one function (function(store, next, action) { }) we'd also have to supply all the arguments every time the middleware is used. With the curried version we can call the outermost function once, and get a return value that "remembers" which store to use. The same goes for the next argument.
The next argument is a callback that the middleware should call when it has done its work and the action should be sent to the store (or the next middleware):
export default store => next => action => {
  return next(action);
}
The middleware could also decide not to call next, if it decided that the action should be halted. In that case it would never go into the reducer or the store.
Let's just log something in this middleware so that we'll be able to see when it's called:
export default store => next => action => {
  console.log('in middleware', action);
  return next(action);
}
If we now plug in this middleware to our Redux store, we should see all actions being logged. The middleware can be activated using an applyMiddleware function that Redux ships with. It takes the middleware we want to register, and returns a function that takes the createStore function. That second function will then create a store for us that has the middleware included in it:
import React from 'react';
import ReactDOM from 'react-dom';
import {Router, Route, hashHistory} from 'react-router';
import {createStore, applyMiddleware} from 'redux';
import {Provider} from 'react-redux';
import io from 'socket.io-client';
import reducer from './reducer';
import {setState} from './action_creators';
import remoteActionMiddleware from './remote_action_middleware';
import App from './components/App';
import {VotingContainer} from './components/Voting';
import {ResultsContainer} from './components/Results';

const createStoreWithMiddleware = applyMiddleware(
  remoteActionMiddleware
)(createStore);
const store = createStoreWithMiddleware(reducer);

const socket = io(`${location.protocol}//${location.hostname}:8090`);
socket.on('state', state =>
  store.dispatch(setState(state))
);

const routes = <Route component={App}>
  <Route path="/results" component={ResultsContainer} />
  <Route path="/" component={VotingContainer} />
</Route>;

ReactDOM.render(
  <Provider store={store}>
    <Router history={hashHistory}>{routes}</Router>
  </Provider>,
  document.getElementById('app')
);
This is another instance of the curried style of configuring things that we just discussed. Redux APIs use it quite heavily.
If you now reload the app, you'll see the middleware logging the actions that occur: Once for the initial SET_STATE, and again for the VOTE action from voting.
What this middleware should actually do is send a given action to a Socket.io connection, in addition to giving it to the next middleware. Before it can do that, it needs the connection to send it to. We already have a connection in index.jsx - we just need the middleware to have access to it too. That's easily accomplished by using currying once more in the middleware definition. The outermost function should take a Socket.io socket:
export default socket => store => next => action => {
  console.log('in middleware', action);
  return next(action);
}
Now we can pass in the socket from index.jsx:
const socket = io(`${location.protocol}//${location.hostname}:8090`);
socket.on('state', state =>
  store.dispatch(setState(state))
);

const createStoreWithMiddleware = applyMiddleware(
  remoteActionMiddleware(socket)
)(createStore);
const store = createStoreWithMiddleware(reducer);
Note that we need to flip around the initialization of the socket and the store, so that the socket is created first. We need it during store initialization.
All that remains to be done now is to actually emit an action event from the middleware:
export default socket => store => next => action => {
  socket.emit('action', action);
  return next(action);
}
And that's it! If you now click on one of the voting buttons, you'll also see the tally numbers update, both within the same browser window and any other ones that you run the app in. The vote is being registered!
There is one major problem we have with this though: When we get the state update from the server and dispatch the SET_STATE action, it also goes right back to the server. Although the server does nothing with that action, its listener is still triggered, causing a new SET_STATE. We have created an infinite loop! That's certainly not good.
It is not appropriate for the remote action middleware to send each and every action to the server. Some actions, such as SET_STATE, should just be handled locally in the client. We can extend the middleware to only send certain actions to the server. Concretely, we should only send out actions that have a {meta: {remote: true}} property attached:
This pattern is adapted from the rafScheduler example in the middleware documentation.
export default socket => store => next => action => {
  if (action.meta && action.meta.remote) {
    socket.emit('action', action);
  }
  return next(action);
}
The action creator for VOTE should now set this property, where as the one for SET_STATE should not:
export function setState(state) {
  return {
    type: 'SET_STATE',
    state
  };
}

export function vote(entry) {
  return {
    meta: {remote: true},
    type: 'VOTE',
    entry
  };
}
Let's recap what's actually happening here:
- The user clicks a vote button. A
VOTEaction is dispatched. - The remote action middleware sends the action over the Socket.io connection.
- The client-side Redux store handles the action, causing the local
hasVotestate to be set. - When the message arrives on the server, the serverside Redux store handles the action, updating the vote in the tally.
- The listener on the serverside Redux store broadcasts a state snapshot to all connected clients.
- A
SET_STATEaction is dispatched to the Redux store of every connected client. - The Redux store of every connected client handles the
SET_STATEaction with the updated state from the server.
To complete our application, we just need to make the Next button work as well. Just like with voting, the server has the appropriate logic already. We just need to connect things up.
The action creator for NEXT needs to create a remote action of the correct type:
export function setState(state) {
  return {
    type: 'SET_STATE',
    state
  };
}

export function vote(entry) {
  return {
    meta: {remote: true},
    type: 'VOTE',
    entry
  };
}

export function next() {
  return {
    meta: {remote: true},
    type: 'NEXT'
  };
}
The ResultsContainer component should connect the action creators in as props:
import React from 'react';
import PureRenderMixin from 'react-addons-pure-render-mixin';
import {connect} from 'react-redux';
import Winner from './Winner';
import * as actionCreators from '../action_creators';

export const Results = React.createClass({
  mixins: [PureRenderMixin],
  getPair: function() {
    return this.props.pair || [];
  },
  getVotes: function(entry) {
    if (this.props.tally && this.props.tally.has(entry)) {
      return this.props.tally.get(entry);
    }
    return 0;
  },
  render: function() {
    return this.props.winner ?
      <Winner ref="winner" winner={this.props.winner} /> :
      <div className="results">
        <div className="tally">
          {this.getPair().map(entry =>
            <div key={entry} className="entry">
              <h1>{entry}</h1>
              <div className="voteCount">
                {this.getVotes(entry)}
              </div>
            </div>
          )}
        </div>
        <div className="management">
          <button ref="next"
                   className="next"
                   onClick={this.props.next}>
            Next
          </button>
        </div>
      </div>;
  }
});

function mapStateToProps(state) {
  return {
    pair: state.getIn(['vote', 'pair']),
    tally: state.getIn(['vote', 'tally']),
    winner: state.get('winner')
  }
}

export const ResultsContainer = connect(
  mapStateToProps,
  actionCreators
)(Results);
And... that's it! We now have a complete, functioning application. Try opening the results screen on your computer and the voting screen on a mobile device. You'll see the actions applied on one device immediately taking effect on another - which always feel magical: Vote on one screen, see the results view update on another screen. Click "Next" on the results screen and see the vote proceed on your voting device. To make it even more fun, arrange a vote with some friends the next time you get together!
Exercises
If you want to develop this application a bit further, while at the same time getting more comfortable with a Redux architecture, here are a few exercises. I have attached a link to one possible solution for each one.
1. Invalid Vote Prevention
The server should not allow entries to be voted if they are not included in the current pair. Add a failing unit test to illustrate the problem and then fix the logic.
See my solution.
2. Improved Vote State Reset
The client currently resets the hasVoted state when the new voted pair does not include the entry that was voted. This has one major problem: If two consecutive pairs include the same entry, which will always happen during the last rounds of the vote, the state is not reset. The user can't vote on the last round because their buttons are disabled!
Modify the system so that it creates a unique identifier for each round of votes instead, and the voted state is tracked based on this round id.
Hint: Track a running counter of rounds on the server. When a user votes, save the current round number in the client state. When the state updates, reset the voted state if the round number has changed.
See my solution on the server and the client.
3. Duplicate Vote Prevention
A user can still vote several times during the same round, if they just refresh the page, because their voted state is lost. Fix this.
Hint: Generate unique identifiers for each user and keep track of who has voted what on the server, so that if a user votes again, their previous vote for the round is nullified. If you do this, you can also skip the disabling of the voting buttons, since it is possible for the user to change their mind during the round.
See my solution on the server and the client.
4. Restarting The Vote
Implement a button to the results screen that allows the user to start the voting from the beginning.
Hint: You need to keep track of the original entries in the state, and reset back to them.
See my solution on the server and the client.
5. Indicating Socket Connection State
When connectivity is poor, Socket.io may not be immediately and always connected. Add a visual indicator that tells the user when they're not connected.
Hint: Listen to connection events from Socket.io and dispatch actions that put the connection state in the Redux store.
See my solution.
Bonus Challenge: Going Peer to Peer
I haven't actually tried this, but it's an interesting path to explore if you're feeling adventurous:
Modify the logic of the system so that instead of having separate implementations of reducers on the client and server, the full voting logic reducer runs on each client. Dispatch all actions to everyone, so that everyone sees the same thing.
How do you make sure everyone receives all actions and receives them in the correct order?
In this architecture, is there necessarily a need for a server at all? Could you go fully P2P using WebRTC? (With Socket.io P2P perhaps)